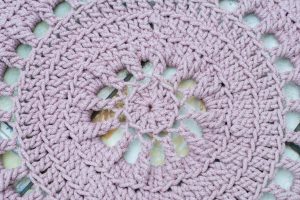
Crochet Rug
Hey there, lovely reader! Welcome to our lovely blog Handmade Learning Here. Today, I’m so excited to share a brand-new pattern with you, a cozy little crochet rug. I just know you’re gonna love having this beautiful handmade piece brightening up your home decor.
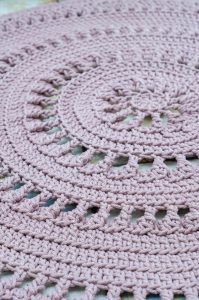
If you’re on the lookout for a crochet project that’s all about mixing style, comfort, and practicality, this round crochet rug is seriously the perfect pick! Not only does it instantly jazz up any room, but it’s also super versatile, you can make it in all sorts of sizes, colors, and textures to totally match your vibe.
Why choose a round crochet rug?
Well, the round rug is a total classic that never goes out of style. It creates such a sweet, cozy focal point ,perfect for living rooms, bedrooms, porches, or even bathrooms! And since each one is handmade with lots of love and care, every rug is one-of-a-kind, showing off the maker’s own unique style and personality.
Plus, crochet lets you play with all kinds of yarn from thick, chunky ones that add loads of texture and durability, to thinner ones for a softer, more delicate finish. You can mix and match colors too, creating stunning visual effects like ombrés, stripes, or even floral patterns right in the center of your rug.
What’s the round crochet rug pattern like?
The basic pattern usually starts with a magic ring in the center, where you work your way out with double crochet or single crochet stitches in rounds; gradually adding more stitches to shape that perfect circle. Often, there are cute decorative touches like puff stitches, popcorn stitches, or fancy stitch patterns that add extra charm and flair.
Here’s the secret to a rug that’s both pretty and sturdy: the stitch tension! It shouldn’t be too tight or too loose, just right so your rug keeps its shape and feels comfy underfoot.
For rugs, cotton yarn is the way to go — it’s durable, easy to wash, and super comfy. Recycled yarn made from fabric scraps is also a fantastic eco-friendly and stylish choice if you’re into a more rustic look. Acrylic yarns can work too for rugs in low-traffic spots, but just a heads up — they don’t soak up moisture very well.
Recommended materials and tools:
-5 mm polyester cord ≈ 650 yards length (600 m)
-size 10 mm crochet hook (№15 / 000)
Skill level:
attentive beginner
Size of the finished item ≈ 42 1/2 ( 1.08 m )
ABBREVIATIONS (US TERMS)
ST – stitch(es).
CH – a chain stitch.
ARCH-…CH – chai arch (stitch number will be indicated).
SL ST – a slip stitch.
BLO – back loops only.
DC – double crochet.
FDC – double crochet you crochet at the beginning. Pull a loop to the length of desired
stitch. Holding a stitch on the hook, wrap it around the stitch, grab working yarn. Holding
working yarn, go to the place where you start, I mean remove one wrapping. 2 loops are
still on hook, crochet through them at once.
FP-… – front post stitch.
CLUSTER-… a group of stitch worked into one stitch and closed together. Crochet indicated
stitch number into the foundation, leaving last loops of each stitch unused. Grab working
yarn; draw working yarn through all remained loops at once.
SPLIT-… – a group of stitches worked into different stitches and closed together. Crochet
stitches into indicated foundation, leaving last loops of each stitch unused. Grab working
yarn, then draw it through all loops at once.
PATTERN
ROUND 1:
Make a sliding loop (also called a magic ring):
-
- First, make a loop with your yarn. The loose end (yarn tail) should be on the right and resting over the loop. The working yarn (the yarn connected to your ball) should be on the left and hanging down.
- Insert your crochet hook from the bottom into the loop.
- Wrap the working yarn around the hook and pull it through the loop to make a stitch.
- Now you have your sliding loop with one chain stitch (CH1).
Next, make 2 more chain stitches (CH2). These count as your first double crochet (DC).
Crochet 10 double crochets (DC) into the sliding loop.
Hold the yarn tail close to your sliding loop as you crochet the stitches.
Make 1 more double crochet (DC) by pulling up loops through both the sliding loop and the yarn tail at the same time.
Gently pull the yarn tail to close the sliding loop tightly.
Finally, slip stitch (SL ST) into the first double crochet to close the round.
ROUND 2:
Start with 1 front post double crochet (FDC) around the post of the first double crochet from Round 1.
(To do this: yarn over, insert your hook from front to back around the post of the stitch (not into the top), yarn over again, pull through, finish as a regular double crochet.)
Now repeat the following steps 11 times:
-
- Chain 2 (CH2)
- Make 1 double crochet (DC) into the next stitch, but only go through the back loop of the top of the stitch (this is called BLO – back loop only).
After you finish the repeats, chain 2 (CH2) one more time.
Join the round by making a slip stitch (SL ST) into the top of the first front post double crochet you made at the beginning.
ROUND 3:
Make a slip stitch (SL ST) into the next chain space (the space made by chains in the previous round).
Make 1 front post double crochet (FDC) around the next stitch.
Make 2 double crochets (2 DC) into the same chain space.
Now, make a CLUSTER-2FP-DC around the next stitch.
(See explanation below.)
Then, repeat this sequence 11 times:
-
- Make 3 double crochets (3 DC) into the next chain space.
- Make 1 CLUSTER-2FP-DC around the next stitch.
Finish the round by making a slip stitch (SL ST) into the top of the half double crochet (HDC) from the previous round.
What is a CLUSTER-2FP-DC?
You crochet 2 front post double crochets (FP-DC) around the same stitch, but don’t finish them separately. Here’s how:
Yarn over, insert your hook from front to back around the post of the stitch below (the stitch in the round below), yarn over and pull up a loop, yarn over and pull through 2 loops — but stop here, don’t finish the stitch yet.
Repeat this step one more time in the same stitch. Now you have 3 loops left on your hook.
Yarn over and pull through all 3 loops at once — this closes the cluster, joining the two stitches together.
ROUND 4:
Start with a Foundation Double Crochet (FDC).
Make 2 Double Crochets (DC) into the next stitch, working into the Back Loop Only (BLO).
Make 2 Double Crochets into the next cluster stitch, also into the BLO.
Then, repeat this pattern 11 times:
-
- Make 3 Double Crochets, each into the next stitch’s back loop only,
- Followed by 2 Double Crochets into the next cluster stitch’s back loop only.
Finish the round by slip stitching (SL ST) into the top of the Half Double Crochet (HDC) from the previous round.
ROUND 5:
Start with a Front Double Crochet (FDC). Then make one Double Crochet (DC) in each stitch of the previous round, working only into the back loop of each stitch (this is called BLO). Do this 59 times. Finish with a Slip Stitch (SL ST) into the Half Double Crochet (HDC) from the previous round.
ROUND 6:
Start with a Front Double Crochet (FDC). Then repeat 29 times:
- Chain 2 (CH2)
- Skip 1 stitch in the round below
- Make 1 Double Crochet (DC) into the next stitch, again into the back loop only (BLO).
At the end, chain 2 and slip stitch into the HDC.
ROUND 7:
Slip stitch into the next chain space (chain arch).
Make 1 Front Double Crochet (FDC). Then make 2 Double Crochets (DC) into the same chain arch.
Next, make a Cluster stitch with 2 front post double crochets (CLUSTER-2FP-DC) around the next stitch — see notes from round 3 for help.
Then repeat 29 times:
- 3 DC into the next chain arch
- CLUSTER-2FP-DC around the next stitch
Finish with a slip stitch into the HDC.
ROUNDS 8 and 9:
Start with FDC, then make 119 DCs into the back loop only (BLO). Finish with slip stitch into HDC.
ROUND 10:
Start with FDC. Then repeat 59 times:
- Chain 2 (CH2)
- Skip 1 stitch below
- DC into next stitch’s back loop (BLO)
End with CH2 and slip stitch into HDC.
ROUND 11:
Slip stitch into the next chain arch.
Make 1 FDC, then 1 DC into the same chain arch.
Make a CLUSTER-2FP-DC around the next stitch (see round 3 notes).
Repeat 59 times:
- 2 DC into the next chain arch
- CLUSTER-2FP-DC around the next stitch
Finish with slip stitch into HDC.
ROUNDS 12 TO 14:
Start with FDC, then make 179 DCs into the back loop only (BLO). Finish with slip stitch into HDC.
ROUND 15:
Start with FDC. Then repeat 89 times:
- Chain 2 (CH2)
- Skip 1 stitch below
- DC into next stitch’s back loop (BLO)
End with CH2 and slip stitch into HDC.
ROUND 16:
Slip stitch into the next chain arch.
Make 1 FDC, then 1 DC into the same chain arch.
Make a CLUSTER-2FP-DC around the next stitch (see round 3 notes).
Repeat 89 times:
- 2 DC into the next chain arch
- CLUSTER-2FP-DC around the next stitch
Finish with slip stitch into HDC.
ROUND 17:
Slip stitch into the next stitch.
Make a Front Post Slip Stitch (FP-SL ST) around the same stitch.
Chain 2 (CH2), skip the cluster stitch, then make a Front Post Double Crochet (FP-DC) around the next stitch. These two stitches form the first Split Stitch with 2 Front Post DC (Split Stitch-2FP-DC).
Then repeat 89 times:
- Chain 2
- Make the Split Stitch-2FP-DC (see notes below)
End with CH2, slip stitch into the first Split Stitch-2FP-DC.
Split Stitch-2FP-DC (how to make it):
Make a Front Post DC (FP-DC) around the Double Crochet stitch below, but don’t finish it—leave the last loop on your hook.
Skip the cluster stitch below.
Make another FP-DC around the next Double Crochet stitch below, again leaving the last loop on your hook.
You now have 3 loops on your hook.
Yarn over and pull through all 3 loops at once to finish the stitch.
ROUND 18:
Slip stitch (sl st) into the next chain space (the little arch made by chains).
Make a front double crochet (FDC) in the same chain space.
Then make 1 double crochet (DC) in the same chain space.
Now, repeat this pattern 44 times:
-
- Double crochet (DC) into the next split stitch worked into the back loop only (BLO).
- Double crochet (DC) into the next chain space.
- Double crochet (DC) into the next split stitch worked into the back loop only (BLO).
- Double crochet (DC) twice into the next chain space.
After repeating, make:
-
- Double crochet (DC) into the next split stitch (BLO).
- Double crochet (DC) into the next chain space.
- Double crochet (DC) into the next split stitch (BLO).
- Slip stitch (sl st) into the half double crochet (HDC) to finish the round.
ROUND 19:
Slip stitch (sl st) into each stitch all the way around until you reach the end of the round. You’ve now created a “braid” effect.
Finishing off:
Cut the yarn, leaving about 15 to 20 cm (6 to 8 inches) of yarn tail.
Gently pull the yarn out to remove the middle part of your work.
To secure the yarn tail, carefully use a lighter to melt the tip of the yarn so it won’t come undone (be very careful and do this safely!).
Making the last loop:
Insert your hook into the middle of the first slip stitch (sl st) from back to front.
Grab the working yarn and pull it through.
Insert the hook into the middle of the previous slip stitch (sl st), again from back to front.
Grab the working yarn and pull it through on the wrong side (the back side of your work).
Now you’ve made your last loop!
Finishing touches:
Hide the leftover yarn tail on the wrong side (back side) of your work and weave it in neatly to secure everything.
Here’s a super cute PDF version of this pattern just for you — perfect for printing and having right by your side while you work on your rug! 🧶🖨️💕
So, what did you think of this lovely crochet rug pattern? A round crochet rug is one of those special pieces that blends art, tradition, and everyday practicality. It adds such a cozy, homey touch to any room and really brings the whole space together.
It’s a project that’s just as delightful for beginners as it is for seasoned crocheters — and honestly, it’s hard not to fall in love with it. 💖
So how ‘bout starting your round rug today and turning your space into something extra beautiful and welcoming? You’ve totally got this!