
Crochet Daisy Shawl
There’s something truly special about a stitch pattern that feels both delicate and timeless, and that’s exactly how I would describe this lovely design. Here at Grandma’s Crafts, I like to call it the Crochet Daisy Shawl, though you might also hear it described as a Vertical Shell Mesh Stitch. Whatever the name, it carries that same soft, airy charm that reminds me of spring mornings and hand-made heirlooms passed down with love.
What makes this pattern so delightful is its beautiful balance between structure and openness. The gentle “daisy-like” clusters, formed by shell stitches, create a rhythm that flows vertically, while the chain spaces give the fabric that breathable, lace-like quality. It’s the kind of pattern that looks intricate at first glance, but once your hands get used to it, it becomes wonderfully relaxing to work on.
I especially adore how this stitch lends itself to color play. When worked in vertical strips and joined as you go, each section stands out just enough to create a soft striped effect without overpowering the overall design. It’s perfect for using those cherished yarn colors you’ve been saving, or even for mixing subtle tones that remind you of nature, sage greens, warm creams, dusty rose… just like a quiet garden in bloom.
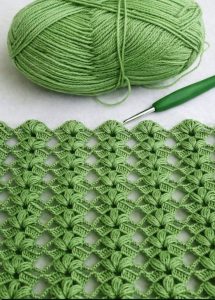
This pattern creates a light, open, textured fabric with vertical stripes using shell stitches and chain spaces, perfect for blankets, scarves, and panels.
Abbreviations (US Terms)
- ch – chain
- dc – double crochet
- st -stitch
- sp – space
- sk – skip
Pattern Notes (Read Before Starting)
This pattern is worked in vertical strips (one strip at a time).
Each strip is later joined to the previous one while working.
The texture comes from shell stitches (groups of dc) and chain spaces.
Very beginner-friendly once you understand the repetition.
STEP 1 — Foundation Chain
Ch 17
Tip: This gives you one vertical strip. You can adjust width later.
STEP 2 — Base Row
In 3rd ch from hook:
dc across until you have 6 dc
ch 3, sk 3 ch
6 dc in next stitches
You should now have:
6 dc / space / 6 dc
STEP 3 — Creating the First Mesh + Shell Setup
ch 6 (this creates the side space)
In the ch-3 space: make 5 dc (shell stitch)
ch 2
make another 5 dc in the same space
ch 2
make another 5 dc in the same space
You now have stacked shells inside the gap
ch 2 to reach bottom
sl st across the dc row (to reposition)
ch 6
sl st into top of shell
This creates the vertical structure.
STEP 4 — Start the Repeat Rows
Row A
ch 2, turn
in the ch-6 space: make 6 dc
ch 3
in next space: 6 dc
Row B
ch 6
in the space: 5 dc (shell)
ch 2
5 dc again in same space
ch 2
5 dc again
ch 2 down to base
sl st across
ch 6
sl st into top of shell.
Repeat
Repeat Row A and Row B until your strip reaches desired height.
Adding New Strips (Color Change)
To create the striped effect like in the image:
Start a new strip with a new color (repeat from STEP 1)
When you make the ch 6 on the edge, do this:
Insert your hook through the side chain space (ch-6) of the previous strip
Then complete the chain
This joins the strips as you go, creating that woven vertical look.
Tips for Beginners
Keep your chains loose, especially the ch 6
Shell stitch = 5 dc in same space
Don’t worry if the first rows feel confusing, after 2 repeats it clicks
Count stitches at the beginning to stay consistent
What You’re Building
You are creating:
* vertical columns
* connected by chain loops
* with textured shell clusters
That’s exactly what gives that elegant lace + structured stripe look ✨
VIDEO TUTORIAL
To watch with English subtitles, please hit CC button.
Another thing I love about the Crochet Daisy Shawl is how versatile it is. While it makes a stunning shawl (light enough to drape over your shoulders on a cool evening), it can just as easily become a cozy blanket, a delicate wrap, or even a decorative panel. It has that rare quality of being both practical and elegant, which is something I always look for in a good crochet pattern.
Most importantly, this is the kind of project that invites you to slow down and enjoy the process. Each row builds gently on the last, and before you know it, you’ve created something that feels thoughtful and full of care. And isn’t that what handmade truly means? A little patience, a little love, and something beautiful to show for it at the end.
Please tell me where I can download this pattern so I can refer to it while I crochet.