Amigurumi Cat Crochet Pattern
🐱 Hello, my dear friends, and welcome back to our cozy little corner here at Handmade Learning Here! Today I am simply delighted to share with you a pattern that has truly stolen my heart the Amigurumi Cat Crochet Pattern , inspired in the pattern created by the lovely folks over at Amigurumi Today.
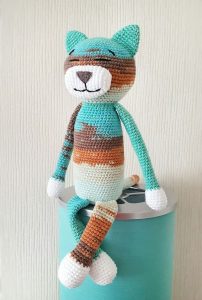
This sweet pattern gives us the chance to crochet a soft, cuddly kitty that measures about 13 to 14 inches (33–36 cm) tall. Isn’t that just the perfect size? Big enough for hugging, yet still small enough to fit beautifully on a shelf or to be carried around by little ones.
Why this pattern is so special
There’s just something timeless about cats, isn’t there? They’re curious, cozy, and full of charm. This crochet kitty captures all of that in the most adorable way. The large head, rounded little paws, and long tail make it look like a classic stuffed animal, the kind that brings comfort to children (and let’s be honest, to grown-ups too!).
What I love most is that the pattern is actually quite beginner friendly. If you’ve mastered your single crochet stitch, increases, and decreases, you’re well on your way to making this darling cat. And don’t you worry, the rounds are repetitive and soothing, the kind of stitching you can enjoy with a cup of tea while your favorite music plays in the background.
Materials and colors
The original pattern uses a soft cotton blend yarn in gentle shades, but you can truly make this kitty your own. Maybe a warm ginger cat, a sleek black kitty, or even a pastel-colored friend to brighten up a nursery. All you’ll need is:
-
A light cotton/acrylic yarn in your chosen color
-
A 2 mm crochet hook
-
Some safety eyes or embroidery thread for the face
-
A bit of stuffing to bring your cat to life
It’s amazing how just a few simple supplies can turn into something so sweet and huggable.
PATTERN
Part 1 – The Head
Notes before we start:
-
We’ll work the head in rounds (spiral), so don’t join at the end of each round unless I say otherwise. Just keep going in a continuous circle.
-
Use a stitch marker (a piece of yarn in a different color works too) to mark the first stitch of each round. This helps you keep track.
-
Remember to stuff as you go. Add a little stuffing at a time so your kitty’s head is firm but still soft.
Head Instructions:
Round 1:
Make a magic ring (also called adjustable ring). Inside the ring, crochet 6 single crochets (6 sc).
(Don’t worry if the magic ring feels tricky. You can chain 2 and work 6 sc into the 2nd chain from the hook as an easier option.)
Round 2:
Do 2 single crochets in each stitch around (this is called an increase). You’ll have 12 stitches total (12 sc).
Round 3:
1 sc in the first stitch, then 2 sc in the next stitch. Repeat this pattern all the way around.
That means: (1 sc, inc) × 6 = 18 stitches total (18 sc).
Round 4:
1 sc in each of the next 2 stitches, then 2 sc in the next stitch. Repeat around.
That means: (2 sc, inc) × 6 = 24 stitches total (24 sc).
Round 5:
1 sc in each of the next 3 stitches, then 2 sc in the next stitch. Repeat around.
(3 sc, inc) × 6 = 30 stitches total (30 sc).
Round 6:
1 sc in each of the next 4 stitches, then 2 sc in the next stitch. Repeat around.
(4 sc, inc) × 6 = 36 stitches total (36 sc).
Round 7:
1 sc in each of the next 5 stitches, then 2 sc in the next stitch. Repeat around.
(5 sc, inc) × 6 = 42 stitches total (42 sc).
Round 8:
1 sc in each of the next 6 stitches, then 2 sc in the next stitch. Repeat around.
(6 sc, inc) × 6 = 48 stitches total (48 sc).
Rounds 9 – 17:
Do 1 sc in each stitch all the way around (no increases here). You’ll keep 48 stitches per round.
This will make the head nice and tall. Remember to pause and add stuffing as the head starts to take shape.
Round 18:
1 sc in each of the next 6 stitches, then do a decrease (sc2tog). Repeat around.
(6 sc, dec) × 6 = 42 stitches total (42 sc).
Round 19:
1 sc in each of the next 5 stitches, then dec. Repeat around.
(5 sc, dec) × 6 = 36 stitches total (36 sc).
Round 20:
1 sc in each of the next 4 stitches, then dec. Repeat around.
(4 sc, dec) × 6 = 30 stitches total (30 sc).
Round 21:
1 sc in each of the next 3 stitches, then dec. Repeat around.
(3 sc, dec) × 6 = 24 stitches total (24 sc).
At this point, the head should look round and firm. Add more stuffing, but don’t overfill. You want it soft and squishy, not hard like a ball.
Round 22:
1 sc in each of the next 2 stitches, then dec. Repeat around.
(2 sc, dec) × 6 = 18 stitches total (18 sc).
Round 23:
1 sc in the next stitch, then dec. Repeat around.
(1 sc, dec) × 6 = 12 stitches total (12 sc).
Round 24:
Do decreases all the way around until you have 6 stitches left. (6 sc total).
Finish off: Cut the yarn, leaving a long tail. Use a yarn needle to weave the tail through the last 6 stitches and pull tight to close the hole. Hide the yarn inside the head.
If you notice the head looking a little like a hexagon instead of a round circle, you can add an extra stitch at the end of a round once in a while. This helps keep the shape nice and smooth. Don’t stress too much—your kitty will be adorable no matter what.
Part 2 – The Body
Notes before starting the body:
-
The body is worked in rounds (spiral), just like the head.
-
Use your stitch marker to mark the beginning of each round.
-
Begin with the magic ring, or chain 2 if that feels easier for you.
-
Start adding stuffing once the body gets tall enough, and continue as you go.
Body Instructions:
Round 1:
Make a magic ring. Inside, crochet 6 sc. (6 stitches total).
Round 2:
Increase in each stitch around (2 sc in each stitch). (12 stitches total).
Round 3:
1 sc in the first stitch, 2 sc in the next (inc). Repeat all the way around.
(1 sc, inc) × 6 = 18 stitches total.
Round 4:
1 sc in each of the next 2 stitches, inc in the next. Repeat around.
(2 sc, inc) × 6 = 24 stitches total.
Round 5:
1 sc in each of the next 3 stitches, inc in the next. Repeat around.
(3 sc, inc) × 6 = 30 stitches total.
Round 6:
1 sc in each of the next 4 stitches, inc in the next. Repeat around.
(4 sc, inc) × 6 = 36 stitches total.
Round 7:
1 sc in each of the next 5 stitches, inc in the next. Repeat around.
(5 sc, inc) × 6 = 42 stitches total.
Rounds 8 – 21:
Work 1 sc in each stitch around (no increases). Keep 42 stitches in each round.
This makes the body tall and tube-shaped. Don’t forget to stop now and then to add stuffing little by little. Push the stuffing down gently with the back of your crochet hook or a chopstick.
Round 22:
1 sc in each of the next 5 stitches, then do a decrease (sc2tog). Repeat around.
(5 sc, dec) × 6 = 36 stitches total.
Round 23:
1 sc in each of the next 4 stitches, dec in the next. Repeat around.
(4 sc, dec) × 6 = 30 stitches total.
Round 24:
1 sc in each of the next 3 stitches, dec in the next. Repeat around.
(3 sc, dec) × 6 = 24 stitches total.
Round 25:
1 sc in each of the next 2 stitches, dec in the next. Repeat around.
(2 sc, dec) × 6 = 18 stitches total.
Stop here for a moment, my dear, and make sure the body is nicely stuffed. It should feel firm, but still soft enough to squish a little. Add as much stuffing as you like now, because the opening will get smaller soon.
Round 26:
1 sc in the first stitch, dec in the next. Repeat around.
(1 sc, dec) × 6 = 12 stitches total.
Round 27:
Do decreases all around until you have 6 stitches left. (6 sc total).
Finish off: Cut the yarn, leaving a long tail. Use your yarn needle to weave the tail through the last 6 stitches and pull to close. Hide the yarn end inside the body.
Tip:
Try to stuff the body a little firmer than the head, so your kitty can sit upright more easily. If it feels floppy, don’t worry—you can always adjust later by adding a bit more stuffing before sewing the body to the head.
Part 5 – Tail
Notes for the tail:
-
The tail is long and thin, worked in rounds.
-
Don’t overstuff, just a gentle bit of filling so it’s flexible and not too stiff.
Round 1:
Make a magic ring. Inside, crochet 6 sc. (6 stitches total).
Round 2:
Increase in each stitch around. (12 stitches total).
Rounds 3 – 45:
Work 1 sc in each stitch around. Keep 12 stitches in each round.
This will make a nice long tail. If you’d like your kitty’s tail shorter or longer, you can simply adjust the number of rounds here.
Lightly stuff as you go, but keep it soft and bendable.
Finish off and leave a long yarn tail for sewing to the body.
Part 6 – Ears
Notes for the ears:
-
The ears are small triangles, worked in rounds.
-
Make two ears.
Round 1:
Make a magic ring. Inside, crochet 4 sc. (4 stitches total).
Round 2:
1 sc in the first stitch, inc in the next. Repeat 2 times.
= 6 stitches total.
Round 3:
1 sc in each of the next 2 stitches, inc in the next. Repeat 2 times.
= 8 stitches total.
Round 4:
1 sc in each of the next 3 stitches, inc in the next. Repeat 2 times.
= 10 stitches total.
Round 5:
1 sc in each of the next 4 stitches, inc in the next. Repeat 2 times.
= 12 stitches total.
Round 6:
Work 1 sc in each stitch around. Keep 12 stitches total.
Finish off and leave a long tail for sewing. Make two ears.
Tip:
When you sew the ears onto the head, place them a little to the sides and toward the top — like a real kitty’s ears. Pin them with safety pins first to check the placement before sewing permanently.
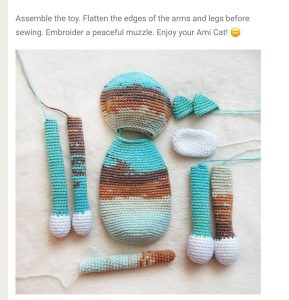
Part 7 – Assembly & Finishing Touches
Notes before assembly:
-
Take your time, dear. This is the part where your kitty comes to life, and each stitch shows your love.
-
Use pins or safety pins to position pieces before sewing them. This way, you can adjust and make sure everything is even.
-
Use the long yarn tails from each part for sewing. A yarn needle works best.
Step 1 – Attaching the Head to the Body
-
Place the head on top of the body. The flat bottom of the head should sit nicely on the top of the body.
-
Pin the head in place if needed.
-
Using the yarn tail from the head or body, sew around the bottom of the head, joining it to the top of the body. Use small, even stitches to make it secure.
-
Make sure the stuffing doesn’t get squeezed out as you sew.
Step 2 – Attaching the Arms
-
Position the arms on each side of the body, just below the head. The arms should sit naturally.
-
Pin them in place to check the position.
-
Sew each arm carefully to the body. Leave the paws slightly floppy so your kitty looks relaxed and cuddly.
Step 3 – Attaching the Legs
-
Place the legs at the bottom of the body. These are the back paws.
-
Pin them in place and adjust so your kitty can sit upright.
-
Sew each leg securely. You may want to add a few extra stitches at the bottom so your kitty sits evenly.
Step 4 – Attaching the Tail
-
Position the tail at the back of the body. You can have it curling to one side or straight — it’s up to you!
-
Pin and sew carefully, using the long yarn tail.
-
Keep the tail flexible by stuffing lightly or not at all — it should bend easily.
Step 5 – Attaching the Ears
-
Place the ears on top of the head, slightly to the sides.
-
Pin them first to make sure they’re symmetrical.
-
Sew each ear securely with small stitches.
Step 6 – Adding the Face
-
Use safety eyes or embroider the eyes with black yarn/thread.
-
Embroider a little nose and mouth. A simple “V” for the nose and a curved line for the mouth is sweet and easy.
-
You can also add whiskers with thin yarn or embroidery thread if you like.
Tips:
Take your time and check symmetry often — a gentle adjustment can make a big difference.
Hide all yarn tails inside the body so nothing dangles.
Remember, handmade toys are meant to be loved, and small imperfections make them charming and unique.
Congratulations, my dear! Your Amigurumi Cat Crochet is now complete. Isn’t it just adorable? Take a moment to admire your handiwork. Each stitch, each curve, and every little paw was made with love. 🐱💖
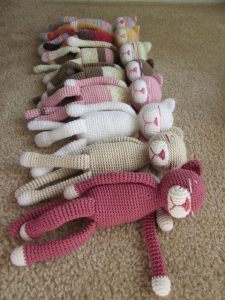
A wonderful gift idea
Crocheting this cat isn’t just about stitches and yarn, it’s about love. Handmade toys carry a little piece of our hearts with them, don’t they? This Amigurumi Cat Crochet would make the most precious baby shower gift, a thoughtful present for a cat lover, or even a comforting keepsake for yourself.
I can already picture this little fellow sitting on a child’s bed, keeping them company through sweet dreams and story times. Or perhaps perched on a cozy armchair, adding a handmade touch to a living room.
Remembering that this is a version inspired by the pattern created by Amigurumi Today, to check out this beautiful pattern developed by them, you can access here > Larg Ami Crochet Cat Pattern
The Amigurumi Cat Crochet Pattern is one of those projects that reminds us why we love crochet so much. With simple stitches, patience, and a sprinkle of creativity, we can turn a ball of yarn into a cuddly friend that will be cherished for years to come.
So, my dear, if you’ve been looking for your next crochet project, I encourage you to give this sweet kitty a try. Take your time, enjoy the process, and remember — each stitch you make is filled with your love and care. And that, more than anything, is what makes handmade so very special.
Happy crocheting, my dears, and may your days be filled with warm yarn and gentle joy. 🐾