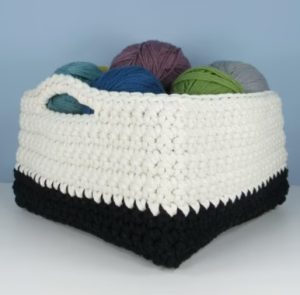
Any-Size Square Basket
Hey there, friend! 😊 Welcome to our lovely blog Handmade Learning Here. We all know how popular crochet basket bags are, right? Well, today we’re bringing you a unique twist to help you get your home organized. This beautiful piece comes in a square/rectangular shape, and you can make it in any size you want! This is the Any-Size Square Basket pattern.
If you’re looking for a practical and stylish way to organize your space, the Any-Size Square Basket crochet pattern is the perfect choice! With its simplicity and versatility, this basket can be customized to fit any area and can be made in different sizes to suit your needs. Let’s dive into what makes this pattern so special and how it can become a standout piece in your home decor.
Development
The square basket pattern is a fantastic option for both beginners and seasoned crocheters. It uses basic stitches that are easy to master. You can choose the color and type of yarn that best matches your decor, making each basket one-of-a-kind. 🧶✨
This simple container features a square base and can be customized in any width, height, or color combination, making it a perfect project for beginners or a great way to use up leftover yarn from other projects. The container is created by working in rounds from the base up, and you can choose to add handles or leave them off.
You will need:
- Any yarn can work, but for a sturdy container, I recommend using a thick, non-stretchy fiber like raffia, cotton, or jute (aran weight or thicker). I used Bobbiny 5mm recycled cotton cord in Black and Natural.
• A crochet hook that’s comfortably small for your chosen yarn. A smaller hook will create denser stitches, helping your container hold its shape better. I used an 8mm (US L/11) hook.
• Stitch markers.
• A tapestry needle if you’re using yarn, or glue if you’re using thick cord.
ABBREVIATIONS (US TERMS)
ch – chain
ch-2 sp – chain space made using 2 ch
CR – Corner = sc (dc) in ch-2 sp, ch 2, sc (dc) in same ch-2 sp.
dc double crochet
sc – single crochet
ss – slip stitch
st(s) – stitch(es)
[ ] – Square brackets show two or more stitches to be repeated as a set.
Gauge
The container shown in the photo has a gauge of 9 stitches x 10 rounds = 10 x 10 cm. However, the gauge isn’t crucial. What’s important is that your stitches are tight enough to create a sturdy container.
Color Changes
Changing colors is optional! If you’d like to switch colors, do so at the slip stitch join at the end of a round.
The Container in the Cover Photo
The instructions below are designed to create any size of container. However, you’ll find examples provided in brackets (e.g., 19 sts) at the end of some instructions. If you want to replicate the container shown in the cover photo, which measures 24cm wide and 15cm tall, just follow these examples (e.g., …).
Alternative to the Magic Loop
If you’re not familiar with the magic loop, you can start your project using a different method. Just chain 4, then join with a slip stitch (ss) into the first chain. After that, chain 1 and work your first round into this circle instead of using the magic loop.
Joining Rounds
At the end of each round, connect your work by making a slip stitch (ss) into the first single crochet (sc) or double crochet (dc) of that round.
BASE
Round 1: Start with a magic loop. Make 4 sets of [single crochet (sc) or double crochet (dc), chain 2]. Then, join to close the round.
Round 2: Chain 1 and turn your work. Make a single crochet (sc) or double crochet (dc) into each stitch from the previous round, and make a corner round (CR) into each chain-2 space. Join to close this round.
Repeat Round 2 until your base is the size you want (for example, a total of 9 rounds).
SIDES
Round A: Chain 1 and turn your work. Make a single crochet (sc) or double crochet (dc) in each stitch, and make 2 sc (dc) in each chain-2 space at the corners. Place a stitch marker between the 2 sc (dc) at each corner to help you keep track. Join to close the round and remember to move the markers up each round to show where each side starts and ends.
Round B: Chain 1 and turn your work. Make a single crochet (sc) or double crochet (dc) in each stitch. Join to close the round. Repeat Round B until your container is the height you want before adding the handles (for example, repeat 9 times and change color after the 2nd repeat).
(If you’re not making handles, keep going until your container reaches your desired height, then fasten off.)
The last round will be on the outside of the container, so if it’s currently inside out, turn it right side out now.
HANDLES
Count Your Stitches: First, count the number of stitches (sts) on each side of your work. You want the handles to be about half the width of one side. For example, if you have 19 sts on each side, your handle will be 9 sts wide, leaving 5 sts on both the left and right sides of the handle.
Starting Your Row:
Chain (ch) 1 and turn your work.
Single crochet (sc) or double crochet (dc) in every stitch (sc or dc) until you reach the first marker.
Creating the Handle:
On the side where the handle will be:
Sc or dc the same number of stitches as you have to the right of the handle (for example, 5 sts).
Then, chain the number of stitches for the handle (9 sts in our example).
Skip the same number of stitches (9 sc or dc).
Now, sc or dc the same number of stitches you have to the left of the handle (5 sts).
Continue Your Work:
Sc or dc in each stitch along the next side of your project.
Repeat the handle side steps again to create the other handle.
Finally, sc or dc in every stitch until you reach the end of the round. Join the round.
Finishing the Row:
Chain 1 and turn your work.
Sc or dc in every stitch again. For the spaces created by each handle, sc or dc the same number of stitches as you have in the chain for the handle (for example, 9 sc or dc).
Join the round again and then fasten off.
FINISHING
Finishing Your Project
Securing Yarn Ends:
If you’ve used yarn for your project, make sure to sew in the ends on the inside. This helps keep everything neat and prevents any unraveling.
If you used a thick cord that can’t be sewn, you can glue the ends down neatly on the inside of your project.
Adding Stiffness:
If your fabric isn’t as stiff as you wanted, you can make it stiffer! Use fabric stiffener and paint it on either the inside, the outside, or both sides of your project. This will help give it more structure.

PRINTABLE PDF
Here is a PDF version of the Any-Size Square Basket tutorial by Squibblybups. The tutorial is very educational and well written and you can download it below:
VIDEO TUTORIAL
Here we have separated for you a different version of Basket Square, this tutorial was developed by the YouTube channel Handmade By Mei and you can watch it below. It is a different version, a new option for you to make your beautiful basket.
The beauty of this pattern is that you can personalize it even more. How about adding handles or some crochet details at different points? Or maybe even using yarn with different textures for an interesting effect? 🤩
The Any-Size Square Basket crochet pattern is a fantastic way to combine functionality and style. As you create your baskets, you’re not only organizing your space but also adding a personal touch to your decor. Try out different colors and sizes, and enjoy the creative process! Whether it’s for storing toys, magazines, or even as a special gift, these baskets are always a charming choice. 🧺✨
It’s always so nice to have you here with us, dear reader. Thank you for following our lovely blog. We have a variety of free crochet patterns here, and you can check them out in our galleries. So, if you liked this pattern, let’s not waste any time putting into practice everything we’ve learned today and make our amazing square crochet basket.
Ready to get started? Gather your materials and dive into the world of crochet! 🧶
We wish you a beautiful day, and we hope to see you back here soon! XoXo 💖
Happy Crocheting!!!