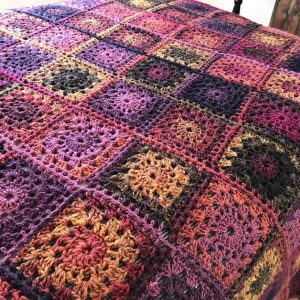
Bumble Berry Square
Hey there, lovely reader! Welcome to our charming little blog, Handmade Learning Here. Today, we’re so excited to share a delightful pattern with you—the Bumble Berry Square, developed by the Crochet Crowd. We’ve got a sweet little PDF for you to follow along with the step-by-step instructions.
If you’re a fan of crochet squares that are full of texture and personality, the Bumble Berry Square is definitely for you! This pattern is known for its delicate details and a look that’s a perfect blend of sophistication and coziness—just right for blankets, pillows, bags, and even clothing.
What Makes the Bumble Berry Square Special?
The design of the Bumble Berry Square combines a charming mix of textured stitches, creating a stunning three-dimensional effect. Here’s what makes it stand out:
- Versatility: Perfect for all kinds of projects, from home décor to fashion pieces.
- Classic Beauty: A sleek square that works just as well in solid colors as in bold, vibrant combinations.
Bumble Berry Square: Ideas for Using It
You can use the Bumble Berry Square for all sorts of amazing projects, like:
- Blankets & Quilts: A fantastic way to add a touch of class.
- Pillows: Bring some extra charm to your favorite spot.
- Bags & Pouches: Add a handmade, stylish touch.
- Tops & Cardigans: Give your wardrobe a vintage, romantic vibe!
Tips for Working with the Bumble Berry Square
- Choose a yarn that really shows off the texture of the stitch, like soft cotton or acrylic.
- Use the right hook size to make sure your square holds its shape.
- Have fun experimenting with different color combos for all kinds of cool effects!
The Bumble Berry Square is one of those patterns that steals your heart at first sight! Whether you’re working on a small project or something big, it always adds that special something.
So, have you tried this gorgeous square yet?
Materials You’ll Need:
- Yarn of your choice
- 5.5 mm (I) hook
ABBREVIATIONS
Ch(s) – Chain(s)
Dc – Double Crochet
Rep – Repeat
Sk – Skip
Sl St – Slip Stitch
Sp – Space
DIMENTIONS
65” x 65”
Tip:
When working with transitioning yarn, you can double your color options from a single ball! Simply crochet half of your squares by pulling yarn from the center of the ball, and the other half by pulling from the outside. This reverses the color sequence, giving you a beautiful variety of shades. Since the squares are small, this technique creates a delightful mix of colors in your project!
Make 128 Squares
Start with a ring:
Chain 6, then slip stitch into the first chain to form a small ring.
Round 1:
Chain 3 (this counts as your first double crochet).
Make 15 more double crochets into the ring.
Join with a slip stitch to the top of the beginning chain. (You should have 16 stitches.)
Round 2:
Chain 4 (this counts as a double crochet + chain 1).
Make 1 double crochet in the next stitch, chain 1.
Repeat around the circle.
Join with a slip stitch to the third chain of the beginning chain.
Round 3 (Forming the square shape):
Slip stitch into the next chain space.
Chain 3 (counts as a double crochet), then make 2 more double crochets in the same space.
Chain 1, then make 3 double crochets in the next space. Chain 1.
In the next space, make (3 double crochets, chain 2, 3 double crochets) – this creates a corner.
Chain 1, then make 3 double crochets in the next space. Chain 1.
Repeat this pattern around the square, making sure each corner has (3 double crochets, chain 2, 3 double crochets).
Join with a slip stitch to the top of the first chain 3.
Round 4 (Making the square bigger):
Slip stitch into the next chain space.
Chain 3, then make 2 more double crochets in the same space.
Chain 1, then make 3 double crochets in each chain-1 space.
At each corner, make (3 double crochets, chain 2, 3 double crochets).
Continue this pattern around the square.
Finish by joining with a slip stitch to the top of the first chain 3. Fasten off.
Joining the Squares – Zigzag Method
Lay out your squares
Arrange your squares in the pattern you want before joining.
Make sure they are facing the same way.
Start joining:
Place two squares together with the wrong sides touching.
Join yarn in the first corner space (chain-2 space) of the first square.
Chain 1, then make a single crochet in the first corner space of the second square.
Zigzag connection:
Chain 1, skip the next stitch on the first square, and single crochet into the next stitch.
Chain 1, skip the next stitch on the second square, and single crochet into the next stitch.
Repeat this pattern across the entire edge of the squares.
Keep going:
Don’t cut the yarn after joining two squares. Keep going and attach the next squares in the row the same way.
Once you finish all rows in one direction, turn the blanket and repeat the same process for the open edges.
Click here to access a PDF version of this amazing pattern, developed by Crochet Crowd. The PDF is different from the pattern we present here, so we suggest you read it. Access the pattern using the button below.
VIDEO TUTORIAL
Dear reader, access here the incredible video tutorial made by the lovely channel The Crochet Crowd, this tutorial is perfect for you who like more visual learning.
What do you think of this beautiful pattern, my dear reader? I really hope you loved it! We’re always here, bringing you the prettiest patterns. Don’t forget to let us know what you think in the comments – we absolutely love hearing from you! Oh, and make sure to keep an eye on our blog; we’re always sharing fresh crochet updates just for you. Thanks again for hanging out with us! Now, let’s put what we’ve learned into action, right? Grab your crochet hooks, your chosen yarn, and let’s get to work… See you soon! XoXo