Crochet Boots / Slippers
Hey there, my sweet friend! Welcome to our charming blog, Handmade Learning Here. Today, I’ve got something a bit special and oh-so-stylish to share with you, especially perfect for those chilly days. Among all the lovely things you can create with crochet, boots and slippers really shine with their blend of comfort and style. In this post, we’ll explore what makes these cozy accessories so delightful.
The Magic of Crochet Boots and Slippers
Crochet boots and slippers are such a fantastic way to add a personal, warm touch to your wardrobe. Made from soft, cozy yarns, they’re just the thing for colder days, giving you both comfort and style without compromising on practicality. With so many patterns and styles to choose from, you can make everything from classic, simple designs to more intricate, elegant looks.
Design and Variety
The design of crochet boots and slippers can be as varied as your imagination. Some patterns mimic traditional winter boots with tall shafts and charming details. Others are shorter, perfect for indoor lounging. The yarn you pick and the pattern you choose can really impact the look, comfort, and durability of your piece.
Choosing the right yarn is key to making sure your crochet boots or slippers are both gorgeous and functional. Soft, warm options like wool or acrylic are popular choices for this kind of project. And playing around with colors and textures can totally transform your design, letting you make something that’s uniquely yours.
One of the best things about crochet boots and slippers is how versatile they are. You can tailor them to fit different occasions and personal styles. Whether you’re looking for something understated for everyday wear or a more decorative option for special events, the possibilities are endless. Plus, these cozy creations can be easily adjusted to fit various foot sizes, so you get a comfy, custom fit every time.
I can share this written pattern for slippers with you. These slippers are incredibly easy to make, so even a beginner can create them with ease, thanks to the straightforward instructions provided.
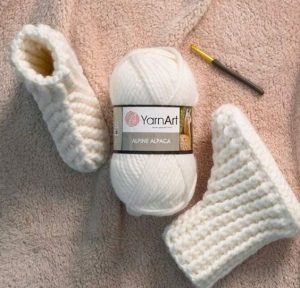
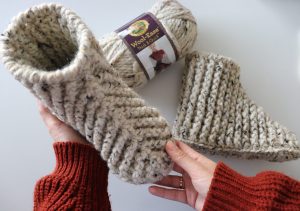
Crochet Boots/Slippers for Men and Women
Yarn size 6 – 97 mt
Hook: 6 mm
Tools: Tapestry needle
ABBREVIATIONS (US TERMS)
Ch – Chain
Sc – Single Crochet
Hdc – Half Double Crochet
Dc – Double Crochet
Fpdc – Front Post Double Crochet
Bpdc – Back Post Double Crochet
St – Stitch
Sp – Space
NOTES:
When you see *( )**, repeat the instructions contained within *( )**.
The term “turn” means to rotate your work clockwise and continue working back down the row.
This pattern is suitable for the following sizes:
European: 37-38-39
US: 7-8
UK: 5-6
CROCHET BOOTS – PATTERN INSTRUCTIONS
Row 1: Start by making a slip knot and then chain 19 stitches. Yarn over and skip the first 3 stitches. In the 4th stitch, make 3 double crochets (dc). Continue making 1 double crochet in each stitch across, but don’t crochet into the last stitch yet. In the last stitch of this side, make 7 double crochets. This will help you work along the other side of your chain.
On the other side of the chain, make 1 double crochet in each stitch except for the last stitch. In the last stitch of this side, make 3 double crochets. Slip stitch to the top of the first double crochet you made at the beginning (the one you started with the chain 3).
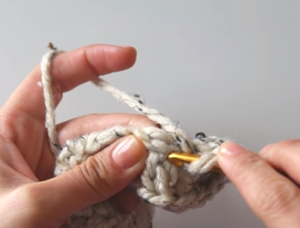
Row 2: Ch 3 (this will be your first double crochet stitch). Double crochet (dc) 6 times in the same stitch where you made the chain 3. In the next 6 stitches, half double crochet (hdc) in each. In the next 9 stitches, single crochet (sc) in each. In the next stitch, half double crochet (hdc) 2 times, then make 2 more half double crochet stitches in the same stitch. Repeat step 5 until you’ve made 6 half double crochet stitches in the same stitch. In the next 9 stitches, single crochet (sc) in each.In the next 6 stitches, half double crochet (hdc) in each. In the same stitch, make 2 double crochet stitches, then make 2 more double crochet stitches in the same stitch. Slip stitch (sl st) into the top of the initial chain 3 to join the round.
Row 3: Start with Ch3. In the same stitch, make a double crochet (dc).
Make a dc in the next stitch.
Make 2 dc in the next stitch.
Make a dc in the next stitch.
Make 2 dc in the next stitch.
Make a dc in the next stitch.
Make 2 dc in the next stitch.
In the next 7 stitches, make a half double crochet (hdc) in each.
In the next 10 stitches, make a single crochet (sc) in each.
Make 2 sc in the next stitch.
Make a sc in the next stitch.
Make 2 sc in the next stitch.
Make a sc in the next stitch.
Make 2 sc in the next stitch.
Make a sc in the next stitch.
Make 2 sc in the next stitch.
In the next 10 stitches, make a sc in each.
In the next 7 stitches, make a hdc in each.
Make 2 dc in the next stitch.
Make a dc in the next stitch.
Make 2 dc in the next stitch.
Make a dc in the next stitch.
Make 2 dc in the next stitch.
Make a dc in the next stitch.
Cut your yarn and join it to the 2nd stitch from the start.
Insert your needle in the first stitch and hide the yarn end.
You should have 64 stitches at the end of this row, and the number of stitches must be even.
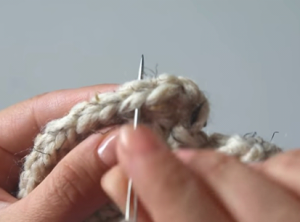
Row 4: Find the middle stitch of the base on the sole part. Slip stitch (sl st) into the back loop of that stitch. In the same stitch, make a double crochet (dc). Continue making a double crochet in each stitch across the row.
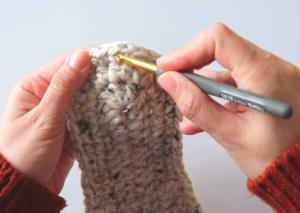
Row 5: Chain 2 (this doesn’t count as a stitch). *Now, in the stitch from the row below, make one front post double crochet (fpdc) and then one back post double crochet (bpdc)**. Repeat from * to ** in the end of the row.
Row 6: Chain 2 (this does not count as a stitch).
*Work 1 front post double crochet (fpdc) and 1 back post double crochet (bpdc)** until you reach the stitch before the middle front post double crochet of the row.
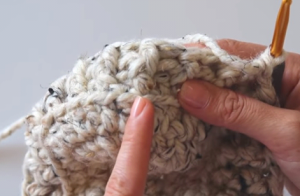
To make the decrease:
Insert your hook before the middle front post double crochet, yarn over, and pull up a loop.
Skip 1 back post double crochet.
Insert your hook into the middle front post double crochet, yarn over, and pull up a loop.
Skip 1 back post double crochet.
Insert your hook after the middle front post double crochet, yarn over, and pull through all loops on your hook.
Continue working *1 back post double crochet (bpdc) and 1 front post double crochet (fpdc) **until the end of the row.
Repeat this Row 6, 7 more times. Each row will decrease the number of stitches, and your boot will become snug up to the ankle.
Row 14 & 15:
Chain 2 (this does not count as a stitch). Then, work 1 front post double crochet (fpdc) and 1 back post double crochet (bpdc). Repeat from * to * across the row.
If you want your project to be longer, you can repeat Row 14 as many times as needed.
Row 16: In this row, work a reverse single crochet stitch into each stitch across the row.
VIDEO TUTORIAL
Hey there! I wanted to share a super cute video tutorial from the YouTube channel Sirin’s Crochet. This video will help you get acquainted with the pattern and give you a good idea of how to make your own beautiful crochet boots. I hope you enjoy it! You can check it out below:
Creating your own crochet boots or slippers is such a rewarding way to mix creativity with practicality. With a wide range of patterns and materials available, you can make pieces that are not only functional but also reflect your personal style. Whether you’re making a pair as a gift for someone special or just treating yourself, these crochet creations are a fantastic addition to any accessory collection.
Thank you so much for joining us, dear reader! I hope this article has been really helpful and that it inspires you to make some lovely pieces of your own. We have plenty of free crochet pattern articles here for you to check out, so take a look and enjoy the creative journey. Let your imagination run wild as you bring these cozy and stylish pieces to life!
I hope to see you around here more often! Have a wonderful day. XoXo

Thank you
Does it matter what size hook you use? I didn’t see that in the directions.
It says 6mm at the beginning xx
Thank you!
God bless you!