Granny Square Bunny Rabbit
Super Cute Granny Square Bunny Rabbit : A Simple and Adorable Project!
Hey there, lovely readers! Welcome to our cute little corner of the internet, Handmade Learning Here. Today, we’ve got a sweet and super handy crochet pattern to share, perfect for Easter.
If you’re into easy and creative crochet projects, the Crochet a Bunny from a Square will totally steal your heart! With just one crochet square, a bit of sewing, and some stuffing, you can turn a simple piece of fabric into an adorable little bunny. This pattern is perfect for beginners and makes for an awesome Easter gift or a cute decoration for the kids’ room.
The magic of this project is in its simplicity. First, you’ll crochet a basic square. Then, with a few clever folds and some light sewing, the square takes shape and turns into a cute little bunny. Finally, just add some stuffing and details like eyes and a nose to give your new friend some personality!
Oh, sweetheart, you’re going to love this adorable little bunny! It’s made from a simple square—yes, just a square!—and with a bit of folding and stitching, it magically turns into a cute, fluffy bunny. Grab your favorite yarn, and let’s get started!
If you can crochet a basic square with single crochet stitches, you can make this sweet little bunny! It’s a fun and beginner-friendly project.
Crochet Bunny – Written Pattern
You can use any yarn you like! Just choose a hook that’s slightly smaller than the recommended size to keep your stitches nice and tight. Happy crocheting!
Recommendation: a double-knit yarn with a 3.5mm E Hook.
What You’ll Need:
- Worsted weight yarn (any soft color you love for your bunny)
- Black yarn (for the eyes)
- Pink yarn (for the nose)
- Crochet hook (matching your yarn size, I’d suggest a 4mm or 5mm)
- Darning needle (to sew everything together)
- Poly-fil stuffing (to make your bunny fluffy)
- Scissors
- A couple of stitch markers (or safety pins)
Abbreviations (Using U.S. terms)
• Ch – Chain
• SC – Single Crochet
• St – Stitch
Granny Square Bunny Rabbit Pattern
Step 1: Crochet the Square
We’re going to start by making a simple square with single crochet stitches (SC).
1️⃣ Chain 26.
2️⃣ Row 1: Make a single crochet (SC) in the 2nd chain from your hook. Continue making one SC in each chain across. (You’ll have 25 SC total.)
3️⃣ Row 2: Chain 1, turn your work. Make a SC in each stitch across. (Still 25 SC.)
4️⃣ Keep repeating Row 2 until your piece is a perfect square.
How do you know it’s a square?
Just fold it diagonally—if the edges line up neatly, you’ve got a square! If one side is longer, just add or remove rows until it folds perfectly.
5️⃣ When you’re done, cut the yarn but leave a long tail for sewing.
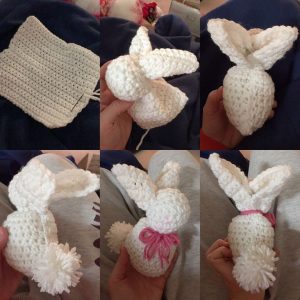
Step 2: Fold the Square
Now, here’s where the magic happens!
1️⃣ Fold your square upwards (so it looks like a rectangle). Press down a little so you can see the fold.
2️⃣ Open it up and place a stitch marker on each side of that middle crease—this helps us see the center.
3️⃣ Fold it again from right to left (so it’s a tall, skinny rectangle). Press to make a crease.
4️⃣ Place another stitch marker at the top of this new fold.
Now we have our little markers to help guide us while sewing!
Step 3: Sewing the Bunny’s Head
1️⃣ Cut a long piece of yarn (the same color as your square) and thread it onto your darning needle.
2️⃣ Insert the needle at the right-side stitch marker and do a running stitch to the other middle stitch marker. (Just simple in-and-out stitches.)
3️⃣ Now, stitch diagonally up to the top stitch marker, then back down diagonally to where you started.
Pull the yarn gently, and watch the bunny’s head take shape! It will cinch together into a cute little bubble.
4️⃣ Before closing completely, add a little stuffing to make the head nice and round. Then pull tight and knot securely.
5️⃣ If there’s a little hole at the top, just sew it closed with the yarn tail.
Step 4: Sewing the Bunny’s Body
1️⃣ Take the bottom half of your square and sew the two edges together to form a tube.
2️⃣ Stuff the body with poly-fil to make it soft and cuddly.
3️⃣ Sew the bottom closed by stitching through the front loops of each stitch around, then pull tight to cinch it closed. Knot it well and tie off.
Now your bunny has a head and body! Look at that cutie! 😍
Step 5: Adding the Bunny’s Face
Eyes:
- Take black yarn and thread it onto your needle.
- Insert the needle where you want the first eye, pull through, and make a little straight stitch.
- Pop the needle out where you want the second eye, make another stitch.
- Do a few stitches for each eye to make them stand out, then tie off and secure.
Nose:
- Use pink yarn and stitch a few little horizontal lines to make a cute bunny nose.
- Add a small vertical stitch for detail if you like.
- Tie off and hide the ends inside the bunny’s head.
VIDEO TUTORIAL
Here we have two perfect tutorial videos for you to follow and make your beautiful Granny Square Bunny Rabbit. Please watch and follow along to learn how to make this beautiful pattern, they are perfect!
All Done!
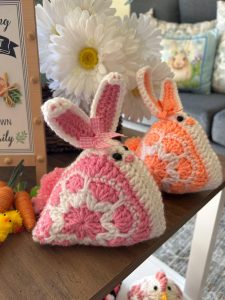
Oh, my dear, look at the sweet little Granny Square Bunny Rabbit you just made! Isn’t it adorable? If you want, you can add a little ribbon around its neck or even a tiny pom-pom for a tail!
This makes a perfect gift or a cozy little friend to sit on your shelf. I hope you had fun making it—happy crocheting, sweetie! 💕🐰✨
Personalize Your Little Bunny!
One of the best parts of this project is the chance to make it your own! You can use different yarn colors and textures to create bunnies that are totally unique. Adding little accessories, like bows or crochet flowers, makes the project even more charming. Plus, by adjusting the size of the starting square, you can make bunnies of all sizes—everything from tiny cuties to bigger ones you can hug.
Granny Square Bunny Rabbit is a super quick and perfect project for anyone who wants to create something special without spending too much time. Plus, handmade bunnies have that extra touch of love and care, making any gift even more special. Whether it’s for a baby, for decorating, or just for fun, this project will warm hearts.
How about grabbing your hook and starting right now?
What do you think of this adorable pattern of Granny Square Bunny Rabbit? I hope your little granny square bunnies turn out as cute as can be! Thanks so much for being here with us—we always love sharing the best patterns with you. They’re going to look amazing! Now, let’s put all the tips we’ve shared here into practice. Keep an eye out for our articles, we’re always bringing fresh new content for you. Hope you have an awesome day! See you soon. XoXo