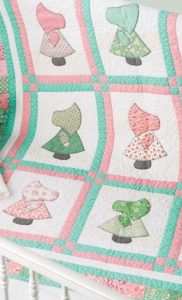
Sunbonnet Sue Quilt
Hello, my friends, welcome to our lovely blog Handmade Learning Here. There’s something truly special about traditional quilt blocks that carry history in every stitch. The Sunbonnet Sue quilt block is one of those timeless designs that continues to charm quilters generation after generation. With her flowing bonnet and sweet silhouette, this classic appliqué motif brings warmth, nostalgia, and personality to any project.
At Handmade Learning Here, we love patterns that are both meaningful and beginner-friendly, and this block is a perfect example. While it may look detailed at first glance, it’s actually a wonderful introduction to fusible appliqué techniques. With just a few fabric pieces and simple stitching, you can create a block that feels both vintage and fresh.
This design is constructed on a rectangular background measuring 13½″ × 12″ (unfinished), with individual appliqué shapes fused and stitched into place. The process involves tracing template pieces onto lightweight fusible web, pressing them onto the wrong side of the fabric, trimming precisely, and arranging them carefully before stitching around each shape. Using coordinating thread helps the appliqué blend beautifully into the background.
Finished Block Size
13½″ × 12″ (unfinished size)
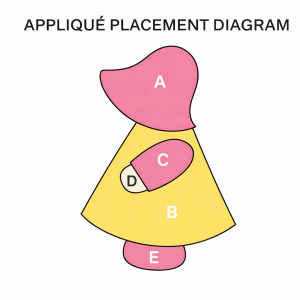
This block features a classic appliqué silhouette of a girl wearing a bonnet and dress, assembled on a rectangular background.
Materials & Fabric Requirements
(Assumes 42″-wide quilting cotton)
Fabric Cuts:
-
12″ × 12″ red print fabric
-
9″ × 9″ blue print fabric
-
3″ × 3″ cream print fabric
-
13½″ × 12″ light background fabric (block base)
Additional Supplies:
-
Lightweight fusible web
-
Coordinating thread for each appliqué section
-
Fabric scissors
-
Iron and pressing surface
-
Sewing machine (or hand-sewing needle for appliqué)
-
Pencil for tracing
Step 1: Prepare the Fusible Shapes
-
Place the paper side of your fusible web over the pattern templates labeled A, B, C, D, and E.
-
Trace each template once using a pencil.
-
Leave about ¼″ space between shapes.
-
Rough-cut around each shape, leaving approximately ⅛″ outside the traced line.
Step 2: Fuse to Fabric
Match each template piece with its assigned fabric:
-
Red fabric → Pieces A, C, and E
-
Blue fabric → Piece B
-
Cream fabric → Piece D
-
Position each fusible shape (adhesive side down) onto the wrong side of the corresponding fabric.
-
Press with an iron according to the fusible manufacturer’s instructions.
-
Allow to cool completely.
-
Cut precisely along the traced lines.
-
Carefully peel off the paper backing.
Now your appliqué pieces are ready.
Step 3: Arrange the Appliqué
-
Lay your 13½″ × 12″ background fabric flat.
-
Position pieces A–E according to the placement layout so the image forms correctly.
-
Once satisfied with placement, press gently with an iron to secure the pieces in place.
Tip: Step back and visually check alignment before pressing permanently.
Step 4: Stitch the Appliqué
Using matching thread for each fabric:
-
Stitch around each piece using your preferred appliqué method:
-
Satin stitch
-
Zigzag stitch
-
Blind hem stitch
-
Hand appliqué stitch
-
Make sure to stitch close enough to the edge to secure the raw edges fully.
Your Block Is Complete!
You now have one finished Sunbonnet Sue quilt block measuring 13½″ × 12″ unfinished.
It’s ready to:
-
Join other blocks in a quilt layout
-
Become part of a sampler quilt
-
Be framed as a decorative textile piece
Tips
✔ Practice stitching on scrap fabric before working on your block
✔ Use thread that blends with each fabric for a polished look
✔ Keep your iron temperature appropriate for cotton
✔ Take your time with placement — alignment makes a big difference
One of the best things about the Sunbonnet Sue block is its versatility. You can personalize it with different fabric prints, experiment with stitching styles such as satin or zigzag stitch, or even incorporate it into a sampler quilt. Whether you’re making a full quilt, a wall hanging, or a decorative panel, this block adapts easily to your creative vision.
If you’re just beginning your quilting journey, this pattern offers the perfect opportunity to practice precision, placement, and clean appliqué stitching, all while creating something charming and timeless. Classic, approachable, and full of character, the Sunbonnet Sue quilt block remains a beautiful project to learn, enjoy, and share