
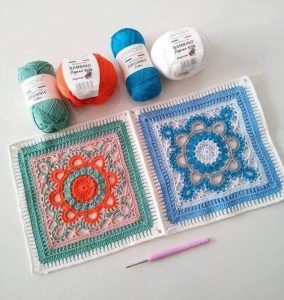
Turkish Granny Square
Hey there, fellow crochet enthusiasts! 🌼 Welcome to our lovely blog Handmade Learning Here. How are you feeling today? I hope you are having a beautiful day. Today I want to bring you a very elegant and unique pattern. Today, we’re diving into the vibrant world of the Turkish Granny Square.
This eye-catching pattern adds a unique twist to the classic granny square, combining intricate motifs with stunning color combinations. If you’re looking to spice up your crochet projects or just want to explore something new, the Turkish Granny Square is a perfect choice!
The Beauty of the Turkish Granny Square
What sets the Turkish Granny Square apart from traditional granny squares is its unique design. While traditional granny squares are typically composed of simple clusters, the Turkish version incorporates additional layers and shapes, resulting in a more complex and visually appealing pattern. This allows for a wide variety of color combinations, making each square a true work of art.
Versatile Uses
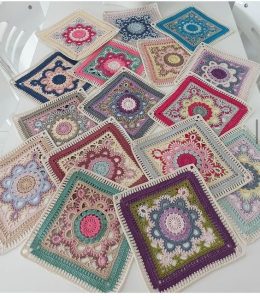
One of the fantastic aspects of the Turkish Granny Square is its versatility. You can use these squares to create a variety of projects, such as:
Blankets: Join several squares together to make a stunning throw or blanket that will be a showstopper in any room.
Garments: Use larger squares to create trendy shawls, vests, or even a unique crochet top.
Home Decor: Incorporate them into cushions, table runners, or wall hangings to add a pop of color to your space.
Easy to Customize
The beauty of crochet lies in its customizability, and the Turkish Granny Square is no exception! You can experiment with different yarn weights, textures, and colors to create something uniquely yours. Whether you prefer a bold, contrasting palette or soft, harmonious hues, the possibilities are endless.
A Gateway to New Techniques
If you’re a crochet newbie, tackling the Turkish Granny Square can also be an excellent way to expand your skills. The pattern introduces various stitches and techniques, providing a fantastic opportunity to enhance your crochet knowledge while having fun! Plus, you’ll get to show off your handiwork to friends and family.
ABBREVIATIONS (US TERMS)
SS: Slip Stitch
TC: Triple Crochet
Ch: Chain
SC: Single Crochet
TC3tog: Triple Crochet 3 Together
TC4tog: Triple Crochet 4 Together
DC: Double Crochet
DTC: Double Triple Crochet
YO: Yarn Over
Special Stitch: Star Stitch
Yarn Over: Yarn over 5 times.
Skip and Pull: Skip the 4th chain, then pull the yarn through the next chain (the 4th one). Pull through 2 loops twice.
Repeat: Skip the 4th chain again. Yarn over, pull through the next chain, and pull through 2 loops once.
Another Repeat: Skip the 4th chain, yarn over twice, pull through the next chain, and pull through 2 loops twice.
Finish: Yarn over and pull through 3 loops on your hook.
Yarn Over: Yarn over and pull through 2 loops a total of 4 times.
Chain 2 and Triple Crochet: Chain 2, then make a triple crochet (tc) into the stitch created in step 5, pulling through 3 loops.
Chain 2 and Double Triple Crochet: Chain 2 again, then make a double triple crochet (dtc) into the same stitch, pulling through 3 loops, and chain 2.
The completed square should measure approximately 30 cm (12 inches) once blocked, using DK yarn and a 4 mm hook.
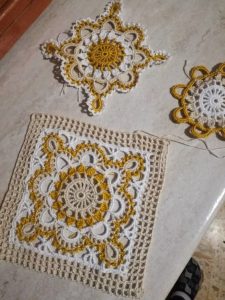
Turkish Granny Square Pattern
Creating a Crochet Circle
Start: Chain 6 and slip stitch (ss) into the first stitch to form a circle.
Round 1:
Chain 5 (this counts as your first triple crochet (TC) and chain 1).
In the circle, make (1 TC, chain 1) 15 times. You should have 16 TCs total.
Slip stitch into the 4th chain of your starting chain 5.
Round 2:
Chain 1 and single crochet (sc) in the same stitch.
In the next chain 1 space, make 2 sc, then 1 sc in the next TC.
Repeat this around. Slip stitch into the first sc. You should have 48 sc.
Note: If your work curls up a bit, that’s totally normal, so don’t worry!
Round 3:
Chain 6 (this counts as your first double crochet (dc) and chain 3).
Skip 2 sc, then make 1 dc in the next space. Chain 3.
Repeat this around 15 more times. Slip stitch into the 3rd chain of your starting chain 6. You should have 16 dcs.
Round 4:
Slip stitch into the next chain 3 space, then chain 3.
Make a cluster of 3 TC together (TC3tog), then chain 4.
In the next chain 3 space, make (TC4tog, chain 4) 15 times.
Slip stitch into the top of the TC3tog. You should have 16 clusters of TC4tog.
Round 5:
Chain 1 and sc in the same space.
In the chain 4 space, make 5 sc. Then sc into the top of the TC4tog.
Chain 11, then slip stitch into the top of the sc from the previous TC4tog.
Chain 1, then make 18 sc back across the chain 11.
Make 5 sc in the chain 4 space, then sc into the top of the TC4tog.
Repeat this process 8 times, and then slip stitch into the first sc to finish.
Round 6:
Slip stitch (ss) into the first single crochet (sc).
Make 18 sc.
Chain 5 (this counts as a double crochet (dc) and chain 2).
Skip 1 sc, then make (dc, chain 2) 3 times.
Skip 1 sc, then make 1 dc and chain 10.
Slip stitch into the dc you just made, so the chain 10 loops back on itself.
Chain 1 and make 19 sc back along the chain 10.
Slip stitch into the top of the dc you’re working in.
Chain 2, skip the next sc, then make 1 dc.
In the next 3 stitches, do (chain 2, skip 1 sc, dc) 3 times.
Skip 6 sc, then make (dc, chain 2, skip 1 sc) 8 times.
Make 1 dc, skip 6 sc, then repeat this section 3 times:
- (dc, chain 2, skip 1 sc) 4 times
- Make 1 dc, chain 10, slip stitch into the dc you just made so it loops back on itself.
- Chain 1, make 19 sc back along the chain 10.
- Slip stitch into the top of the dc you’re working in.
- Chain 2, skip the next sc, then make 1 dc.
- In the next 3 stitches, do (chain 2, skip 1 sc, dc) 3 times.
- Skip 6 sc, then make (dc, chain 2, skip 1 sc) 8 times.
- Make 1 dc, skip 6 sc.
Slip stitch into the 3rd chain of your starting chain 5. Fasten off the yarn.
Round 7:
Attach yarn to the 9th sc of any 19 sc section.
Chain 4, skip 1 sc, and slip stitch (ss). Repeat this step 5 times.
Then do this:
- Slip stitch into the chain 2 space, chain 4, and slip stitch in the next chain 2 space 3 times.
- Slip stitch into the chain 2 space, chain 4, and slip stitch in the next chain 2 space 7 times.
- Slip stitch into the next chain 2 space, chain 4, and slip stitch into the chain 2 space 3 times.
- Slip stitch into the sc, chain 4, skip 1 sc, and slip stitch 9 times.
Repeat all of this 3 times.
Then, slip stitch into the chain 2 space, chain 4, and slip stitch in the next chain 2 space 7 times.
Slip stitch into the next chain 2 space, chain 4, and slip stitch into the chain 2 space 3 times.
Slip stitch into the sc, and then chain 4, skip 1 sc, and slip stitch 4 times.
Slip stitch into the first chain 1 of the first chain 4.
Round 8:
Slip stitch into the chain 4 space, chain 1.
In the same space, make (sc, chain 4, sc).
In the next chain 4 space, chain 3 and make 1 sc.
In the same chain 4 space, chain 3 and make 1 dc.
In the same chain 4 space, repeat:
- (chain 2, make a star stitch, skip chain 4)
- Make 1 dc in the next chain 4 space, chain 3.
- Make 1 sc in the next chain 4 space, chain 3.
- Make 1 dc in the next chain 4 space, chain 2.
- Make a star stitch, skip chain 4.
- Make 1 dc in the next chain 4 space, chain 3, and make 1 sc in the next chain 4 space, chain 3.
Repeat the entire section 4 times.
Finally, slip stitch into the first sc.
Round 9:
Chain 3 (this counts as your first dc).
In the chain 3 corner space, make 5 dcs.
In the next two stitches, do (dc in sc, 3 dcs in chain 3 space) twice.
In the next 4 stitches, do (3 dcs in chain 2 space) 4 times.
Make 1 dc in a dc, then 3 dcs in the chain 3 space.
In the next stitch, do (dc in sc, 3 dcs in chain 3 space, dc in dc) and then repeat the previous step (3 dcs in chain 2 space) 4 times.
Make 1 dc in the chain 3 space, dc in the sc, and 3 dcs in the chain 3 space.
Repeat this entire section 4 times.
Finally, slip stitch in the top of the chain 3 to finish. You should have 216 dcs in total.
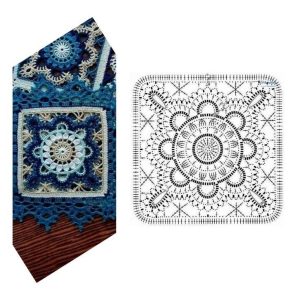
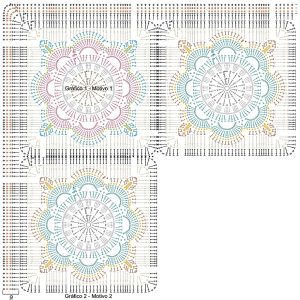
Turkish Granny Square – CHART
Dear reader, for those of you who prefer a graphic form of this lovely pattern, here it is available for you:

The Turkish Granny Square is more than just a crochet pattern; it’s a canvas for your creativity! Whether you’re using it to make cozy blankets, stylish garments, or beautiful decor, this pattern will elevate your crochet game to new heights. So grab your yarn and hook, and let your imagination run wild. Happy crocheting! 🧶✨

Your Turkish granny square is beautiful
I wish if you can do video on this pattern
Beautiful. Would love to give these a try. Is there a way to print this pattern?
Please where is a way to print the pattern???
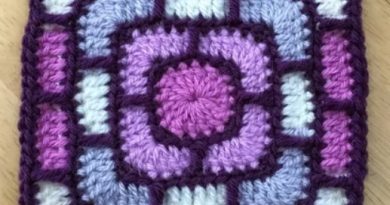
I would also love the pattern for the edging you did in the blue one in the last picture.