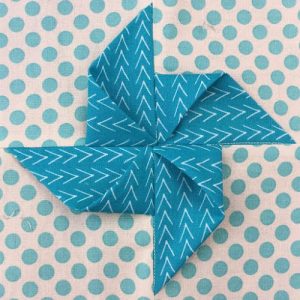
3D Pinwheel Quilt Block
Hello, my quilting friend, welcome to our lovely blog Handmade Learning Here. I am so excited to share this delightful project with you! The 3D Pinwheel Quilt Block, is one of those blocks that makes your heart skip a beat. It’s simple, playful, and creates the most wonderful texture, all while being perfectly approachable for beginners.
What I love about this block is how it combines the basics of a simple four-patch with a clever folded triangle technique. The result? A block that looks much more advanced than it really is. The best part is you don’t need fancy tools or tricks, just some fabric squares, a sewing machine, and a little bit of patience.
So, let’s dive in together! I’ll walk you through the steps slowly and clearly so you can enjoy the process from the very first cut to the final press.
Supplies You’ll Need (for one block)
Fabric:
4 background squares each of two fabrics, in any size.
4 pinwheel squares (same size as the background squares)
In the tutorial, 3½-inch squares are used, which makes a finished 6-inch block.
Tools:
Sewing machine
Rotary cutter, mat, and ruler
Iron and pressing surface
Seam ripper (just in case!)
Pins or clips
Step-by-Step Instructions
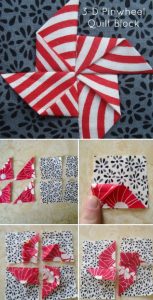
Cut and prepare your squares
Choose your background fabric and your pinwheel fabric. Cut four squares of each, all the same size. Place them into pairs, one background square and one pinwheel square.
Fold the pinwheel squares
Take each pinwheel square and fold it diagonally, wrong sides together, to make a triangle. Lay this folded triangle on top of a background square, aligning the raw edges. Do this for all four pairs.
Position the triangles
Fold one tip of the triangle over again to create the “wing” of your pinwheel. Pin it down neatly so it stays in place. Arrange all four so that they’re ready to spin around the center.
Sew the pairs into halves
Sew two of your squares together with a ¼-inch seam allowance. Then sew the other two together the same way. Press your seams to one side. Now you have two halves of your block.
Join the halves
Sew the two halves together to complete your block. Try to nest the seams at the center so everything lines up nicely. Don’t worry if it’s not absolutely perfect, quilting is all about joy, not perfection!
Reduce the bulk in the center
Because of the folded fabric, the center can get a little thick. If you’d like, carefully unpick just a few stitches in the seam allowance (not in the actual seam!) and press the seams open like a little flower. This makes the block lay flatter.
Press and admire
Give your block a nice press with your iron. As you open it up, you’ll see that beautiful 3D pinwheel effect shining through, what a happy moment!
Extra Tips for Success
- Pin both tips of the folded triangles to keep them from shifting while you sew.
- Solid fabrics are great for learning, but once you feel comfortable, try ombrés or prints for even more dimension.
- Precut charm packs are perfect for these blocks, and they make the sweetest baby quilts, full of texture little hands will love.
- Don’t be afraid to play with different arrangements. These pinwheels are stunning in quilts, table runners, or even as accent pillows.
VIDEO TUTORIAL
The 3D Pinwheel Quilt Block is such a joyful pattern to sew. It’s quick, it’s fun, and it gives you that satisfying “wow” factor without being complicated. Whether you’re brand new to quilting or just looking for something playful to add to your next project, this block will bring a smile to your face every single time.
So grab your fabric squares, warm up your sewing machine, and let’s make those pinwheels spin!