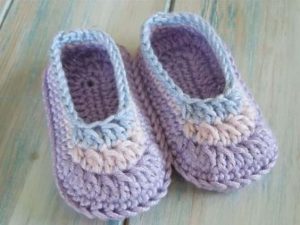
Baby Slipper Booties
Crocheting baby slipper booties is a delightful project that combines creativity and practicality. These adorable little shoes not only keep tiny toes warm but also add a touch of charm to any baby outfit. Whether you’re a seasoned crocheter or just starting out, this project is perfect for showcasing your skills while making a heartfelt gift for a baby shower or a special occasion.
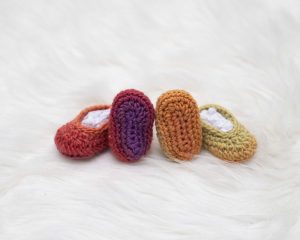
Baby booties are more than just footwear; they are a symbol of love and warmth. With various designs and colors, you can personalize each pair to match the baby’s style or theme. From classic solid colors to vibrant patterns, the possibilities are endless. Plus, they make excellent keepsakes, reminding parents of those precious early months.
To create beautiful baby slipper booties, you’ll need some basic materials: soft yarn, a crochet hook, and some decorative elements like buttons or ribbons for an added touch. Choosing the right yarn is crucial, as it should be gentle on a baby’s delicate skin. Cotton or acrylic yarn is often recommended for its softness and durability.
The technique for crafting these booties usually involves basic crochet stitches, making it accessible for beginners. You can experiment with different styles—think of Mary Janes, booties with cuffs, or even animal-themed designs! Each style brings its own flair, ensuring that your creations are as unique as the babies who will wear them.
Materials:
Any DK yarn you have on hand will work for this project. You’ll need less than 10g, or about a third of an ounce (though yarn sold by the ounce seems rare these days – I haven’t seen it since my childhood!). Some DK yarns are a bit thicker than others, but it’s not a huge deal.
If you plan to use different colors for the soles and tops, you’ll need even less yarn. Just try to use yarn from the same manufacturer so the thickness matches up nicely.
One tip: avoid using yarn that changes color randomly, as it can be tricky to create a matching pair (trust me, been there – see the picture!).
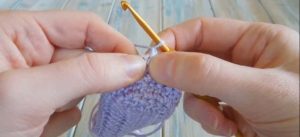
You’ll need a 4mm hook and a large-eye needle (or a smaller hook) to weave in your ends.
Size: These slippers are designed for a newborn, likely to fit for the first few months unless the baby has larger-than-usual feet. If you want to make them bigger, you can add a chain or two to the starting chain, and one or two double crochets on each side of the straight sections. Babies’ feet don’t get much wider in the first year, and since the slippers are soft, they should still fit comfortably. For example, the brown and red ones have one extra chain and stitch on each side, making them a bit larger.
Tension: Not super important. My soles come out to about 7.5 cm x 3 cm (3”x1.2”), and they’re quick to work up, so if yours are much smaller, just switch to a bigger hook. If they turn out larger, no worries – they’ll fit as the baby grows!
PDF PATTERN
Abbreviations:
ch – chain
sc – single crochet (called double crochet in the UK)
sc2tog – single crochet two together (called dc two together in the UK): Insert your hook into the next stitch, pull up a loop. Insert your hook into the following stitch, pull up another loop. You’ll have three loops on the hook. Yarn over and pull through all three loops. Note: Don’t use an invisible decrease here.
hdc – half double crochet (called half treble crochet in the UK)
dc – double crochet (called treble crochet in the UK)
dc2tog – double crochet two together (called treble decrease in the UK): Yarn over, insert your hook into the next stitch, pull up a loop. Yarn over, pull through two loops. Yarn over, insert your hook into the next stitch, pull up a loop. Yarn over, pull through two loops. Then yarn over and pull through all the remaining loops on the hook. If this technique is new to you, it’s worth checking out a tutorial online for more clarity!
st – stitch
PATTERN
Instructions:
Step 1: Create the Foundation Chain
Ch 10: Make a chain of 10 stitches. This will be the foundation of your oval.
Step 2: Form the Oval Base
Row 1:
In the second ch from the hook, make 2 dc (double crochet).
In the next 7 ch, make 1 dc in each (totaling 7 dc).
In the last ch, make 5 dc. This will create a nice curve on the other side.
Now, you will work in the back loops of the chain.
In the next 7 back loops, make 1 dc in each (totaling 7 dc).
In the last back loop, make 3 dc.
Now, join with a slip stitch to the top of the first dc you made. You should have 24 stitches in total.
Step 3: Continue to Build the Shape
Row 2:
Ch 2 (this counts as your first tr).
In the first two stitches, make 2 tr (treble crochet) in each.
In the next 7 stitches, make 1 tr in each.
In the next 5 stitches, make 2 tr in each.
In the next 7 stitches, make 1 tr in each.
In the last 3 stitches, make 2 tr in each.
Join with a slip stitch. You should have 34 stitches now.
Row 3:
Ch 1.
In the next stitch, make 1 dc, then in the next stitch, make 2 dc. Repeat this pattern twice (total: 6 stitches).
In the next 7 stitches, make 1 dc in each.
Repeat the pattern of (1 dc in next st, 2 dc in next st) for the next 5 stitches.
In the next 7 stitches, make 1 dc in each.
In the last 3 stitches, repeat the pattern of (1 dc in next st, 2 dc in next st).
Join with a slip stitch. You should now have 44 stitches.
Row 4:
Ch 1.
Into the BACK LOOPS ONLY, make 1 dc in each stitch all the way around.
Join with a slip stitch. You should have 44 stitches.
Row 5:
Ch 1.
Make 1 dc in each stitch all the way around, using both loops this time.
Join with a slip stitch. You should still have 44 stitches.
Row 6:
Ch 1.
Make 11 dc in the next 11 stitches.
In the next 2 stitches, make 2 hdc (half double crochet).
For the next part, you’ll repeat (1 tr in the next st, then tr dec over the next two stitches) 6 times.
Make 2 hdc in the next 2 stitches.
Finish this row with 11 dc.
Join with a slip stitch. You should have 38 stitches.
Row 7:
Ch 1.
Make 13 dc in the next 13 stitches.
Make dec (decrease) (crochet two stitches together) 6 times.
Make 13 dc in the next 13 stitches.
Join with a slip stitch. You should have 32 stitches.
Row 8:
Ch 1.
Make 11 dc in the next 11 stitches.
Make tr dec (treble crochet decrease) 5 times.
Make 11 dc in the next 11 stitches.
Join with a slip stitch. You should have 27 stitches.
Row 9:
Ch 1.
Make 11 dc in the next 11 stitches.
Make 1 dec, then 1 dc, then make another dec.
Finish with 11 dc.
Join with a slip stitch. You should have 25 stitches.
Finishing Up:
Finish off: Cut the yarn, leaving a tail for weaving in. Use a yarn needle to weave in any loose ends.
If this was your first piece, go ahead and make another one to match!
VIDEO TUTORIAL
In the world of crochet, baby slipper booties hold a special place. They are not only functional but also a canvas for your creativity. As you embark on this cozy project, remember that each stitch is made with love. Whether you choose to gift them or keep them for your little one, these booties are sure to bring smiles and warmth to all. So grab your hook and yarn, and let your imagination run wild with adorable designs! 🧶👶💖