Twinkle Trees
Hello my dear friend, and welcome back to Handmade Learning Here! The holiday season is right around the corner, and oh, how I love this time of year, the lights, the laughter, and of course, the endless joy of handmade decorations. Today, I have something extra special for you: a sweet little Twinkle Tree Crochet Pattern that will bring sparkle and warmth to your home.
A Cozy Handmade Touch
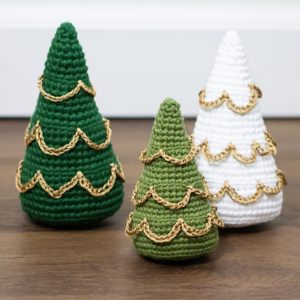
There’s something so magical about tiny crochet trees, don’t you think? This one, in particular, looks like it came straight out of a snowy fairytale forest! It’s soft, beautifully shaped, and glimmers thanks to its shiny Garland, just like a starry night in December.
What I love most about this project is how beginner-friendly it is. You only need to know a few basic stitches (single crochet, increase, and decrease), and the rest is simply watching your adorable little tree take shape round by round. Even if this is your very first holiday project, you’ll find it relaxing and oh-so-satisfying.
The Twinkle Tree is made from the top down in continuous rounds. That means no seams, no joining, just peaceful, circular crocheting. You’ll work your way down, shaping the cone by adding little increases every few rounds.
As you go, stuff your tree gently with fiberfill to keep it nice and plump. You’ll notice that some rounds are worked in the back loop only (BLO) — don’t skip those! Those loops are what create the tiny ridges where the sparkly garland will later be attached.
When your tree reaches about 5 inches tall, you’ll close it up with neat decreases. Then, it’s time for the fun part: decorating!
Using metallic yarn or embroidery floss, crochet a delicate twinkle garland around the ridges. This gives your tree that magical, shimmering look, just like a real Christmas spruce dusted with snow and fairy lights.
About the Project
This tiny crochet Christmas tree is perfect for adding handmade charm to your holiday decor. It’s small, cute, and glitters beautifully thanks to its shiny garland. Even if you’re new to crochet, this project is beginner-friendly and works up quickly — just a few hours of cozy stitching!

Materials You’ll Need
- Worsted weight yarn (50g) – choose any green shade you like (cotton or acrylic both work great!)
- Crochet hook size 3.25 mm (US D) – for the main tree
- Crochet hook size 2.75 mm (US C) – for the garland
- Metallic yarn or embroidery thread – for the twinkle garland (gold, silver, or copper looks lovely)
- Fiberfill – for stuffing your little tree
- Tapestry needle – for sewing and weaving in ends
- Stitch marker – to keep track of rounds
Tip: You can also use DK yarn and a smaller hook for a smaller tree.
Stitches You’ll Use
All instructions are in US terms:
- MR – Magic Ring
- ch – chain
- sc – single crochet
- inc – increase (2 sc in same stitch)
- dec – decrease (invisible decrease preferred)
- sl st – slip stitch
- BLO – back loop only
How the Tree is Built
The tree is crocheted from the top down, all in one piece. The sparkly garland is added later using the front loops that you leave unworked.
Important: Crochet continuously in rounds, don’t join or turn your work. Use a stitch marker to mark the first stitch of each round.
Stuff your tree gradually as you go. Before closing, add a little extra fiberfill so it keeps its cute, full shape.
Tree Body
Start with a magic ring.
Make 6 single crochets inside the ring and tighten it gently.
Increase gradually.
Every few rounds, you’ll add more stitches — that’s what shapes the cone!
Example: do 1 sc in each stitch for one round, then on the next round do “2 sc in the same stitch” (that’s your increase). Continue this rhythm until your tree widens to about 2 inches at the base.
Use back loops on certain rounds.
Working in the BLO helps create little ridges — these are where you’ll later attach your garland!
Keep crocheting and stuffing.
Once the tree looks tall and full enough (around 5 inches or 12.7 cm), start decreasing to close the bottom.
Close and secure.
When you have just a few stitches left, cut the yarn, thread it through the front loops, pull tight, and weave in the ends.
Twinkle Garland
Use your metallic thread and the smaller hook (2.75 mm).
Attach it to the first ridge (front loop) you left on Round 9.
Chain about 12 stitches, skip 5 loops, and slip stitch into the next one. Repeat this pattern around the tree to create a spiral garland look.
Finish off and weave in your ends.
Repeat for the other two ridges (Rounds 15 and 21) for three twinkly rows of garland.
Optional: You can add a tiny star or bead at the top for extra sparkle!
Final Touch
Fluff your tree gently and adjust the stuffing. You can use it as:
- A cute tabletop decoration
- A handmade gift
- Or even a tree ornament if you add a hanging loop!
Once finished, your little tree will be ready to brighten any corner of your home. You can make a few of them in different shades of green for a festive forest scene, or even attach a small loop at the top and hang them as ornaments. They also make the most heartwarming handmade gifts… each one is a tiny bundle of love.
If you want to get extra creative, add tiny beads, sequins, or a mini star on top. After all, there’s no such thing as too much sparkle during Christmas time!

In the Spirit of Handmade Joy
Crocheting little pieces like this reminds me that sometimes, the simplest projects bring the most happiness. Sitting with your yarn, sipping a warm drink, and watching your tree come to life stitch by stitch, it’s pure comfort.
So grab your hooks, my dear, and let your heart twinkle along with this lovely little tree.
I hope this pattern brings you as much joy as it brought me to share it.
Thank you for stopping by Handmade Learning Here!
Don’t forget to explore our other crochet patterns, from cozy winter ornaments to adorable gifts, there’s always something delightful waiting for you.
See you soon, sweetheart. XoXo