Crochet Octopus Pattern
Welcome to Handmade Learning Here, my friend! I’m so happy you stopped by to explore another cozy and creative crochet project with me. Today, I’m sharing an adorable little octopus pattern that’s perfect for beginners and for anyone who loves making charming, colorful amigurumi pieces. Whether you’re crocheting for a little one, decorating a nursery, or just adding some cuteness to your collection, this tiny jellyfish is sure to make your heart melt.
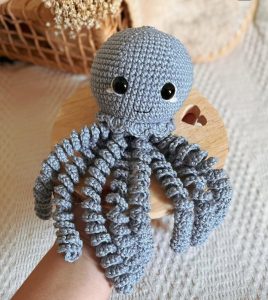
This lovely design features a round, soft head, curly tentacles, a wavy collar, and even two sweet hat options so you can personalize your jellyfish exactly the way you like. Everything is crocheted with simple stitches, making this pattern very accessible even if you’re just starting your crochet journey. With a little patience and some cheerful yarn colors, you’ll have a small ocean friend in no time!
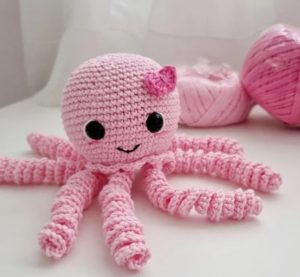
The pattern is fully worked with US crochet terms and uses lightweight cotton yarn to create a soft and bright finish. The octpous begins from the top of the head and is crocheted downward, forming a rounded body that is gently stuffed as you go. The lovely frilled collar uses front-loop-only stitches to create a delicate, flowy look, and the tentacles are made with long chain curls that spring into shape on their own.
You can choose between using safety eyes or embroidering the facial features, which is a wonderful option for baby-safe toys. The final touches, a tiny bow tie and a choice of two different hats—add personality and charm to your finished octopus. One hat has a playful pom-pom top, while the other has a simple sailor-style brim with cute little straps. No matter which route you choose, your octopus will turn out irresistibly sweet.
The instructions are clear and step-by-step, making this a great pattern for building confidence with increases, decreases, color changes, and decorative details. Plus, because the body is so small, this project works up very quickly. It’s perfect for last-minute gifts or for crocheters who enjoy creating several versions in different colors.
Customization Ideas
One of the sweetest things about this little octopus is how easy it is to personalize. You can:
-
Change the colors for different moods or themes
-
Make longer or shorter tentacles
-
Add embroidered cheeks, a bigger smile, or tiny freckles
-
Swap the bow tie for a little flower or heart
-
Make multiple hats and switch them whenever you want
Each octopus will have its own personality, and they look adorable hanging on a mobile, decorating shelves, or being cuddled by tiny hands.
Materials You’ll Need
-
Any lightweight yarn in your favorite colors.
-
The sample uses light green, blue, white, red, and pink cotton yarn.
-
A thinner black thread for embroidering facial features.
-
A 2 mm crochet hook (or the size that works best with your yarn).
-
7 mm safety eyes, if you prefer them over embroidery.
-
Polyester fiberfill stuffing.
-
Scissors, yarn needle, stitch marker, and a long needle for assembling the details.
-
Optional: small rattle insert for a baby-safe toy.
Stitch Abbreviations (US Crochet Terms)
MR – Magic Ring
ch – chain
sc – single crochet
hdc – half double crochet
dc – double crochet
tr – treble crochet
inc – increase (2 sc in the same stitch)
dec – decrease (single crochet 2 stitches together)
sl st – slip stitch
st / sts – stitch / stitches
BLO – back loop only
FLO – front loop only
Rnd – round
Skill Level
Easy
Size
Roughly 6–7 cm tall without tentacles.
General Notes
-
For babies or toddlers, it’s safest to embroider the eyes instead of using plastic ones.
-
When switching colors, change yarn in the very last pull-through of the last stitch of the current color.
-
Add stuffing gradually so the shape stays firm and round.
OCTOPUS HEAD & BODY
Start with any yarn of your color choice. (We use here light green)
Rnd 1: Work 6 sc into a MR (6)
Rnd 2: Work an increase in each stitch (12)
Rnd 3: Repeat (1 sc, inc) all the way around (18)
Rnd 4: Repeat (2 sc, inc) (24)
Rnd 5: Repeat (3 sc, inc) (30)
Rnd 6: Repeat (4 sc, inc) (36)
Rnd 7: Repeat (5 sc, inc) (42)
Rnd 8: sc around (42)
Rnd 9: Repeat (6 sc, inc) (48)
Rnd 10: sc around (48)
Rnd 11: Repeat (3 sc, inc) × 12 (60)
Rnd 12–18: sc around for 7 full rounds (60)
If you’re using safety eyes, place them between Rounds 15 and 16, leaving about 8 stitches between them.
Rnd 19: (13 sc, dec) repeated 4 times (56)
Rnd 20: (5 sc, dec) repeated 8 times (48)
Rnd 21: (4 sc, dec) repeated 8 times (40)
Switch to blue yarn.
Rnd 22: sc around (40)
Switch back to light green.
Rnd 23 (BLO): (3 sc, dec) × 8 (32)
Rnd 24: (2 sc, dec) × 8 (24)
Rnd 25: (1 sc, dec) × 8 (16)
Rnd 26 (BLO): dec × 8 (8)
Stuff the body firmly so it stays nicely shaped.
Fasten off, pull the opening closed, and hide the tail.
FRILLED COLLAR
Turn the octopus upside down.
Locate Round 22, where the front loops (FLO) of the blue stitches were left unworked.
Attach blue yarn to one of those FLO stitches.
If your octopus has safety eyes, begin the collar centered beneath them.
Work the following sequence around the entire round:
- sl st,
- sc,
- hdc,
- (dc + tr in the same stitch),
- (four tr in the same stitch),
- (tr + dc in the same stitch),
- 2 dc in the same stitch repeated four times,
- 20 dc evenly across,
- 2 dc in the same stitch four more times,
- (dc + tr in the same stitch),
- (four tr in the same stitch),
- (tr + dc in the same stitch),
- hdc,
- sc,
- sl st to join.
Switch to white yarn.
Work one round of slip stitches all the way around to create a clean edge.
Fasten off and weave in the yarn ends.
LITTLE BOW TIE (RED)
Begin with a magic ring.
Inside the ring, repeat TWICE:
- ch 8
- Starting in the 2nd ch from the hook:
2 sl sts, 3 sc, 2 sl sts - Finish with a sl st back into the ring.
Pull the ring tight.
Cut yarn, leaving a tail long enough to sew onto the body.
TENTACLES
Feel free to add as many tentacles as you like, and vary the length.
For this rewritten pattern, we will make five curled tentacles.
Turn the octopus upside down.
Find the FLO stitches of Round 25, and join light green yarn.
For each tentacle:
- sl st into the FLO loop
- ch 55
- Starting in the 2nd ch from the hook: work 3 sc into every chain to make a springy curl
- sl st back into the same FLO loop
- ch 2 to move to the next tentacle
Repeat this sequence five times.
Finish with a sl st, then fasten off and hide the tails inside the body.
HAT OPTION 1 (with Pom-Pom Top)
Start with white yarn.
Rnd 1: 6 sc in MR (6)
Rnd 2: inc around (12)
Rnd 3: (1 sc, dec) × 4 (8)
Switch to blue yarn.
Rnd 4 (BLO): sl st around (8)
Rnd 5 (BLO): inc in every stitch (16)
Rnd 6: (1 sc, inc) around (24)
Rnd 7: (3 sc, inc) × 6 (30)
Rnd 8: (dec, 3 sc) × 6 (24)
Switch to red yarn.
Rnd 9 (BLO): sl st around (24)
Rnd 10 (BLO): sl st around (24); join with a sl st.
Cut yarn, leaving a long tail for sewing the hat onto the jellyfish.
HAT OPTION 2 (Sailor Hat Style)
Start with white yarn.
Rnd 1: 8 sc in MR (8)
Rnd 2: inc around (16)
Rnd 3: (1 sc, inc) × 8 (24)
Rnd 4–6: sc around (24)
End with a sl st and ch 1.
Turn your work (this creates the shaping for the bottom edge).
Place a stitch marker at this turning point.
Rnd 7 (BLO): (5 sc, inc) × 4 (28)
Resume working normally in the round.
Rnd 8: sc around (28)
Switch to blue yarn.
Rnd 9 (BLO): sl st all the way around (28) and join with a sl st.
Leave a long tail for sewing.
SAILOR STRAPS FOR HAT 2
To make the straps:
- ch 14 for the first strap
- With the hat upside down, attach the strap
- Then work sc across the FLO stitches from Round 6 (24 sc)
- sl st to join
- ch 12 for the second strap
Cut yarn and secure the ends.
ASSEMBLY
- If you prefer long straight tentacles instead of curls, you can simply make chain loops and stitch them to the bottom.
- Embroider cheeks, eyes, and a small smile with colored thread or yarn.
- Sew the bow tie in place.
- Attach the hat you chose. For the second hat style, you may lightly stuff the tip so it holds its shape.
Your completely adorable octopus is ready to be loved!
VIDEO TUTORIAL
Thank you so much for visiting Handmade Learning Here today! I truly hope this cheerful octopus pattern brings you joy and inspires you to keep exploring new stitches and projects. Your support means the world to me, and I’d love to see you back here soon for more beginner-friendly tutorials, patterns, and creative ideas. Don’t forget to take a peek at the other patterns on the site, there’s always something new to make with love. 💗🧶
See you next time, and happy crocheting!