Mile a Minute Blanket
Mile a Minute Blanket
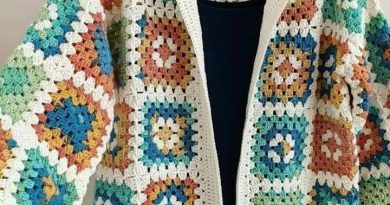
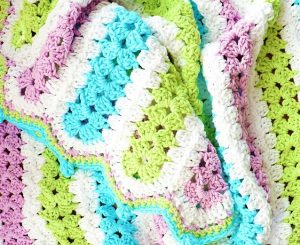
Hello, my dear reader! Welcome to another article on our lovely blog Handmade Learning Here. Today, I’m excited to share with you a very elegant and charming pattern. It’s the Mile a Minute blanket pattern. This blanket features a beautiful design and is a perfect piece for gifting, whether for babies or to add a touch of charm to your living space.
This pattern isn’t too difficult to master; you’ll be able to create your beautiful blanket perfectly with just a few steps that we’ll make available to you in a free tutorial. You’ll see, there’s no mystery to it. You’ll surely do a beautiful job.
The mile a minute crochet technique is just wonderfully named for its speedy progress, dear. Unlike those traditional blanket patterns that require endless rows of stitching, this method involves crafting darling little strips or panels of crochet, which we then join together ever so delicately to form the blanket. Oh, and these strips, they often boast a charming combination of stitches and patterns, resulting in such a visually intricate design, all while keeping things pleasantly simple, my dear.
Now, to get started:
To embark on your mile a minute crochet blanket, my darling, gather your materials, won’t you? You’ll need yarn in the loveliest colors you fancy, and of course, don’t forget an appropriate crochet hook size. Oh, and do be sure to choose a hook size that matches the weight of your yarn, dear, to ensure the perfect tension and drape.
Well, darlings, let’s talk about selecting a pattern or design for your lovely crochet strips. You have a plethora of options – from timeless classics like single crochet and double crochet to more intricate stitches such as shells or clusters. It’s all about playing around with different combinations to create that delightful texture and visual interest.
Once you’ve settled on your pattern, it’s time to dive into crocheting those strips, my dears. Work diligently in rows until each strip reaches your desired length. Oh, and don’t forget to leave a little tail at the start and end of each strip for our joining adventure later on.
Now, onto the assembly of your delightful blanket, sweethearts:
Once you’ve crafted enough strips to cover the width of your envisioned blanket, it’s time to bring them all together. Lay out your precious strips in your desired arrangement, making sure those patterns align flawlessly. Then, using your favorite joining method – whether it’s a dainty slip stitch or a cozy whip stitch – connect those strips along their edges with grace and care. Remember, my lovelies, maintaining even tension is the secret ingredient for achieving that impeccable finish.
MATERIALS NEEDED:
- Medium weight (DK/8ply) yarn
7 ounces (200 grams) of white
3.5 ounces (100 grams) of a contrasting color
- Size G (4mm) crochet hook
Shell Stitch Pattern: 3 double crochet (dc), 2 chain (ch), 3 double crochet (dc)
Instructions:
Pattern:
Row 1: Using white yarn, chain 9.
Row 2: In the 6th chain from the hook, work the shell stitch: (double crochet 3, chain 2, double crochet 3), chain 3. Skip 2 chains and slip stitch into the last remaining chain to join. Chain 3 and turn your work, so you are now working into the bottom chains (upside down).
Row 3: Work a shell stitch: (double crochet 3, chain 2, double crochet 3). Work 1 double crochet into the 3rd chain. Chain 3, turn your work.
Rows 4-45: Repeat Row 3.
Border: With a contrasting color, join the yarn at a convenient place and chain 3. Work double crochet stitches all around the strip, adding extra double crochets at the points of the strip.
Joining Strips: After completing 10 strips with the contrasting yarn (or as many as needed for your project), join the strips with white yarn using a single crochet join. Refer to the provided video clips for demonstrations of the flat single crochet join and another preferred method.
Final Border: Once all strips are joined as one piece, work a double crochet border around all four sides, adding multiple double crochets at the corners and points for a lovely finish to the blanket.
VIDEO TUTORIAL
Dear reader, we want to make available here for you a lovely version of this Mile a Minute Blanket pattern in video tutorial format, which you can follow perfectly. The video tutorial was made by the YouTube channel CrochetItForward and you can watch it below:
In summary, the mile-a-minute crochet blanket provides a wonderful blend of swiftness and artistic expression for crochet enthusiasts at any skill level.
So gather your hooks and yarn, and allow your creativity to soar as you embark on your mile-a-minute crochet journey!