
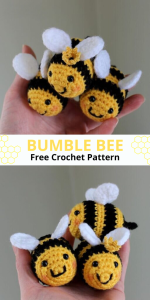
Crochet Bumble Bee
Hello, my dear crocheting friends. Today I want to bring you something new. In fact, it is an item that has been used for a long time, but lately it has become very popular. It’s a cute pattern that can be used in different ways, whether as decoration or a toy for dogs and children. These are adorable crochet bees (the famous tiktok bee pattern).
Amigurumis, small crochet dolls, have won hearts around the world with their cuteness and artisanal appeal. In this article, we will dive into a fun learning journey as we create a charming crochet bee to add a special touch to your handmade universe. Let’s explore the basic steps, techniques and tips to ensure your little bee becomes a successful project.
The crochet bee amigurumi pattern can be perfect to place in your baby’s room, on top of the crib or also to use as keychains. It’s quite an attraction for children, I’ve even seen people use it as a decoration on Christmas trees. If you are a bee lover, this is the ideal pattern for you.
Crochet Bumble Bee – Versatility in Colors:
Use whatever colors you want, you can make your bees pink, blue, or even use several colors. If you want to follow reality, use the colors yellow and black and your crochet bee will be perfect. Each project is an opportunity to create a unique personality, whether through the choice of colors, facial expressions or small details that bring these yarn creatures to life.
A vibrant and diverse palette of colors allows artisans to customize their bees according to their creative vision. From soft tones to bold combinations, the options are as varied as nature itself.
Meaningful Gifts:
Crochet bees are very symbolic and meaningful gifts. When you gift someone one of these creations, you are not only giving a handcrafted object, but also sharing a message of affection and appreciation for nature.
It is not a difficult project to do, with a few steps that we will make available here in PDF you will be able to make your perfect bees.
Let’s go step by step:
CROCHET BUMBLE BEE PATTERN
MATERIALS:
• Crochet hook size 2.5
• Yarn needle
• Scissors
• Crochet yarn in 4 chosen colors (We will call it COLOR A, B, C and D)
• Stuffing material
• 6 mm black safety eyes
STEP BY STEP
Row 1 – Start with color A and make 6 single crochet stitches in a magic ring (a loop) – you should have 6 stitches.
Row 2 – Increase in each stitch (double the stitches) – now you have 12 stitches.
Row 3 – *Single crochet in 1 stitch, then increase in the next stitch ** – repeat from * to ** 6 times in total (18 stitches).
Row 4 – *Single crochet in 2 stitches, then increase in the next stitch ** – repeat from * to ** pattern 6 times (24 stitches).
Row 5 – *Single crochet in 3 stitches, then increase in the next stitch** – repeat this pattern (from * to **) 6 times (30 stitches).
Row 6 – Single crochet in each stitch.
7-10. Switch to color B and continue with single crochet stitches. Pause crocheting to place safety eyes between rounds 5 and 6, making sure there are 8 stitches between the eyes.
11-13. Switch back to color A and continue with single crochet stitches.
14-17. Switch to color B and continue with single crochet stitches.
Row 18 – Switch to color A and continue with single crochet stitches.
Row 19 – *3 sc, then decrease**– repeat this pattern ( from * to **)6 times (24 stitches).
Row 20 – *2 Single crochet, then decrease** – repeat this pattern 6 times (18 stitches).
Stop crocheting to start stuffing the bee. You can add a small parcel of dried lavender if you like, but it’s optional.
Row 21 – *1 Single crochet, then decrease** – repeat this pattern 6 times (12 stitches).
- Decrease in each stitch until you have 6 stitches left.
Finish off, leaving a long tail for sewing the last stitches together.
WINGS (make 2):
Start with color C and make 6 single crochet stitches in a magic ring (6).
Increase by 2 stitches in each round (12 in total).
After completing the wings, create a slip stitch, fasten off, and leave a long tail for sewing them onto the bee.
ASSEMBLING:
Sew the wings on top of the bee, positioning them between the two black stripes with a gap of 2 rows to allow space for the chain.
Chain 40, leaving a tail long enough to thread through the bee. Complete the chain by joining the first stitch with a slip stitch. Use the two long tails to sew the hanging loop onto the body.
To add details to the bee’s face:
Using three strands of thread from color D, sew two pink dots two rows down from the eyes on each side.
Use three strands of thread from color B to create the mouth by forming a V shape at the front of the face.
This pattern is very easy to make and you can access the PDF pattern made by the lovely Catharina U (Catknit). You can access it below:
Access the Free Bumble Bee PDF
VIDEO TUTORIAL
Dear reader, we always like to make a tutorial video available so that our readers can better follow the tutorial, or for those who prefer this form of learning. The video available is from the Hooked by Robin channel and you can watch it below:
Conclusion:
Amigurumi crochet bees are not just handmade objects; they are loving representations of a connection between human creativity and nature. Each crochet stitch becomes a statement of admiration for the beauty of bees and the vital role they play in our ecosystem. May these little amigurumis continue to buzz with joy in the hearts of crochet lovers, inspiring a renewed appreciation for life in miniature and the treasures that crafts can create.
So, my friend crocheter, what do you think of this beautiful pattern? I hope that you enjoyed. Send this article to your 5 best contacts right now, this way other people can make beautiful crochet bees too.
Now that your little bee has come to life, feel free to share your creations on the Handmade Learning Here blog and inspire other crochet enthusiasts to embark on their own amigurumi journeys. We love reading the comments you leave here. Have fun crocheting! See you soon. XoXo
Just what I need to keep myself occupied and relaxed