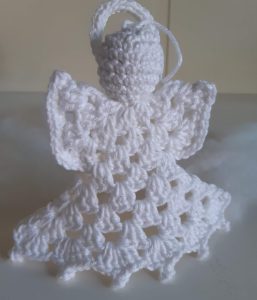
Crochet Angel Ornament
Hello my lovely readers. How are you feeling? Hope you are doing very well. I am always very happy to have you here so that together we can share and learn new crochet techniques. We love festive seasons and you? I love organizing the preparations and getting everything ready for parties, love seeing my house decorated. Well then, if you, like me, also like to put together a beautiful Christmas tree, no matter how small it is, it doesn’t hurt to make a decoration, don’t you think? Usually some people find it too expensive to decorate their home, as this problem is gone. I brought here for you an innovative way to decorate your home, with beauty, elegance and that will cost you very little. What’s more, it’s going to be something you’re going to have fun doing. It is about crochet angel ornament pattern for christmas.
Angels are very beautiful and have a very special symbolism, especially on dates like Christmas. But it doesn’t mean that with these ornaments you need to limit yourself to Christmas, you can use them as decoration whenever you want and for whatever reason you think it’s coherent. It is a very beautiful and delicate pattern that has a refinement, in addition it is very easy to be done, you will really enjoy your time working with it, sit down one morning to make them and you will see that in a blink of an eye you did it. several.
You can use white, light-toned colors, or whatever color you prefer. You don’t have to limit yourself, let your creativity flow and do as you think is best, if you want you can also make a combination of colors, making the piece totally unique and exclusive. This ornament will make your decoration much more beautiful and special, it will give an intimate and exclusive touch because it was something you spent your time doing and dedicating love.
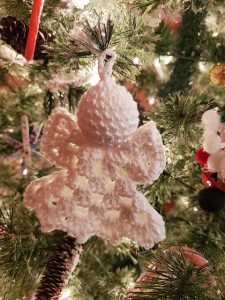
No doubt it is also a nice gift for festive dates. Make some for yourself, your family and friends. They will definitely like it! These beautiful angels add a completely harmonious touch to any Christmas tree. You can also use your creativity and put some rhinestones, pearls, pendants on the pieces that you think match. Its decoration will certainly be different and will draw the attention of everyone who sees it, as it is something totally unique and at the same time modern.
It’s done quickly, uses an open granny stitch pattern without too many secrets, if you’re not used to it, watching the available video and practicing will get you the hang of it quickly. The open granny stitch pattern allows the Christmas lights to shine through the piece, giving it an appearance that it is lighting up from the inside. Very beautiful, don’t you think? The free pattern is provided by Stitches ‘n scraps and is written very clearly and is easy to understand.
We also make available a video tutorial so you can better follow the pattern and understand the execution. Always recommended to our readers to watch the videos. Take some yarn that you have left over from some other work and be available there and test it along with the video, do and undo as many times as you need and in your time, so when you do it for real you will have a lot of practice.
SUPPLIES
- Approximately 40-50 yards of worsted weight yarn
- A crochet hook in size H / 5 mm, or the appropriate size to achieve the desired gauge
- A yarn needle
- A stitch marker or scrap of yarn
- Fiberfill stuffing (enough to stuff the head to your preference)
STITCH ABBREVIATIONS:
(US TERMS)
Chain: CH
Single Crochet: sc
Double Crochet: dc
Invisible Increase (Refer to Special Stitches): INC
Invisible Decrease (Refer to Special Stitches): dec
Space: sp
Chain Space: ch-sp
Stitch(es): st(s)
Round: rnd
Right Side: RS
Skill Level:
Intermediate – proficiency in executing increases, decreases, and picots.
Size:
Standing at approximately 6 inches tall, excluding the loop. Feel free to select a diferente yarn or thread size for a larger or smaller angel; however, please be aware that the required yardage will adjust accordingly.
Gauge:
Utilize the head as your gauge reference. Prior to adding stuffing, the head should have approximate dimensions about 2 inches tall and 2.5 inches wide. While precision in gauge is not essential, ensure that your stitches are snug enough to prevent the stuffing from escaping.
STITCHES
Invisible increase (inc): Begin with a single crochet (sc) in the back loop only of the designated stitch, then proceed to single crochet (sc) in both loops of the very same stitch.
Invisible decrease (dec): Start by inserting your hook into the front loop only of the following next 2 stitches, then yarn over and draw up a loop, followed by yarning over again and pulling through both loops on the hook.
This presents an alternative method to create a decrease in crochet, distinct from the conventional single crochet 2 together (sc2tog) stitch. If you find it more convenient, you can opt for the standard sc2tog technique instead.
Picot: Ch 3, slip stitch into the top of the stitch you created previously.
PATTERN
Begin with an 8-inch starting tail.
Create a loop for hanging: Ch 6, then join them with a slip stitch to form a circle.
- HEAD
The entire angel is crafted on the right side, refrain from flipping your work. The head is formed using continuous rounds. Indicate the initial stitch of each row and refrain from connecting at the end of the row.
Round 1 (Right Side): Ch 1, make 6 single crochets in the same chain where you joined the loop. (6 single crochets)
Fold the loop forward to continue working around it.
Round 2: Increase in each stitch around. (12 single crochets)
Round 3: (Increase in the next stitch, single crochet in the next stitch) around. (18 single crochets)
Rounds 4-7: Make a single crochet in each stitch around.
Round 8: (Decrease, single crochet in the next stitch) around. (12 stitches)
Round 9: Decrease in each stitch around, then slip stitch in the first stitch of the round. (6 stitches)
You can choose to remove the stitch marker if desired.
2. BODY
Ch 3 at the beginning of a rnd counts as a dc.
Round 10: Chain 3, (2 double crochets, chain 2, 3 double crochets) into the first stitch, chain 1, (3 double crochets, chain 2, 3 double crochets) into the next stitch, chain 1, work 3 double crochets into the following stitch, then [chain 1, (3 double crochets, chain 2, 3 double crochets) into the next stitch] twice, chain 1, work 3 double crochets into the next stitch, chain 1, and finally, join with a slip stitch to the first stitch. (30 double crochets, 4 chain-2 spaces, 6 chain-1 spaces)
For remainder of body, work only into ch-sps, skipping sts unless otherwise indicated.
Round 11: Begin by slip stitching (sl st) in the next 2 stitches and then in the first chain-2 space (ch-2 sp). Next, chain 3, and work (2 double crochets, chain 2, 3 double crochets) all within the same chain-2 space. Now, proceed as follows: *Chain 1, work 3 double crochets in the next chain-1 space, chain 1, then work (3 double crochets, chain 2, 3 double crochets) in the next chain-2 space, [chain 1, 3 double crochets in the next chain 1 space] twice**. ch1, (3dc, ch2, 3dc) in the next ch-2 sp. Repeat from * to **, and after the final repeat, chain 1. Conclude the round by joining with a slip stitch to the first stitch. Don’t forget to place a marker in the last chain-1 space created. (42 double crochets, 4 chain-2 spaces, 10 chain-1 spaces)
Stuff head. Ensure that the beginning of the tail protrudes through the stuffing at the neck. Then, use the starting tail to sew the neck closed.
Round 12: Skip the next 4 chain spaces, then in the next chain-1 space, perform a slip stitch, chain 3, and make 2 double crochets. After that, (chain 1 and work 3 double crochets in the next chain-1 space) twice. Skip the next 4 chain spaces, chain 2, and work (3 double crochets in the next chain-1 space followed by a chain 1) twice. Complete the round by working 3 double crochets in the last chain-1 space, chain 2, and join with a slip stitch to the first stitch. This round will result in a total of 18 double crochets, 2 chain-2 spaces, and 4 chain-1 spaces.
Round 13: Begin by Chain 3, then make 2 double crochet stitches in the same ch-2 space (the last one before the join). Next, (chain 1, make 3 double crochet stitches in the next ch-1 space) twice. After that, work (3 double crochet stitches, chain 2, 3 double crochet stitches) in the following ch-2 space. Then, (chain 1, make 3 double crochet stitches in the next ch-1 space) twice. Chain 1, create 3 double crochet stitches in the initial ch-2 space, chain 2, and finally, join with a slip stitch to the first stitch. This completes the round with a total of 24 double crochet stitches, 2 ch-2 spaces, and 6 ch-1 spaces.
Start round 13 in the same chain space you just finished making (the last ch-sp from round 12).
Round 14: Chain 3. Next, work 2 double crochets in the same chain-2 space. Afterward, (chain 1, work 3 double crochets in the next chain-1 space), repeat this sequence 3 times. Then, in the next chain-2 space, create (3 double crochets, chain 2, 3 double crochets). Subsequently, (chain 1, work 3 double crochets in the next chain-1 space), repeat this sequence 3 times. Finally, complete the round by working 3 double crochets in the initial chain-2 space, Chain 2, and joining with a slip stitch to the first stitch. This round yields (30 double crochets, 2 chain-2 spaces, 8 chain-1 spaces).
Edging along the bottom:
Round 15: Begin with a chain of 3, double crochet in the same chain-2 space. In each chain space around, work (3 double crochets, picot, 2 double crochets). Complete the round by working (3 double crochets, picot) in the initial chain space. Join with a slip stitch to the first stitch, and then fasten off. This round should result in 50 double crochets and 10 picots.
Wing Edging:
Fold the wings in such a way that the skipped stitches and chain spaces from round 11 match up. You’ll notice that at the top of each wing, there will be one stitch that is by itself.
First Wing: Begin by attaching the yarn with a slip stitch in the marked space (located at the underarm) with the right side facing you. Continue working through both layers as follows: single crochet in the next 3 stitches, make 3 single crochets in the next chain-2 space, single crochet in the next 3 stitches, single crochet in the next chain-1 space, single crochet in the next stitch, and finish by slip stitching in the remaining single stitch at the top of the wing. Secure the yarn end and cut it. This completes the first wing, which consists of 11 single crochets.
Second Wing: With the right side facing you, attach the yarn by making a slip stitch in the single stitch located at the top of the wing. Continue working through both layers as follows: single crochet in the next stitch, single crochet in the next chain-1 space, single crochet in the next 3 stitches, make 3 single crochets in the next chain-2 space, single crochet in the next 3 stitches, and finally, slip stitch in the next chain-1 space. Secure the yarn end and cut it.
To finish, weave in all ends.
We really like to share with you all these different projects that we found so that we can have a very wide range of crochet work that can be done and exchange experiences with you. We strongly recommend that you watch the video tutorial from this wonderful Stitches n Scraps youtube channel to better follow the techniques on how to make a beautiful crochet angel ornament. We also recommend checking out the amazing content they have!
What did you think of this beautiful crochet angel ornament pattern? A great idea for decoration isn’t it? Tell us how you’re going to make these angel ornaments, what details look nice on them, and the best color choices you think should be used. We are always following your comments, we love to read them and they can also serve as an incentive for others who seek different opinions.
Maybe you might like this beautiful project too: Crochet Slippers with Soles
If you have any questions or suggestions, don’t hesitate to let us know in the comments below, we are open for your comments and always looking at everything you say. We really appreciate your presence, we love this moment we have to exchange knowledge about crochet and crafts and for this special space we have here.
We wish your day to be happy and that many good things happen to you! Grab your hooks and let’s crochet! See you soon.