Garden Quilts
There is something truly magical about garden-inspired quilts. The calm color palettes, the soft geometric movement, and the comforting feeling they bring into a home make them especially beloved among quilters. The “Garden Quilts” style captures that feeling beautifully, blending floral inspiration with structured patchwork to create a design that feels peaceful, timeless, and wonderfully cozy. Inspired by blooming gardens, seasonal landscapes, and classic quilting traditions, this type of quilt creates a stunning project for anyone who enjoys elegant and comforting sewing projects.
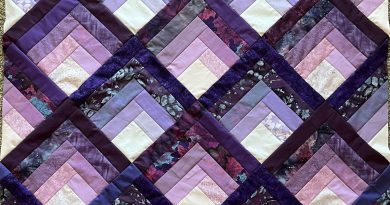
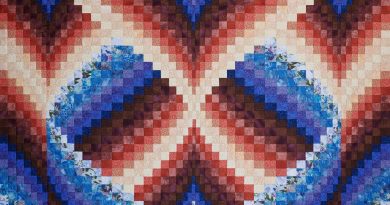
One of the loveliest things about this quilt style is the balance between softness and geometry. The repeating shapes create movement across the quilt top, while carefully chosen fabrics, deep greens, soft creams, charcoal tones, icy blues, or rich burgundy shades, help create a warm and sophisticated atmosphere. Many quilters especially enjoy garden-inspired projects because they feel comforting and inviting while still looking elegant enough to display all year long. Quilting communities often describe these quilts as timeless seasonal pieces that become treasured decorations and cozy family favorites for years to come.
This style of quilt is especially appealing because it works beautifully for many skill levels. Confident beginners can enjoy learning precision piecing and fabric coordination, while experienced quilters can explore more advanced techniques like careful color placement, layered borders, and intricate quilting textures. Some garden-inspired quilts are designed using strip piecing, while others incorporate floral blocks, star motifs, or layered geometric arrangements that resemble pathways through a blooming garden.
When selecting fabrics for a quilt like this, contrast becomes very important. Pairing dark fabrics with soft neutrals allows the shapes to stand out clearly and gives the quilt depth and movement. Prints featuring florals, leaves, branches, berries, vines, or subtle textures can add visual richness without overwhelming the design. Many quilters also enjoy mixing modern solids with traditional floral prints to create a look that feels both contemporary and classic at the same time.
Another reason quilters love garden-inspired quilts is the emotional feeling they create. Quilting has always been connected to comfort, warmth, and home, and floral quilts naturally enhance those feelings. A handmade quilt draped across a chair, folded at the foot of a bed, or gifted to someone special carries a sense of care that machine-made items simply cannot replicate. Every carefully sewn seam becomes part of a story stitched slowly over time.
For beginners, one of the best ways to approach a quilt like this is to work section by section rather than focusing on the entire quilt at once. Organizing fabrics beforehand, pressing carefully after each seam, and maintaining consistent seam allowances will help the quilt come together beautifully. Taking your time is part of the process, quilting has never been about rushing. In fact, many quilters describe the repetitive motion of piecing as peaceful and deeply relaxing.
The quilting stage itself offers another opportunity for creativity. Simple straight-line quilting can give the project a clean modern appearance, while free-motion quilting with swirls, vines, leaves, or floral-inspired stitching can add softness and movement across the surface. Even minimal quilting can dramatically enhance the texture and coziness of a quilt like this.
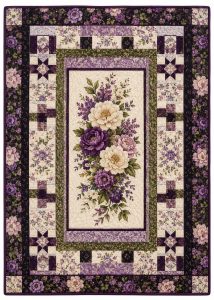
This quilt style is perfect for quilters who love traditional elegance with a cozy seasonal touch. The structured borders create beautiful movement around the center panel, while the layered fabrics add richness and depth without making the construction feel overwhelming for beginners. Even though the finished quilt looks intricate and sophisticated, the piecing itself is very approachable when taken step by step.
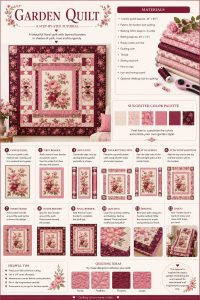
The Garden Quilt features:
- a large decorative centerpiece
- layered inner and outer borders
- coordinating side panels
- balanced geometric framing
- festive floral and winter-inspired fabrics
The finished design creates a beautiful throw-size quilt that works wonderfully as:
- a winter decoration
- a holiday throw blanket
- a guest room quilt
- a handmade family heirloom
- a thoughtful seasonal gift
One of the loveliest things about this quilt is how dramatic it appears while still using mostly straightforward quilting techniques.
Choosing Fabrics
This style of quilt becomes especially beautiful when fabrics are chosen with strong contrast and warmth in mind.
Traditional winter-inspired palettes may include:
- deep red
- pine green
- cream
- black
- gold accents
- floral holiday prints
But dear friend, do not feel limited.
You can also create gorgeous versions using:
- icy blues and silver
- sage green and ivory
- burgundy and champagne
- soft farmhouse neutrals
- vintage-inspired florals
The beauty of quilting is making a project feel personal and uniquely yours.
Materials You Will Need
For a quilt in this style, gather:
- one large centerpiece fabric panel
- coordinating border fabrics
- accent fabrics
- backing fabric
- batting
- neutral thread
- sewing machine
- quilting ruler
- rotary cutter
- pins or clips
- iron and pressing surface
A walking foot can also be very helpful during quilting, especially for beginners.
Before You Begin
Press Your Fabrics First
My dear, this small step makes a tremendous difference.
Pressed fabrics give you:
- straighter cuts
- flatter seams
- more accurate borders
- easier assembly
Many quilting frustrations disappear simply by pressing carefully.
Check Your Quarter-Inch Seam
This quilt depends heavily on border accuracy.
Even small seam inconsistencies can slowly affect the final layout.
Before starting:
- sew a quick seam test
- measure carefully
- adjust if needed
That little bit of preparation saves so much trouble later.
Understanding the Quilt Layout
Think of this quilt like framing a beautiful winter painting.
The construction grows outward in layers:
- Center panel
- Inner borders
- Decorative side sections
- Outer borders
- Final framing strips
Working in stages makes the project feel calm and manageable.
And honestly?
That is one of the secrets to enjoying quilting.
Step 1 — Preparing the Center Panel
The center panel becomes the heart of the entire quilt.
Choose a large floral or winter-themed print and carefully trim it so the artwork feels balanced and centered.
When cutting:
- measure slowly
- double-check alignment
- leave clean edges
A beautifully centered panel instantly gives the quilt a polished appearance.
Step 2 — Adding the First Inner Borders
Now we begin framing the centerpiece.
Attach:
- side borders first
- top and bottom borders second
This keeps the quilt balanced and helps prevent stretching.
After sewing:
- press seams outward gently
- avoid pulling the fabric
At this stage, the quilt already begins looking elegant and refined.
Step 3 — Creating the Decorative Side Units
One of the prettiest features of the Frosted Garden Quilt is the decorative side framing.
Long strips of coordinating fabrics are sewn together to create:
- vertical accent units
- layered borders
- structured framing around the center
This is a wonderful beginner exercise for practicing:
- straight seams
- fabric alignment
- strip piecing
Sew slowly and let the machine do the work.
There is never a reason to rush quilting.
Step 4 — Constructing the Smaller Accent Units
Next, smaller horizontal units are created to connect the larger borders.
These shorter sections help:
- balance the design
- create movement
- frame the centerpiece beautifully
Lay your fabrics out before sewing.
Seeing everything arranged ahead of time helps prevent orientation mistakes.
And every experienced quilter has sewn something upside down at least once — so you are in very good company.
Step 5 — Building the Side Borders
Now the quilt begins looking dramatic.
The side borders combine:
- focal fabric squares
- decorative strip units
- coordinating prints
Carefully align seams before stitching.
Those extra few moments spent pinning carefully create a much cleaner finished quilt.
Step 6 — Assembling the Top and Bottom Borders
The top and bottom borders are assembled similarly using:
- feature fabrics
- framed sections
- balanced color placement
At this point, your quilt top starts feeling substantial and complete.
This is usually the moment quilters begin getting very excited about the finished result.
Step 7 — Attaching the Borders
Attach:
- side borders first
- then top and bottom sections
Sew slowly and evenly.
Large quilt sections can shift more easily than small blocks, so gentle handling matters.
Once attached, the quilt suddenly transforms from separate pieces into a real quilt top.
And my goodness…
that moment never gets old.
Step 8 — Adding the Final Outer Frame
The final borders create the grand frame around the quilt.
This outer edge adds:
- visual balance
- richness
- structure
- a finished appearance
Long borders should always be pinned generously.
Avoid stretching the fabric while sewing.
Let everything feed naturally through the machine.
Step 9 — Quilting Your Project
Now comes the stage where texture brings everything to life.
Layer:
- backing
- batting
- quilt top
Then quilt as desired.
Beautiful quilting ideas for this style include:
- swirls
- holly vines
- snowflake motifs
- feather quilting
- simple straight lines
- floral free-motion quilting
Even very simple quilting looks lovely because the fabrics themselves already create so much visual interest.
Step 10 — Binding the Quilt
Binding is the final loving touch.
Join your binding strips carefully with diagonal seams for a smoother finish.
Fold:
- wrong sides together
- press thoroughly
Then sew around the quilt edges slowly and carefully.
And suddenly…
all those separate fabrics and seams become a finished quilt filled with warmth and personality.
Helpful Beginner Tips
Press Constantly
Good pressing improves:
- seam accuracy
- border alignment
- flatness
- overall appearance
Label Pieces If Needed
Large border quilts can become confusing quickly.
Sticky notes or small labels help enormously.
Measure Before Sewing Borders
Always measure the quilt itself rather than relying only on border strip length.
This prevents wavy borders.
Because the design style is timeless, these quilts often become cherished heirlooms used and loved for many years.
With the help of this tutorial, you can create a beautiful quilt inspired by the quiet charm of seasonal gardens and timeless patchwork traditions. Every stitch adds warmth, personality, and handmade beauty, turning your project into a special piece that can be enjoyed and treasured for many years to come.
Quilters frequently share how much joy they feel when creating garden-inspired projects, especially when experimenting with bold palettes, layered textures, and nature inspired fabrics. Many mention how these quilts become favorite home decorations and meaningful handmade gifts for loved ones.
In the end, a Garden Quilts project is much more than fabric and thread. It is a quiet celebration of warmth, creativity, patience, and beauty stitched together slowly by hand. With every carefully chosen fabric and every seam stitched into place, the quilt gradually transforms into something comforting, artistic, and deeply personal, exactly the kind of handmade treasure quilting has always been meant to create.
Now it’s your turn to bring your creativity to life with your own Garden Quilt project. Have fun choosing fabrics, experimenting with colors, and making the design uniquely yours. And of course, don’t forget to share your thoughts, ideas, and experience, your feedback is always appreciated and helps inspire even more beautiful quilting creations within our community.
This quilt tutorial was inspired by classic winter floral quilts, traditional holiday color palettes, and timeless layered border quilting styles. The article above presents an original educational interpretation created for learning, inspiration, and creative quilting enjoyment purposes.