How to Make a Cozy Puff Quilt
Welcome to our lovely blog Handmade Learning Here, dear friend! Today I’m so happy to share a project that feels like a warm hug stitched with fabric and love: the beautiful Puff Quilt. If you adore soft textures, romantic florals, and cozy handmade creations, this quilt may steal your heart the very moment you see it.
There’s something truly special about a handmade quilt that looks soft enough to nap on the moment it’s finished. Puff quilts, sometimes lovingly called biscuit quilts, have a charming little pillow effect that makes them extra cozy and comforting. They’re wonderful for baby blankets, reading corners, movie nights, or simply adding warmth and personality to your home. And the best part? You don’t need to be an expert quilter to make one.
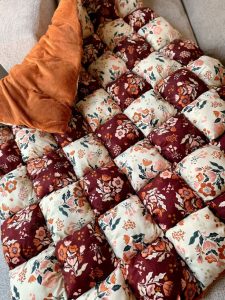
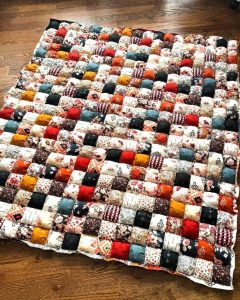
This lovely puff quilt combines delicate pastel fabrics with adorable dimensional squares that create the sweetest “puffy” effect. Every little section looks like a tiny fabric pillow, making the quilt feel extra soft, playful, and comforting. It’s the kind of project that instantly brings warmth to a room and makes everyone want to reach out and touch it.
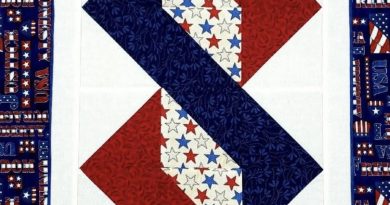
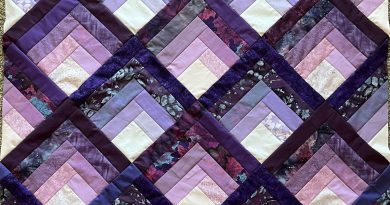
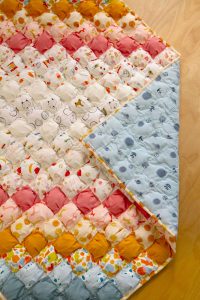
One of the most charming things about this Puff Quilt is its gentle palette of soft colors and prints. Light pinks, fresh greens, creamy yellows, and airy blues work together beautifully, giving the entire quilt a cheerful and peaceful appearance. Draped over a chair, spread across a bed, or used in a nursery, it brings such a cozy cottage-style feeling into the home.
Unlike traditional flat quilts, puff quilts have wonderful dimension and texture. Each fabric square is lightly stuffed before being sewn together, creating a plush and cloud-like finish. The result is not only beautiful to look at, but also incredibly cozy to use during chilly evenings or quiet afternoons with a good book.
This project is especially lovely for beginners who want to explore quilting in a fun and creative way. Since the quilt is made from individual puff blocks, it’s easy to work on little by little. It’s also a wonderful opportunity to use favorite fabric scraps, floral prints, ginghams, and soft vintage-inspired patterns.
Another sweet detail about this quilt is how customizable it can be. You can create a baby quilt, a lap quilt, or even make a larger version for a bed simply by adding more puff blocks. Some quilters like to sew decorative buttons into the center of each puff square for extra texture, while others prefer a simple stitched finish for a softer and safer design.
The Puff Quilt is more than just a sewing project, it’s the kind of handmade piece that becomes part of family memories. It feels nostalgic, comforting, and timeless all at once. Whether you’re sewing it for a child, a loved one, or yourself, every stitch adds a little more warmth and personality.
Gather your prettiest fabrics, prepare your sewing space, and enjoy the slow and comforting process of creating something truly special. Quilts like this remind us that handmade treasures are often the ones we cherish the longest
So pour yourself a cup of tea, pick out some pretty fabrics, and let’s sew something lovely together.
What Is a Puff Quilt?
A puff quilt is made from many small fabric pockets lightly stuffed to create a soft, puffy texture. Once all the little cushions are sewn together, they form a quilt that feels plush, warm, and wonderfully squishy.
Unlike traditional flat quilts, this style has beautiful dimension and texture that makes every square stand out.
Supplies You’ll Need
Before we begin, gather these materials:
- Cotton fabric for the top squares
- Lightweight fabric for the backing squares
- Polyester fiberfill stuffing
- Sewing machine and thread
- Fabric scissors or rotary cutter
- Pins or clips
- Ruler or measuring tape
- Iron and ironing board
- Quilt backing fabric
- Batting (optional)
- Binding fabric for finishing edges
Step-by-Step Instructions
Step 1 — Cut Your Fabric Squares
For each puff block, cut:
- One larger square for the top layer
- One slightly smaller square for the backing layer
The size difference is what creates the lovely puffed effect once the fabric is gathered.
Choose coordinating prints, florals, ginghams, or cheerful scraps for a playful look.
Step 2 — Create the Puff Shape
Place the smaller square centered underneath the larger square.
As you pin the edges together, gently create tiny folds or pleats in the larger fabric so it matches the smaller piece underneath. This extra fabric will become the “puff.”
Sew around the edges, leaving one side open.
Step 3 — Add the Stuffing
Turn the piece right side out if needed and add a small handful of fiberfill stuffing.
You want the block soft and fluffy — not overstuffed.
Once filled, sew the opening closed carefully.
Repeat this process until all your puff blocks are finished.
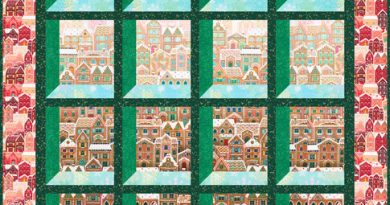
Step 4 — Arrange Your Quilt Layout
Lay all your puff squares out on the floor or a large table.
This is the fun part! Move colors and prints around until everything feels balanced and cozy to your eye.
You can create:
- Checkerboard patterns
- Rainbow layouts
- Soft neutrals
- Scrappy vintage looks
There’s no wrong way to make it beautiful.
Step 5 — Sew the Rows Together
Sew the puff blocks into rows first.
Then join the rows together slowly, making sure the seams stay aligned as neatly as possible. Because the blocks are stuffed, sewing can feel a little bulky — just take your time.
Step 6 — Add the Backing
Place your quilt backing fabric underneath the puff quilt top.
If you’d like extra warmth, add batting between the layers.
Smooth everything carefully and sew around the outer edges.
Step 7 — Finish with Binding
Add binding around the quilt edges to give your project a polished, finished look.
You can machine bind for speed or hand stitch for a softer handmade touch.
Helpful Tips
- Light stuffing creates a softer drape
- Thin fabrics help reduce bulk
- Clips often work better than pins for thick layers
- Press seams gently as you work
- Start with a small baby-size quilt if you’re a beginner
To help make your quilting experience even more enjoyable, I’ve put together two helpful downloadable PDFs for you. The first features a complete step-by-step Puff Quilt tutorial, while the second includes a printable layout guide along with fabric cutting instructions. Whether you’re just starting your quilting journey or simply searching for a cozy new project, these resources will guide you through every stage of creating your very own beautiful puff quilt.
VIDEO TUTORIAL
I’d like to share with you a beautiful video tutorial from the Sweet Country Living In Michigan channel. Watch it to better understand how to make your adorable puff quilt. Watch it and have a lovely result. Good luck!
A Quilt Full of Comfort
One of the sweetest things about puff quilts is how comforting they feel. They’re soft, playful, and full of personality, the kind of quilt people instantly want to touch.
Whether you make one for a child, a loved one, or yourself, it’s a project stitched with warmth from beginning to end.
And just like that, your beautiful quilting journey continues one soft stitch at a time. 💕 This Puff Quilt is the kind of project that fills a home with warmth, sweetness, and handmade charm, and we truly hope it inspires you to create something special with your own personal touch. Whether you choose delicate florals, cheerful pastels, or a completely unique color palette, this quilt is sure to become a treasured piece for many years to come.
Here at Handmade Learning Here, we absolutely love sharing cozy projects, creative inspiration, and lovely quilting ideas with wonderful readers like you. We invite you to explore our other articles and discover even more beautiful patterns, tutorials, and handmade treasures waiting for your next project. Be sure to visit us again soon, we are always bringing new ideas, fresh inspiration, and many different patterns to make your creative days even more special.