Folded Star
Hello, my dear reader, and welcome to our lovely blog, Handmade Learning Here. If you’re new here, welcome, dear friend. Today I want to share with you a truly beautiful pattern, something that will certainly leave you enchanted. It can be used to create lovely decorative pieces or to add a special touch to your quilts. This beautiful design is called the Folded Star pattern.
There’s something so heartwarming about fabric projects that combine beauty with tradition. The Folded Star pattern is one of those timeless creations that instantly makes a home feel warm, welcoming, and handmade with love.
With its layered folds and lovely dimensional design, this project may look intricate at first glance, but many folded fabric projects are actually built from simple repeated folds and careful placement, making them approachable even for beginners.
Whether displayed on a table, used as a decorative hot pad, or gifted to someone special, the folded star brings a charming vintage feel that never goes out of style.
Handmade Learning Here is a cozy little place for anyone who loves sewing, quilting, crochet, and the joy of making beautiful things by hand. Projects like this one remind us that creativity doesn’t have to be complicated, sometimes the loveliest pieces come from simple folds, soft fabrics, and a little patience.
So make yourself comfortable, gather your favorite fabric scraps, and enjoy learning about this beautiful folded star design.
What Makes the Folded Star So Special?
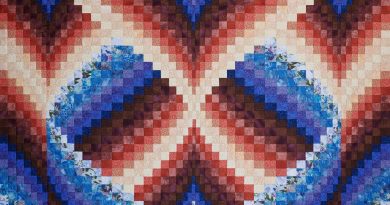
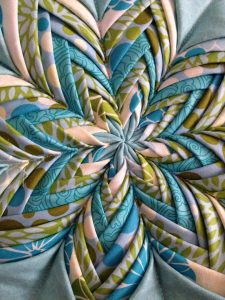
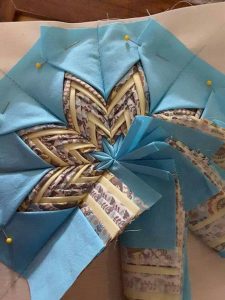
Unlike traditional quilt blocks that are pieced flat, the folded star creates dimension by layering folded pieces of fabric on top of one another.
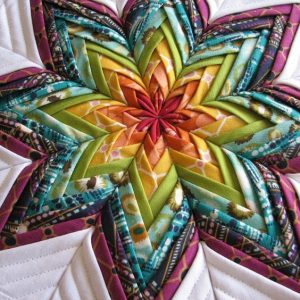
This gives the design a beautiful textured appearance that almost looks woven or sculpted. The overlapping folds catch light and shadow in such a lovely way, making the star appear rich and detailed even when made with simple fabrics.
Folded fabric stars have long been appreciated in decorative sewing and Scandinavian-inspired fabric crafts because of their elegant geometric look and cozy handmade charm.
A Wonderful Project for Beginners
One of the nicest things about this project is that it allows beginners to explore quilting and fabric folding without needing complicated piecing techniques.
Rather than sewing together many tiny shapes, the design is created step by step through folding, layering, and stitching fabric into place.
That slower process makes it feel calm and enjoyable, perfect for quiet afternoons spent sewing at home.
And because the folds repeat throughout the project, the pattern quickly becomes familiar and relaxing to work on.
Choosing fabrics and colors
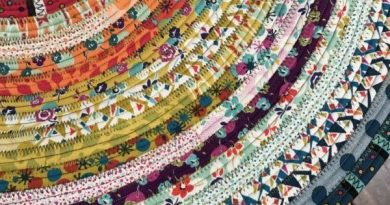
This pattern becomes especially beautiful when different colors and prints are combined thoughtfully.
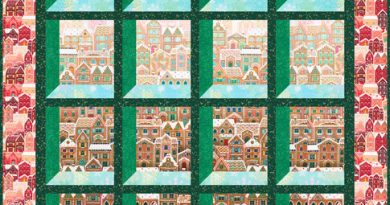
Soft florals create a sweet vintage feel, while holiday fabrics make the star perfect for seasonal decorating. Rich jewel tones can make the design feel elegant and dramatic, while soft neutrals create a more modern farmhouse look.
Many quilters also enjoy mixing solids and prints together to help the star layers stand out more clearly.
One of the joys of sewing projects like this is that every version turns out a little different — each one carrying its own personality and charm.
Skill Level
Beginner Friendly
Materials Needed
Fabrics
You will need:
- 1 fabric for the center
- 3 coordinating fabrics for the middle layers
- 1 fabric for the outer border
- Muslin or plain cotton for the foundation
- Backing fabric
Additional Supplies
- Cotton batting or heat-resistant batting
- Sewing machine
- Coordinating thread
- Hand-sewing needle
- Straight pins or clips
- Iron
- Scissors or rotary cutter
- Turning tool or chopstick for corners
Fabric Cutting Guide
Foundation
Cut:
- 1 square of muslin or plain cotton approximately 7 inches
Folded Layers
Cut:
- 4 small squares for the center layer
- 8 squares from each fabric used in the middle rounds
- 4 small squares and 4 larger squares for the final outer layer
Backing and Batting
Cut:
- 1 backing square
- 1 batting square slightly larger than the finished project
Before You Begin
Press all fabrics before cutting.
Crisp folds make this project much easier, especially for beginners.
One important thing to understand about Folded Stars:
The star shape is created by fabric folds and layering — not by piecing traditional patchwork shapes together.
Step 1 — Preparing the Foundation
Take the muslin square and create guide creases.
- Fold the square in half horizontally and press.
- Open it.
- Fold vertically and press again.
- Open once more.
- Fold diagonally corner to corner and press.
- Repeat on the opposite diagonal.
When unfolded, the square should have:
- a cross crease
- and diagonal “X” crease lines
These markings help keep every layer centered and symmetrical.
Step 2 — Folding the First Pieces
Take one fabric square from the center fabric.
To fold:
- Fold the square in half to form a rectangle.
- Press well.
- Bring each top corner down toward the center fold line.
- The piece should now resemble a folded triangle or arrow shape.
Repeat until you have 4 identical folded units.
Step 3 — Building the Center Star
Place the folded pieces onto the center of the foundation square.
Arrange them:
- top
- bottom
- left
- right
The pointed ends should meet in the middle.
Use the crease lines on the foundation to help keep everything straight.
Once aligned:
- pin the pieces in place
- sew a basting stitch around the outer edges
Add a few small hand stitches near the center points if needed to keep the folds flat.
Step 4 — Adding the Next Layers
Now repeat the same folding method with the next fabric.
This time you will create 8 folded units.
Placement Tips
Position the new folded pieces:
- between the points of the first layer
- evenly spaced
- with the folds facing upward
Start with:
- top
- bottom
- left
- right
Then fill in the diagonal positions.
Pin carefully before stitching.
After positioning the full round:
- baste around the outer edges again
- secure the points if necessary
Step 5 — Continue Layering the Star
Repeat the same process for each additional fabric round.
Each layer creates:
- more depth
- more texture
- and a more detailed star effect
Helpful beginner tip:
Press every folded piece before attaching it.
Sharp folds make the finished star look much cleaner and more professional.
Step 6 — Creating the Outer Border
For the final round:
- place the smaller folded pieces on the straight sides
- place the larger folded triangles on the corners
Make sure all raw edges align with the foundation square.
Pin well and baste around the entire outer edge.
Trim away any excess fabric extending beyond the foundation.
Step 7 — Assembling the Project
Layer the pieces in this order:
- Batting
- Backing fabric right side up
- Folded Star piece right side down
Pin all layers together.
Sew around the edges using a seam allowance of about ¼ inch, leaving an opening for turning.
Step 8 — Turning and Finishing
- Trim excess bulk from the corners.
- Turn the project right side out through the opening.
- Carefully push out the corners using a turning tool.
- Press the entire piece flat.
- Fold the raw edges of the opening inward.
- Hand stitch the opening closed using an invisible stitch.
Remove any visible basting stitches if necessary.
More Than Just a Pretty Decoration
Although folded stars are often used as decorative hot pads or table accents, many sewists also enjoy displaying them throughout the home during holidays and special seasons.
They add such a cozy handmade touch to:
- dining tables
- kitchen spaces
- coffee tables
- sewing rooms
- gift baskets

And because they are relatively small projects, they also make thoughtful handmade gifts for friends, neighbors, and family members.
There’s something especially meaningful about gifting an item that clearly took time, care, and creativity to make.
The Beauty of Slow Sewing
Projects like the Folded Star remind us why handmade crafts feel so comforting.
The simple rhythm of folding fabric, pressing seams, and layering shapes creates a peaceful experience that allows creativity to slow down and breathe a little.
And in the end, what begins as a few pieces of fabric becomes something warm, decorative, and filled with personality.
That is the quiet magic of sewing by hand and heart.
VIDEO TUTORIAL
The Folded Star pattern is a beautiful blend of quilting tradition and creative simplicity. It’s the kind of project that feels impressive without being overwhelming, perfect for beginners who want to try something new, and equally enjoyable for experienced sewists looking for a relaxing weekend project.
Most of all, it’s a lovely reminder that even simple folds of fabric can become something truly beautiful.