Spin Me Round Quilt
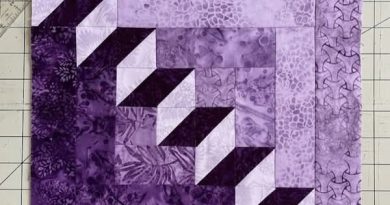
There are some quilts that seem to dance right before your eyes, and Spin Me Round is exactly that kind of design. With its sweeping strips spinning around a central square, this quilt creates beautiful movement while still holding onto the warm, comforting charm of traditional quilting.
What I especially love about this project is that it looks wonderfully intricate at first glance, but it’s actually built from very approachable techniques. It’s a marvelous quilt for beginners wanting to experiment with diagonal piecing and angled construction without feeling overwhelmed. And let me tell you, dear, many quilts that look complicated are simply a series of gentle little steps done carefully and patiently.
This article has been fully rewritten in original wording and instructional style, inspired by the construction methods of the original pattern while respecting copyright and avoiding reproduction of the original instructions.
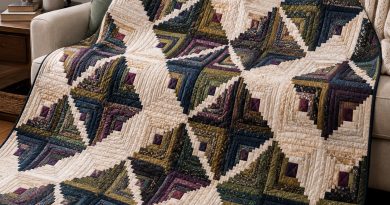
Some quilts have a quiet charm, while others seem to dance right across the room. Twisting Paths is one of those playful designs that instantly catches the eye with its flowing diagonal strips and rotating layout. The movement in this quilt creates a beautiful sense of motion, almost as if the fabrics are gently swirling around the center.
What I adore most about this style of quilt is how dramatic it looks while still being wonderfully approachable for beginners. With a little patience, careful cutting, and steady sewing, you can create something that looks remarkably sophisticated without needing advanced quilting techniques.
This tutorial was written as an original educational guide inspired by modern rotating strip quilts, with adjusted construction methods and measurements to create a fresh interpretation suitable for personal blogs, tutorials, and broader publication.
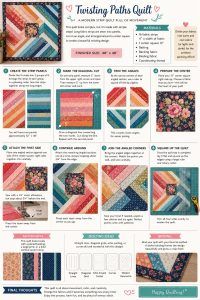
Finished Quilt Size
Approximately:
- 48″ x 48″
This slightly larger size makes a lovely baby quilt, wall hanging, lap quilt, or cozy decorative throw.
Materials
For the Quilt Top
- 16 fabric strips measuring 4″ x width of fabric;
- 1 center square measuring 12″;
- batting;
- backing fabric;
- binding fabric;
- coordinating thread.
You may use:
- modern quilting cottons;
- scraps;
- coordinated collections;
- solids and prints;
- or even soft vintage florals.
For the prettiest visual effect, I recommend dividing your fabrics into:
- warm tones and cool tones;
- or lights and darks.
Before You Begin
Dear friend, before we sew a single stitch:
- press all fabrics carefully;
- starch lightly if desired;
- use a fresh rotary blade;
- and test your ¼” seam allowance.
Accuracy matters in angled quilts like this one, but please don’t let that intimidate you. Quilting is simply one gentle step after another.
Step 1 — Create the Strip Panels
Divide your 16 strips into:
- 2 groups of 8 strips.
Arrange the fabrics until the colors flow nicely from one strip to the next.
Sew each group together along the long edges to create:
- two strip panels approximately 32″ x 40″.
Press seams all in one direction to reduce bulk.
Now stand back and admire them for a moment, this is where the quilt’s personality begins to appear.
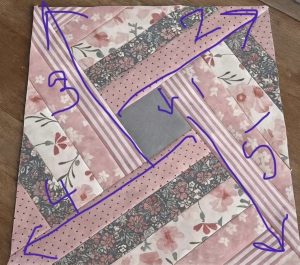
Step 2 — Mark the Diagonal Cut
Place one strip panel flat on your cutting mat.
Now:
- measure 5″ down from the upper right corner;
- make a small mark;
- then measure 5″ up from the lower left corner;
- make another mark.
Using a long ruler, draw a diagonal line connecting those marks.
Carefully cut along the line.
Repeat with the second strip panel.
You should now have:
- four angled sections with long diagonal edges.
These angled cuts are what create the lovely twisting illusion in the finished quilt.
Step 3 — Trim and Prepare the Angles
At the narrow clipped corners of each angled section:
- use a ruler to square off the tip slightly;
- creating a cleaner angle for joining later.
This tiny preparation step makes the quilt much easier to assemble neatly.
Step 4 — Prepare the Center Square
Take your 12″ center square and place it right side up.
Choose something eye-catching here:
- a bold floral;
- a geometric print;
- or a calm neutral for a more modern look.
This center becomes the visual anchor of the entire quilt.
Step 5 — Attach the First Side
Place one angled strip section against one side of the center square, right sides together.
Pin carefully.
Sew using a ¼” seam allowance, but stop sewing about ¾” before reaching the end.
That little unsewn space helps the rotating sections fit together smoothly later on.
Press the seam away from the center.
Step 6 — Continue Around the Quilt
Attach the remaining angled sections one at a time around the center square.
For each section:
- align carefully;
- pin generously;
- sew slowly;
- and stop about ¾” from the edge.
As the quilt begins to come together, you’ll start seeing the beautiful spinning movement emerge around the center.
It truly feels magical every single time.
Step 7 — Join the Angled Corners
Now gently bring the angled edges together.
Match the corners carefully and pin thoroughly before sewing.
Take your time here, sweetheart. Angled seams behave best when they aren’t rushed.
If a point doesn’t align perfectly:
- simply remove a few stitches;
- adjust;
- and try again.
That’s not failure.
That’s quilting.
Step 8 — Square Up the Quilt
Once the quilt top is fully assembled:
- lay it flat;
- use a large quilting ruler;
- and trim the outer edges evenly.
You’ll notice the design suddenly looks polished and professional after this step.
Quilt Back Suggestions
This quilt looks especially lovely with:
- a pieced backing;
- a single oversized floral print;
- or a bold vertical accent strip.
A simple backing can beautifully balance the movement happening on the quilt front.
Quilting Ideas
Some quilting patterns that pair beautifully with this design:
- straight-line quilting;
- diagonal grid quilting;
- echo quilting around the center;
- gentle curves;
- or modern geometric stitching.
For beginners, straight-line quilting spaced about 1″ apart creates a clean and elegant finish.
Binding
Join your binding strips into one continuous strip and bind the quilt using your preferred method.
A darker binding frames the movement beautifully and gives the quilt a crisp finished edge.
Twisting Paths is one of those quilts that teaches confidence.
Spin me round PDF PATTERN
VIDEO TUTORIAL
Dear reader, we have selected some video tutorials for you to watch and follow along, so you can learn in the best way how to make your beautiful quilt. These tutorials are very well explained and you will be able to understand everything clearly, as they are very well made and explained.
It may look intricate at first glance, but underneath it all are simple techniques repeated with care and patience. That’s often the secret behind the most beautiful quilts.
And the loveliest part? No two versions will ever look exactly alike. So gather your favorite fabrics, pour yourself a warm cup of tea, and enjoy every moment of the process. Because quilts are never just fabric and thread. They become memories stitched together one seam at a time.