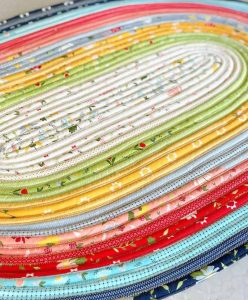
Jelly Roll Rug
Dear friends, welcome to Handmade Learning Here, It truly warms my heart to have you here. Today I have something special to you! This amazing pattern, the Jelly Roll Rug, it’s really special and beautiful… Perfect idea as a gift for someone special, don’t you think?
If you’re just beginning your journey into sewing, quilting, or simply exploring the joy of handmade creations, please know you are in the right place. This little corner was made especially for you, a gentle, encouraging space where we learn together, one stitch at a time.
I would love to sit with you and share a project that is both practical and absolutely delightful: the Jelly Roll Rug. It’s one of those creations that feels almost magical, transforming simple strips of fabric into something sturdy, useful, and full of personality.
So let’s begin, slowly and comfortably, just like good crafting should be.
What Is a Jelly Roll Rug?
A jelly roll rug is a handmade rug created from long strips of fabric, usually pre-cut into neat rolls called jelly rolls. These strips are wrapped around batting (a soft inner layer) and then sewn together in a continuous spiral or oval shape.
The result is a thick, durable rug that works beautifully in kitchens, entryways, or beside your bed — anywhere you’d like a touch of handmade warmth.
And the best part? It’s surprisingly beginner-friendly.
Materials You Will Need
Before we begin, let’s gather everything together, there’s something so calming about having your materials neatly prepared:
- 1 jelly roll (pre-cut fabric strips, typically 2.5 inches wide)
- Approximately 50 yards of cotton batting (cut into strips of the same width)
- Strong thread (polyester or a cotton blend works nicely)
- Sewing machine with a zigzag stitch
- Iron and ironing surface
- A few extra bobbins (you’ll thank yourself later!)
Take your time here, preparing your materials is part of the joy
Step 1: Joining Your Fabric Strips
Begin by sewing all your fabric strips together end to end, creating one long continuous strip.
A gentle tip: try to sew the ends at slight angles rather than straight across. This helps reduce bulk and gives your rug a smoother finish.
Once joined, press the seams flat with your iron. This small step makes everything easier as you move forward.
Step 2: Wrapping the Batting
Now we create the foundation of your rug, a soft, sturdy fabric “rope.”
Lay your batting strip along the center of the wrong side of your fabric
Fold one side of the fabric over the batting
Fold the other side over, enclosing it completely
Fold the whole strip in half lengthwise
Then sew straight down the center to secure everything in place.
You’ll now have a long, padded strip, and this is what will become your rug.
Step 3: Beginning the Rug
Take one end of your strip and gently fold it into a small “U” or tight curve.
Using a zigzag stitch, begin sewing the layers together as you coil the strip around itself.
This is the heart of the project, slow, steady, and quite soothing.
Step 4: Building Your Shape
Continue wrapping and sewing your strip around in a spiral or oval shape.
Here’s where patience becomes your best friend:
Keep your rug flat as you sew , guide it gently, don’t pull or force the fabric. Let the machine do most of the work
With each round, your rug will grow, and it’s such a satisfying thing to watch.
Gentle Tips for Beginners
Oh, my dear… let me share a few little secrets that can make your experience much smoother:
- If your rug starts to cup upward, you may be pulling too tightly
- If it begins to wave or ripple, it might be too loose
- Adjust your guiding pressure as you go, you’ll quickly feel the rhythm
- Don’t worry about small mistakes, they’re part of every handmade piece
And remember… there’s no rush here.
Size & Creative Variations
A standard jelly roll rug often finishes around 30” x 44”, but truly, you can make it any size you like.
You might also try:
- A round version instead of oval
- A longer runner for hallways
- Smaller pieces for placemats
- Even baskets using the same technique
Once you understand the process, the possibilities are endless.
Caring for Your Rug
Yes, your rug can absolutely be used and loved every day.
To care for it:
- Wash on a gentle cycle or by hand
- Let it air dry flat
- Use steam to reshape if needed
Over time, it will soften beautifully and feel even more special.
Discover the simple pleasure of creating something beautiful with the Jelly Roll Rug pattern. Over at CreateWhimsy.com, you’ll find a free and thoughtfully explained tutorial that gently walks you through each step of this charming project. Whether you’re an experienced quilter or just beginning your sewing journey, this guide makes the process enjoyable and easy to follow, helping you craft a lovely rug of your own. It’s a wonderful way to explore color, texture, and creativity all in one project. Be sure to visit CreateWhimsy.com to access the full tutorial and get started.
ACCESS THE JELLY ROLL RUG PATTERN
In the end, what makes Jelly Roll Rugs so special is their versatility. You can choose soft, calming tones for a cozy feel or play with bright, cheerful colors to bring energy into a room. With a little imagination, you can arrange fabrics in ways that reflect your personal style, adding a warm and handmade touch to any space in your home.
VIDEO TUTORIAL
Below is a great video tutorial from Erica Arndt’s channel. It’s very clear and well-made, and with it you’ll be able to visualize and make a beautiful Jelly Roll Rug.
Projects like this are about so much more than the finished piece. They are about quiet moments, learning something new, and creating with your own two hands. And if you’re just starting out, please don’t worry about perfection, what you are making is already meaningful.
I hope this little guide brings you comfort and inspiration. And who knows… this might just be the first of many rugs you’ll create.