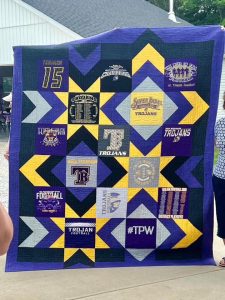
T-shirt Memory Quilt
Welcome to Handmade Learning Here, dear quilting friend. We’re so happy you stopped by our cozy little corner filled with creativity, fabric, and handmade inspiration. Whether you’ve been quilting for years or are just beginning your sewing journey, we hope you’ll feel right at home here with us. Today we’re sharing a beautiful Memory Quilt tutorial, a meaningful quilting project designed to turn favorite memories, game-day moments, team spirit, and treasured shirts into something warm, personal, and lasting.
This beginner friendly quilt combines classic patchwork blocks with memory-style fabric panels to create a quilt full of movement, personality, and cozy handmade charm. It’s the perfect project for preserving special moments while practicing fun quilting techniques in a creative and relaxing way. So gather your favorite fabrics, clear a little sewing space, and let’s stitch something truly memorable together.
Some quilts do more than keep us warm, they tell stories. The memory quilt is one of those wonderful projects that brings together memories, favorite teams, school pride, childhood moments, and treasured T-shirts into one heartfelt quilt. Whether you’re sewing for a sports fan, a graduating student, or someone who simply has a collection of meaningful shirts tucked away in a drawer, this style of quilt transforms those memories into something useful, comforting, and deeply personal.
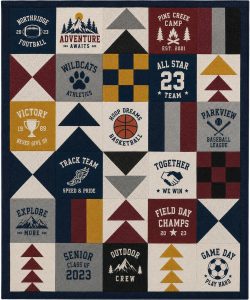
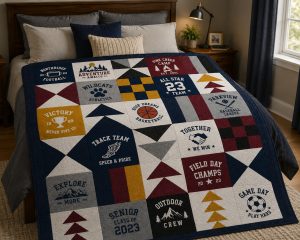
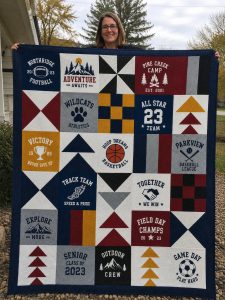
One of the loveliest things about this quilt design is how flexible it is. The original pattern combines T-shirt logo blocks with classic patchwork units like Four-Patch blocks, Flying Geese blocks, Three-Bar blocks, and Hourglass blocks, creating a sporty quilt with movement and variety while still allowing the T-shirt designs to remain the true stars of the project.
And while memory quilts may look a little intimidating at first, don’t you worry, dear friend, we’ll walk through everything slowly and gently together.
Why Quilters Love T-Shirt Quilts
T-shirt quilts hold memories in such a special way.
Instead of storing old shirts in boxes, you can preserve:
- school memories,
- sports teams,
- concerts,
- family vacations,
- college years,
- and childhood moments
inside a beautiful quilt that can actually be used and loved every day.
Many quilters especially enjoy how personal every quilt becomes because no two collections of shirts are ever exactly alike.
Finished Quilt Information
The original quilt design finishes at approximately:
- 60” x 72”
- with 12” finished blocks
But one of the wonderful things about memory quilts is that you can easily resize them by adding more blocks or borders.
Supplies You’ll Need
Fabrics & Materials
- 15–30 T-shirts with logos or graphics
- Coordinating quilting cotton fabrics
- Lightweight fusible interfacing
- Batting
- Backing fabric
- Binding fabric
Sewing Supplies
- Rotary cutter and ruler
- Cutting mat
- Sewing machine
- Iron and pressing mat
- Pins or clips
- Neutral thread
Important Beginner Tip — Stabilizing T-Shirts
T-shirt fabric stretches much more than quilting cotton.
Before cutting your blocks, you’ll want to stabilize each shirt using lightweight fusible interfacing. This helps prevent stretching and puckering while sewing.
To do this:
- Turn the shirt wrong side up
- Place fusible interfacing behind the logo area
- Fuse carefully with an iron following package instructions
- Let the fabric cool completely before cutting
This step makes a huge difference for beginners.
Planning Your Quilt Layout
Before cutting anything:
- spread all your shirts out,
- decide which logos you want to feature,
- and think about color balance.
Some logos may need larger blocks, while others fit nicely into smaller sections.
The original quilt mixes:
- full-size logo squares,
- plus several patchwork block styles
for visual variety.
Step-by-Step Memory Quilt Tutorial
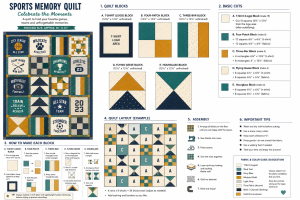
Step 1 — Cut the Main T-Shirt Squares
Cut your largest featured T-shirt logos into:
- 12½” squares
Try to center the designs as evenly as possible.
A large acrylic quilting ruler helps tremendously here.
The original pattern uses 15 large T-shirt squares.
Step 2 — Make the Four-Patch Blocks
These blocks add variety and help balance the larger logo squares.
For each Four-Patch block:
- cut two T-shirt squares,
- and two coordinating fabric squares.
Arrange them in alternating positions and sew together in rows.
Then join the rows to create the block.
Press carefully after each seam.
The finished block should measure:
- 12½” unfinished.
Step 3 — Make the Three-Bar Blocks
The Three-Bar blocks are wonderfully simple for beginners.
You’ll need:
- one centered T-shirt rectangle,
- and two matching side rectangles.
Sew the pieces together vertically to form a striped block.
These blocks help give the quilt movement and a sporty feel.
Step 4 — Create the Flying Geese Blocks
Now for one of the prettiest blocks in the quilt.
Flying Geese blocks create diagonal movement and make the quilt feel lively without becoming too complicated.
For beginners:
- work slowly,
- pin carefully,
- and trim excess fabric neatly.
The original pattern combines T-shirt triangles with coordinating print triangles.
Step 5 — Sew the Hourglass Blocks
Hourglass blocks create a lovely spinning effect.
To make them:
- pair contrasting triangles,
- sew into units,
- then join the units together.
The contrast between logo fabric and quilting cotton gives these blocks wonderful visual interest.
Step 6 — Lay Out the Quilt
This is one of the most enjoyable parts.
Spread all your blocks across the floor or a large table.
Move them around slowly until:
- colors feel balanced,
- logos are spaced nicely,
- and the quilt flows comfortably from block to block.
Take a photo before sewing rows together.
It’s surprisingly easy to forget your favorite arrangement once pieces start moving around.
Step 7 — Sew the Rows Together
Begin sewing blocks into rows.
Press seams carefully after each row.
Then join the rows together to complete the quilt top.
The original quilt arranges the blocks into six horizontal rows.
Step 8 — Quilt the Layers
Layer:
- backing,
- batting,
- and quilt top.
Baste securely before quilting.
Simple quilting designs work beautifully here:
- loops,
- stars,
- meandering stitching,
- or straight-line quilting.
The original quilt uses a playful meandering pattern with stars and loops.
Step 9 — Add the Binding
Finish the edges with binding fabric.
Navy blue binding gives a classic sporty look, but you can choose any coordinating color from your T-shirts.
Take your time here, binding is the final little frame around all your memories.
Beginner Tips for T-Shirt Quilts
- Wash shirts before cutting
- Avoid overly stretchy fabrics
- Stabilize every logo section
- Use sharp rotary blades
- Press carefully without stretching
- Keep seam allowances consistent
- Don’t overcrowd the quilt with too many busy logos
And most importantly:
remember that memory quilts are meant to feel personal, cozy, and loved — not perfectly flawless.
A Quilt Full of Memories
The memory quilt is much more than patchwork and fabric.
It becomes:
- a memory keeper,
- a celebration of favorite teams,
- a reminder of childhood games,
- school years,
- tournaments,
- and treasured moments shared with people we love.
And perhaps that’s the true beauty of quilting:
stitching memories together one block at a time.
MEMORY QUILT PDF PATTERN
VIDEO TUTORIAL
Dear reader, here is a very well-explained video tutorial from the talented Angela Walters’ channel. She teaches how to make a beautiful memory quilt, and you can watch it below.
Thank you so much for spending part of your day with us here at Handmade Learning Here. We truly hope this Memory Quilt tutorial inspired you to create something meaningful, personal, and filled with wonderful memories. Handmade quilts have such a special way of telling stories through fabric, and we feel honored to share that creative journey with you. Before you go, we warmly invite you to explore the rest of our blog, where you’ll find many other unique quilt patterns, beginner-friendly tutorials, cozy sewing ideas, and handmade projects designed to spark creativity and bring joy to your sewing room.
We’ll be posting brand new articles and quilting inspiration every single week, so we would absolutely love for you to come back and visit us again soon. Until next time, dear friend, we wish you a beautiful day filled with peace, creativity, happy stitching, and many cozy handmade moments ahead.