Pole Twist Table Runner
Hello, dear friend, welcome to our lovely blog Handmade Learning Here. Today I’d love to gently guide you through making a beautiful Pole Twist Table Runner. This is a lovely quilting project that may look complex at first glance, but once you understand the steps, it becomes very enjoyable, even for beginners.
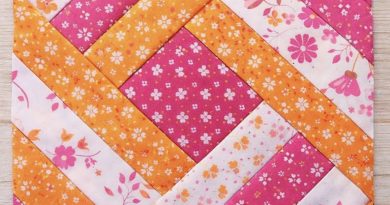
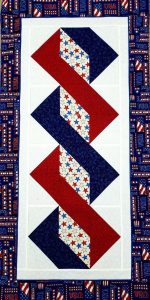
The Pole Twist Table Runner is a beautiful quilting project that combines movement, contrast, and geometric elegance in a design that feels far more intricate than it truly is. Built entirely from Half Square Triangles (HSTs), this pattern is an excellent introduction to traditional quilt construction while still producing a striking and sophisticated final result. The original design measures approximately 47 inches long by 19½ inches wide, making it the perfect size for a dining table, console table, or decorative seasonal display.
What makes this pattern especially appealing is the illusion of motion created by the repeated diamond twists running through the center of the runner. By carefully arranging Color 1/Color 2 and Color 1/Color 3 half square triangle units, the design creates a rhythmic “twisting” effect that guides the eye across the entire piece. Though visually dynamic, the construction itself relies on one of the most beginner-friendly quilt blocks available, proving how powerful simple patchwork can become through thoughtful arrangement.
The project offers multiple methods for constructing the HST units, allowing quilters to choose the technique that best matches their comfort level and tools. Beginners may prefer the traditional square method, while more experienced quilters might enjoy using a half square triangle ruler or the faster four-at-once method. Each technique ultimately produces the same clean geometric effect, reinforcing an important quilting principle: precision and consistency matter more than speed.
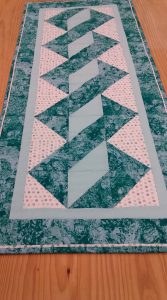
Another strength of this design is its adaptability. While the original version uses strong color contrast to emphasize the twisting shapes, the pattern can easily be personalized through different fabric choices. High-contrast combinations create a bold, graphic appearance, while softer tones produce a more subtle and elegant look. Seasonal fabrics, modern solids, florals, batiks, or even scrappy fabric combinations can completely transform the mood of the finished runner without changing the structure of the design itself.
Construction of the runner also teaches foundational quilting skills beyond piecing. Quilters practice pressing seams for accurate nesting, assembling rows with alignment, adding borders, layering batting and backing, quilting the finished top, and attaching binding. Because the project is manageable in size, it provides an ideal opportunity for beginners to experience the complete quilting process from start to finish without becoming overwhelmed.
Perhaps the most rewarding aspect of the Pole Twist Table Runner is the balance it strikes between simplicity and visual impact. The pattern demonstrates how repeated shapes and careful color placement can create movement and complexity from very basic units. It is a project that encourages patience, precision, and creativity while remaining approachable and enjoyable throughout every stage of construction.
Whether made as a first quilting project, a seasonal table decoration, or a thoughtful handmade gift, the Pole Twist Table Runner is a timeless design that showcases the enduring beauty of traditional patchwork techniques. Its flowing geometric movement and elegant structure make it a pattern that quilters of all skill levels can appreciate and return to again and again.
Take your time, prepare a cozy space, and let’s begin together.
Finished Size
Your table runner will measure approximately:
47 inches long x 19½ inches wide
Materials You’ll Need
Here’s everything to gather before we begin:
- Color 1 fabric (main + binding): about 1 yard
- Color 2 fabric (triangles + inner border): about 10 inches (WOF)
- Color 3 fabric (triangles): about 10 inches (WOF)
- Backing fabric: 25″ x 50″
- Batting (thin): 25″ x 50″
Tip: WOF means Width of Fabric (usually ~44–45 inches).
Understanding the Project
The design is built using Half Square Triangles (HSTs), one of the most common and beginner-friendly quilt units.
You’ll need to make:
- 10 Color 1/Color 2 HST units
- 20 Color 1/Color 3 HST units
Each unit will finish at 4½” x 4½” (unfinished size)
Step 1: Cutting Your Fabric
For beginners, I recommend the basic square method, which is the easiest to understand.
Cut the following:
From Color 1 fabric:
Cut strips, then subcut into 5″ x 5″ squares
From Color 2 fabric:
Cut 5″ x 5″ squares
From Color 3 fabric:
Cut 5″ x 5″ squares
Step 2: Making Half Square Triangles (HSTs)
Let’s do this slowly and comfortably:
For each HST:
Place one Color 1 square + one Color 2 (or Color 3) square
Right sides together
Draw a diagonal line from corner to corner
Sew ¼ inch on BOTH sides of that line
Cut along the drawn line
You now have 2 triangle units
Press seams:
First press flat, then open toward the darker fabric
Trim each unit to:
4½” x 4½”
Remove little corners (“dog ears”)
Repeat until you have:
10 Color 1/Color 2 HSTs
20 Color 1/Color 3 HSTs
Take your time here, accuracy matters more than speed.
Step 3: Arranging the Pattern
Now comes the fun part!
You will arrange the blocks into a twisting diamond layout (as shown in the images on pages 9–12 of your PDF).
Each section forms a diagonal “twist”
You will repeat this layout 5 times
Tip for beginners:
Lay everything out on a table or floor before sewing.
Step 4: Sewing the Rows
You will work in rows:
Sew units together row by row
Keep pieces right sides together
Match seams carefully
You can:
Sew one row at a time, OR
Try “chain piecing” (faster, but optional)
Step 5: Joining Rows
Press seams in alternating directions
→ This helps seams “lock” together nicely
Pin where seams meet
Sew rows together slowly
Your center panel should now show the beautiful twisting pattern.
Step 6: Adding Borders
Inner Border (Color 2)
2 strips: 40½” x 1½” (long sides)
2 strips: 14½” x 1½” (short sides)
Sew:
Long sides first
Then short ends.
Outer Border (Color 1)
2 strips: 42½” x 3″ (long sides)
2 strips: 19½” x 3″ (short sides)
Attach the same way:
Long sides → then short sides
Step 7: Quilting & Finishing
Make your quilt sandwich:
Backing + batting + top
Secure layers:
Pins or spray baste
Quilt as desired:
Simple meandering stitch works beautifully for beginners
Step 8: Binding
Cut binding strips: 2½ inches wide
Join on the diagonal (bias join)
Attach binding:
Sew to front
Fold and finish by hand or machine
Final Thoughts
This project is a wonderful introduction to:
Half square triangles
Color contrast
Quilt assembly
It may look intricate, but it’s truly a matter of repeating simple steps with care and patience.
Take it slowly, enjoy each stage, and don’t worry about perfection, your piece will be beautiful because you made it.
POLE TWISTE TABLE RUNNER PDF PATTERN
Important Note: The patterns and tutorials shared through links on our website are created and owned by their respective talented designers. We do not claim ownership of these patterns, and they are not sold or distributed by us. Our goal is simply to help connect our readers with inspiring creators and valuable quilting resources available online.
If you have questions about a specific pattern, please contact the original designer directly using the link provided on the pattern page. We deeply appreciate and respect the creativity and hard work of independent designers, and we kindly encourage our readers to support and respect their work as well.
VIDEO TUTORIAL
Quilting is a journey built one stitch at a time, and projects like the Pole Twist Table Runner are a wonderful reminder that even simple techniques can create something truly beautiful. Whether you are making your very first table runner or adding another piece to your quilting collection, the most important part is enjoying the creative process and allowing yourself to learn along the way. Every finished project carries your personal touch, and that is what makes handmade work so special.
I hope this pattern inspires you to experiment with color, practice your piecing skills, and continue exploring the world of quilting with confidence and joy. There are so many beautiful techniques, blocks, and styles waiting to be discovered, and every project becomes another step in your creative journey.
Thank you so much for visiting Handmade Learning Here! Be sure to explore our other articles and patterns for even more quilting inspiration, beginner-friendly tutorials, and creative ideas. New projects and fresh patterns are always being added, so we’d love for you to come back often and continue learning and creating with us. Happy quilting, and see you again soon!