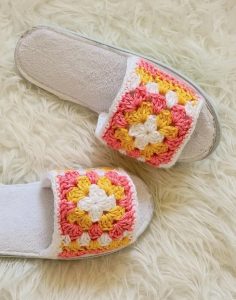
Crochet Slippers with Soles
Hello crocheters! How are you? We always want to bring you new things, so today we brought you something very cool and special. We know that crochet is a very versatile art and that it allows us to do different types of work, right? So today we have here a very beautiful mold to share with you. It is the pattern of crochet slippers with soles. It’s a very different job and very fashionable. I bet all your friends will want one just like it!
It’s a lovely and very dear technique, which is successful because it’s something different from what we find out there and because of its beauty. When you do, you’ll see how practical and easy it is to make it, and you’ll even want to do it in other colors and maybe get some orders from your friends and family, and maybe even generate some extra income selling this beautiful work.
Crochet has a huge range of varieties of projects that we can do with it, the most different items can be produced with crochet, from home decor, toys for children to clothes, shoes and beautiful blankets. When you let your creativity flow, you can achieve many amazing projects with crochet. And best of all, you don’t need a lot of materials to make and you can create beautiful things.
ABOUT THIS MODEL
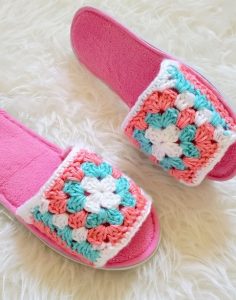
This pattern Crochet Slippers with Soles offers a hint of what you can do, but feel free to make your changes and use other crochet stitches that you think match or however you like, thus producing different types of slippers. The idea of this project is to use the base of a slipper you already have, the crochet part above is a detail that will be placed, a square of grandma that you make separately and then apply to the sole. You know there are many beautiful granny squares, right? Use your favorite and make your flip-flop completely personalized, matching you, with your face!
You can produce this item in different colors, you can make beautiful combinations. Remember to use tones in your yarn that match or are the same color as your flip-flop, this way you will have a uniform or harmonious piece. The granny square is the default size, but if you need it to be bigger, just increase the border size.
For the top of the toes, first you make a simple square and then add the granny stitch lines to the sides. For the last rows on the side you will need to insert sts of variable height to be able to adhere the shape of the fingertips. Another thing you can do is use plastic slides and glue the tops of your toes over them. That way your new flip-flops will be beautiful, different and unique.
 Image/ by Crochet Dreamz
MATERIAL
Recommended Supplies
Here’s a list of the materials you will require:
- Slippers from Dollar Tree or plastic slides (for DIY assembly)
- Worsted weight yarn in thinner options.
Our suggestion:
For the white slippers, use colors White, Strawberry, and Sunshine. For the pink sandals, use White, Robin’s Egg, and Strawberry.
STITCH ABBREVIATIONS:
This pattern is presented using the standard crochet terminology used in the United States/ UK.
Chain Stitch – CH
ST – Stitch
Single Crochet – SC
Double Crochet – DC
hdc – Half Double Crochet
sk – skip
Notes:
- To create the toe top, begin by crafting a fundamental granny square, and then incorporate rows of granny stitches along the sides. The final rows on the sides will consist of stitches of varying heights to shape the toe top.
- Commencing from the center and expanding outward, a basic granny square is composed of sets of three double crochet stitches. Each corner is established with two chain stitches, with no additional chains between the groups of three double crochets.
- Throughout this project, ensure that the right side is facing you for all rounds.
- In the pattern instructions, we will refer to the colors used in the white slippers as white, yellow, and pink for simplicity.
- Whenever possible, crochet over the yarn tails. Since these slippers won’t undergo washing, it’s practical to weave them in as you work. Alternatively, you can weave them in after completing the toe top.
- The initial round is worked into the space at the center of a chain ring, rather than into the chains themselves.
PATTERN
Round 1: Using white yarn, create a foundation chain of 4 and join it with a slip stitch to form a ring. Chain 3 (which counts as a double crochet), work 2 double crochets into the chain ring, chain 2 to create your first corner, then repeat the following sequence three times: work 3 double crochets into the chain ring, chain 2. Finally, join with a slip stitch to the top of the initial chain 3, fasten off without turning. This round results in 4 groups of double crochets.
Note: Starting from this point, begin each subsequent round in a ch-2 space or corner prior to the fastening off point. This allows you to work over the yarn tail as you progress.
Round 2: Switch to yellow yarn, slip stitch into the ch-2 space just before the fastening off point, chain 2 (which counts as a double crochet for this round and all following rounds). Work 2 double crochets into the same ch-2 space, chain 2, and then work 3 double crochets into the same ch-2 space. Next, follow this pattern: skip the next 3 double crochet stitches, then work (3 double crochets, chain 2, 3 double crochets) into the next ch-2 space. Repeat this sequence two more times, and finish by joining with a slip stitch to the top of the initial chain-2. Fasten off without turning. This round results in 8 groups of double crochets.
Round 3: Transition to pink yarn, slip stitch into the corner before the fastening off point, chain 2, and work 2 double crochets into the same ch-2 space. Chain 2, then work 3 double crochets into the same ch-2 space. Continue with the following pattern: work 3 double crochets into the next space between the 3 double crochet groups, then work (3 double crochets, chain 2, 3 double crochets) into the next ch-2 corner space. Repeat this sequence two more times, work 3 double crochets into the next space between the 3 double crochet groups, and finally, join with a slip stitch to the top of the initial chain-2. Fasten off without turning.
Your basic granny square is now complete. We will now proceed to add rows to the sides to make it wider.
Row 1: Using white yarn, begin by slip stitching to the corner just before the fastening-off point. Chain 2, then work 1 double crochet (dc) into the same ch-2 space. Follow this with 3 dc in the gap between the double crochet groups, then another 3 dc in the subsequent gap between dc groups. Finish the row by placing 2 dc in the next ch-2 space in the corner. Fasten off without turning.
Row 2: Switch to yellow yarn and attach it by slip stitching to the top of the initial ch-2 from Row 1. Chain 2, and work (3 dc in the next gap between dc groups) three times. Conclude this row with 2 dc on top of the last dc from the previous row. Fasten off without turning.
Last Row: Transition to pink yarn by slip stitching to the top of the starting ch-2 from Row 2. Chain 2, then crochet 2 dc in the next dc, followed by 1 dc in the next stitch. Continue with 1 half double crochet (hdc) in the next 4 stitches, and 1 single crochet (sc) in the following 5 stitches. Fasten off.
Left Side Rows
Row 1: Begin by using white yarn. Slip stitch into the corner’s ch-2 space, then chain 2. Make 1 double crochet in the same ch-2 space. Follow this with 3 double crochets in the gap between the double crochet groups, then another 3 double crochets in the next gap between double crochet groups. Finish this row by adding 2 double crochets in the next ch-2 space in the corner. Fasten off without turning your work.
Row 2: Switch to yellow yarn. Slip stitch to the top of the initial ch-2 from Row 1, then chain 2. Work 3 double crochets in the next gap between double crochet groups, repeating this process a total of 3 times. Finish the row by adding 2 double crochets on top of the last double crochet from the previous row. Fasten off without turning.
Note: To attach white yarn at the end of the next row, begin the double crochet as usual. When you have 2 loops remaining on your hook, yarn over and pull through with the white yarn.
Last Row: Transition to pink yarn. Slip stitch into the top of the starting ch-2 from Row 2. In the same stitch, make 1 single crochet, then continue with 1 single crochet in each of the next 4 stitches, followed by 1 half-double crochet in each of the next 4 stitches, and 1 double crochet in each of the next 2 stitches. Finish the row by making another double crochet in the last stitch while joining with white yarn.
Bottom Border
The bottom border is taller at the beginning and end to imitate the shape of the slipper top.
Border Row: Ch 3: Begin by attaching white yarn. Move along the base (the longer edge of the piece) as follows: make 2 double crochet stitches along the initial pink row’s edge, 2 half-double crochet stitches along the yellow row’s edge, and 3 single crochet stitches across the white row’s edge. Continue with 1 single crochet stitch in each stitch until you reach the side rows on the opposite end. Then, make 1 single crochet in the next space, 3 single crochet stitches across the first white row’s edge, 2 half-double crochet stitches along the yellow row’s edge, and 3 double crochet stitches across the pink row’s edge. Finally, fasten off the yarn.
Top Border
Using white yarn, slip stitch (sl st) to the top right corner of the toe top. Next, work one single crochet (1 sc) in the same corner. Continue with two single crochets (2 sc) across the end of the next yellow row. Follow this with three single crochets (3 sc) across the end of the white row. Then, work one single crochet (1 sc) in each stitch across until you reach the side rows on the opposite side. In the next space, work one single crochet (1 sc). After that, work three single crochets (3 sc) across the end of the white row, followed by two single crochets (2 sc) across the end of the yellow row. Finally, work one single crochet (1 sc) in the corner, and then fasten off.
Finishing the Toe Top
Weave in any tails left.
Attaching the Toe Top to the Slipper
You have two options for attaching it: you can either stitch it in place using matching sewing thread and a needle or adhere it with fabric glue. If you’re working with plastic slides, you’ll need to locate glue that can effectively bond fabric to plastic.
There are many different types of granny squares, the most beautiful patterns that can give you countless possibilities of slippers to be produced. They are done quickly, you sit down and you can do many of them in the same day. The complete written pattern is available below in the PDF, where you can follow the magnificent pattern of the easy crochet complete slippers with sole step by step. Now just separate the materials, the threads of your favorite colors and that match the color of the sole you have, and get to work!
Access thePDF/ Crochet Slippers with Soles
As I said here, crochet allows us to make many beautiful projects with a variety of patterns and options. Now tell us what you think of this beautiful pattern and if you’ve seen a beautiful project like this one of the crochet slippers with soles before? Enjoy that and make beautiful gifts for your friends and family, I believe they will love it. If you have any questions or suggestions, let us know in the comments below. We love to hear from you and your comments can help and inspire others.
I believe you will like Crochet Cat Stitch
We really enjoyed having you here and thank you for following along with our stories. Don’t miss our content, we’re always bringing new patterns and inspiring ideas for you to execute on your projects. Enjoy! Now it’s time to crochet.
See you later!!!