Log Cabin Granny Square Blanket
Hello, my dear reader. It’s great to have you here with us! Welcome to our lovely blog, Handmade Learning. Today, we want to share an incredible blanket pattern that will leave anyone enchanted! In this article, I will show you how to make a Log Cabin Granny Square Blanket!
Don’t worry; it’s a straightforward project, perfect for beginners on this incredible crochet journey. If you know how to crochet a granny square or have made one before, this blanket will be VERY EASY for you! It requires only one repetition of four rows. You’ll see how quickly your blanket will grow. In fact, this project is perfect for using up your yarn stash!
This classic crochet design combines the traditional charm of grandma’s square with the rustic allure of a log cabin, resulting in a cozy and visually striking throw that has captured the hearts of crafters around the world.
The Granny Square tradition: Granny squares are the cornerstone of crochet, with origins dating back to the early 19th century. Characterized by their square shape and intricate patterns, granny squares have been essential in creating beautiful and functional crochet items, from blankets to clothing. The Log Cabin Granny Square Blanket takes this beloved tradition to a new level by infusing it with the warmth and nostalgia associated with log cabin quilting.

The log cabin aesthetic: The log cabin pattern, often associated with quilt making, involves arranging strips of fabric around a central square in a spiral, imitating the appearance of a log cabin structure. This aesthetic has made its way to crochet, providing a unique and visually appealing twist on the classic granny square. The Log Cabin Granny Square Blanket expertly combines the simplicity of the granny square with the geometric beauty of the log cabin pattern, resulting in a mesmerizing, textured design.
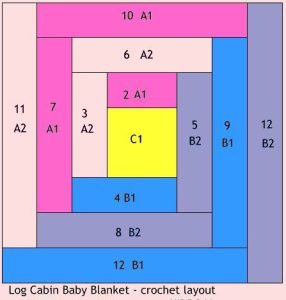
Start with a traditional granny square as the center of the blanket. Work the first round of log cabin-style strips by crocheting along both sides of the square. Continue adding circles, alternating colors, and extending the strips in a spiral. Experiment with color combinations to create a visually appealing and harmonious design. Adjust the size of your blanket by continuing to add circles until you reach the desired dimensions. The end result:
The Log Cabin Granny Square blanket is not just a functional piece; it is a work of art that tells a story. The interplay of colors and geometric arrangement of the log cabin pattern make each blanket unique. The final product is not only a testament to your crochet skills but also a cozy and comforting companion for cold nights.
Log Cabin Granny Square Blanket – WRITTEN PATTERN
MATERIALS
- Yarns with the colors of your choice.
- Hook size(s): Choose your hook size based on the yarn you have.
- Scissors for the ends
NOTES
Arrange the colors in rows with cream placed between two blocks of colors. For example: CREAM, purple, pink, CREAM, pinky red, blue, CREAM, green, yellow, CREAM, orange, purple, CREAM, etc.
The blanket’s size is approximately 39 inches (99cm) square. It consists of 27 blocks of color, with 4 rows per color block, totaling 108 rows.
Feel free to use any yarn, hook size, and color combinations that appeal to you!
Abbreviations (US TERMS):
- Ch – Chain
- DC – Double crochet
- Rep – Repeat
- St – Stitch
- Ch sp -Chain space
- Sl St – Slip Stitch
LOG CABIN GRANNY SQUARE BLANKET STEP BY STEP
Foundation Ring: Ch5. Join with a slip stitch in the first chain to create a ring.
Row 1: Ch 3, then make 2 double crochets into the ring. Ch 2, and work 3 double crochets into the ring.
Row 2: Ch 3, then turn your work. Make 3 double crochet stitches in the chain-2 space. Ch 2, then make another 3 double crochet stitches in the same chain-2 space. Finally, make a double crochet stitch in the top of the chain-3 from the previous row.
Row 3: Ch 3 and turn your work. Make 2 double crochet stitches in the first space between clusters. Then, in the chain-2 space, work (3 double crochet stitches, ch 2, 3 double crochet stitches). Finally, make 3 double crochet stitches in the last chain space between clusters.
Row 4: Ch 3 and turn your work. Make 3 double crochet stitches in the first space between clusters (3 double crochet, ch 2, 3 double crochet) all in the chain-2 space. Place 3 double crochet stitches in the last space between clusters. Finally, double crochet into the top of the chain-3 from last row.
Change Colours here and every 4 Rows throughout.
Row 5: Ch 3 and turn your work. Make 2 double crochet stitches into the first space. Crochet 3 double crochet stitches into the space located between the clusters. In the chain-2 space, work (3 double crochet stitches, ch 2, 3 double crochet stitches). Crochet 3 double crochet stitches into the next space between clusters. Finally, make 3 double crochet stitches in the last space.
Row 6: Ch 3 and turn. Work 3 double crochet stitches in the first space between clusters, followed by 3 double crochet stitches in the next space between clusters. Then, in the chain-2 space, execute (3 double crochet stitches, ch 2, 3 double crochet stitches). Continue with 3 double crochet stitches in the next space between clusters and 3 double crochet stitches in the last space between clusters. Finish the row with a double crochet stitch in the top of the chain-3 from the previous row.
Row 7: Ch 3 and turn your work. Make 2 double crochet stitches in the first space. Then, repeat the pattern: *do 3 double crochet stitches in the space between clusters*, do this twice. After that, work 3 double crochet stitches, chain 2, and then another 3 double crochet stitches, all into the chain-2 space. Repeat the pattern again: 3 double crochet stitches in the next space between clusters, twice. Finally, finish the row with 3 double crochet stitches in the last space.
Row 8: Ch 3 and turn your work. Make 3 DC in the first space between clusters. Repeat the sequence: * 3 double crochet stitches in the next space between clusters, * two times. Next, work (3 double crochet stitches, ch 2, 3 double crochet) all into the chain-2 space. Repeat the sequence: * 3 double crochet stitches in the next space between clusters, * three times. Finally, make a double crochet stitch in the top of the ch3 from the last row.
Row 9: Chain 3, turn your work 90 degrees clockwise. Make 2 double crochet stitches around the last double crochet made in the previous row. Repeat the pattern *Skip a row, make 3 double crochet stitches around the stitch in the next space* until you reach the chain-2 space. In the beginning foundation ring or chain-2 space, make 3 DC, ch 2, and then make another 3 DC. Repeat * Skip a row, make 3 double crochet stitches around the stitch in the next space* pattern until you reach the end of the row. Finish with 3 double crochet stitches into the last space.
Row 10: Ch 3 and turn. Make 3 DC in the first space between clusters. Continue the pattern by repeating *3 double crochet stitches in the next space between clusters* until you reach the chain-2 space. In the chain-2 space, work (3 double crochet stitches, ch 2, 3 double crochet). Repeat 3 double crochet stitches in the next space between clusters until you reach the end of the clusters. Finish the row by making a double crochet stitch in the top of the chain 3 from the last row.
Row 11: Ch 3, then turn your work. Make 2 double crochet stitches into the first space. Repeat the pattern: * 3 double crochets in the space between clusters * until you reach the ch2 space. In the ch2 space, crochet (3 double crochets, ch 2, 3 double crochets). Continue the pattern: * crochet 3 double crochets in the next space between clusters * until you reach the end of the clusters. Finally, crochet 3 double crochets in the last space.
Row 12: Ch 3 and turn your work. Make 3 double crochet stitches in the first space between clusters. Continue repeating *3 double crochet stitches in the next space between clusters* until you reach the chain-2 space. In the Ch 2 space, work (3 DC, Ch 2, 3 DC). Repeat *3 double crochet stitches in the next space between clusters* until you reach the end of the clusters. Finish the row by making a double crochet stitch in the top of the chain 3 from the last row.
Continue iterating through Rows 9-12 until you achieve the desired size.
If you have any questions about the pattern, you can check out this beginner’s guide.
VIDEO TUTORIAL
We always like to offer a video tutorial option for you, if that’s your preferred way of learning, or even to reinforce the written content. We suggest watching the video tutorial before tackling the project, so you can become familiar with the process, understand how to do it step by step, and maybe even pick up new techniques to do yout Log Cabin Granny Square Blanket. The video tutorial was created by the YouTube channel Hooked by Robin, and you can watch it below.
The Log Cabin Granny Square Blanket seamlessly blends the classic allure of granny squares with the rugged elegance of log cabin quilting. By marrying tradition and innovation, this crochet pattern provides crafters with a gratifying and visually striking project. So, snag your crochet hook, pick out your preferred yarn shades, and dive into the adventure of crafting a Log Cabin Granny Square Blanket that is sure to become a cherished heirloom.
Thanks for joining us, dear reader. We hope you have a fantastic day. See you soon!
Happy Crocheting! ✨💖