
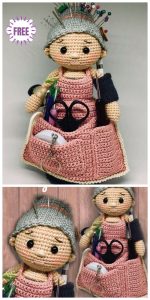
Caddy Dolls
Caddy Dolls
Hello, my dear reader! I hope your day is absolutely splendid! Welcome to our charming blog, Handmade Learning Here. Today, we’re excited to share with you a lovely pattern that’s perfect for gifting to a friend or perhaps your sewing-savvy grandma.
Check out these delightful free patterns for Caddy Dolls and other crochet accessories! Crochet accessories are wonderful for adding a touch of style to any outfit. Not only do they add personality, but they’re also incredibly practical. Dive into this blog post for some crochet accessory inspiration.
Whether you’re looking for a handy crochet accessory to keep your yarn and supplies neatly organized or you simply enjoy crafting, these patterns are sure to bring you joy. With clear instructions and helpful images, you’ll be guided through the process of creating your own caddy doll in no time. Don’t miss out on the chance to unleash your creativity and craft some fabulous accessories today!
So… Let’s go!
Materials:
Using the recommended wool, the resulting figure stands approximately 25 cm tall.
- Sport weight wool, such as Schachenmayr Catania or Scheepjes Catona (in colors 242, 255, 408, 172, 130)
- Crochet hooks in appropriate sizes (for instance, 2.0 mm and 2.5 mm)
- Polyester stuffing
- A piece of cardboard or plastic
- Stones, rice, or other suitable weighting materials
- Eyes of appropriate size ( I recommend 8 mm)
Abbreviations (US Terms):
MR – Magic Ring
sc – Single Crochet
ch – Chain
st – Stitch
slst – Slip Stitch
inc – Increase
dec – Decrease
BLO – Back Loop Only
FLO – Front Loop Only
Please note that the wool and hook sizes I mention are merely examples. Using a different type of wool will result in a larger or smaller finished product. The choice of wool is entirely up to you. Additionally, the needle size should be adjusted according to the wool and the desired crochet tension. When making Amigurumis, it’s advisable to use a smaller hook size than what’s typically recommended on the yarn label or for other crochet projects. This prevents holes from forming when stuffing. For instance, I achieved a diameter of 4.5 cm after crocheting six rounds with a 2 mm hook. Unless specified otherwise, the pattern is worked in spiral circles.
CADDY DOLLS PATTERN
Head / Body:
To start, choose a skin color yarn.
1: Make a magic ring (MR) and single crochet (sc) 6 stitches into it. (6 stitches)
2: Increase (inc) in each stitch around. (12 stitches)
3: Sc 1, inc repeat 6 times. (18 stitches)
4: Sc 2, inc repeat 6 times. (24 stitches)
5: Sc 3, inc repeat 6 times. (30 stitches)
6: Sc 4, inc repeat 6 times. (36 stitches)
7: Sc 5, inc repeat 6 times. (42 stitches)
8: Sc 6, inc repeat 6 times. (48 stitches)
9: Sc 7, inc repeat 6 times. (54 stitches)
10-19. Single crochet in each stitch for 10 rounds. (54 stitches per round)
If you’re using safety eyes, attach them now between rounds 12 and 13, leaving about 8 stitches between them. If you’re using sew-on eyes, you can attach them later at this point.
20: Single crochet 7 stitches, then decrease, repeat this sequence 6 times. (Total: 48 stitches)
21: Single crochet 6 stitches, then decrease, repeat this sequence 6 times. (Total: 42 stitches)
22: Single crochet 5 stitches, then decrease, repeat this sequence 6 times. (Total: 36 stitches)
23: Single crochet 4 stitches, then decrease, repeat this sequence 6 times. (Total: 30 stitches)
24: Single crochet 3 stitches, then decrease, repeat this sequence 6 times. (Total: 24 stitches)
25: Single crochet 2 stitches, then decrease, repeat this sequence 6 times. (Total: 18 stitches)
26: Slip stitch 1 in each stitch. (Total: 18 stitches)
27 (Back Loop Only): Single crochet 2 stitches, then increase, repeat this sequence 6 times. (Total: 24 stitches)
28: Single crochet 3 stitches, then increase, repeat this sequence 6 times. (Total: 30 stitches)
29: Single crochet 9 stitches, then increase, repeat this sequence 3 times. (Total: 33 stitches)
30: Single crochet 10 stitches, then increase, repeat this sequence 3 times. (Total: 36 stitches)
31: Single crochet in each stitch around. (Total: 36 stitches)
Change clothing color to dark gray:
32.-37. (6 rounds) Single crochet in each stitch (36)
38: (Single crochet 10, decrease) repeat 3 times (33)
39: Single crochet in each stitch (33)
40: (Single crochet 9, decrease) repeat 3 times (30)
41: Slip stitch 1 in each stitch (30)
42: Back loop only: (4 single crochet, increase) repeat 6 times (36)
43: (Single crochet 5, increase) repeat 6 times (42)
44: (Single crochet 6, increase) repeat 6 times (48)
45: (Single crochet 7, increase) repeat 6 times (54)
46: (Single crochet 8, increase) repeat 6 times (60)
47.-78. (32 rounds) Single crochet in each stitch (60)
79: (Single crochet 9, increase) repeat 6 times (66)
80: (Single crochet 10, increase) repeat 6 times (72)
Fasten off, hide the yarn later in the body.
Dark gray (color of clothing)
1: Single crochet 8 into a magic ring (8)
2: Increase in each stitch around, 8 times (16)
3: (Single crochet 1, increase) repeated 8 times (24)
4: (Single crochet 2, increase) repeated 8 times (32)
5: (Single crochet 3, increase) repeated 8 times (40)
6: (Single crochet 4, increase) repeated 8 times (48)
7: (Single crochet 5, increase) repeated 8 times (56)
8: (Single crochet 6, increase) repeated 8 times (64)
9: (Single crochet 7, increase) repeated 8 times (72)
Don’t fasten off; now, connect the bottom to the body.
Start by cutting out a circle from sturdy cardboard or flat plastic, like from packaging. Make it the same size as the bottom of your project to add stability.
To weigh down the bottom of your project, add some heavy material like a cleaned stone or rice in a bag at the bottom of the dress.
Now, start crocheting the bottom plate and the dress together:
- Insert your crochet hook through both pieces.
- Chain 1, then single crochet (sc) 8 times, increasing (inc) every now and then. Do this 8 times around. Finish the round by slip stitching (slst) into the first single crochet. You’ll have 80 stitches.
- For the next round, single crochet once, chain 2, single crochet again all in one stitch, then skip the next stitch. Repeat this pattern around the circle until you reach the end of the round. Finish the round with a slip stitch into the first single crochet.
Caddy Dolls Arms (Make 2)
Using yarn in your desired skin color
Start by making a magic ring (MR).
Round 1: Single crochet (sc) 6 stitches into the magic ring. (6 stitches)
Round 2: Increase (inc) in each stitch around. (12 stitches)
Round 3: Single crochet in 3 stitches, then increase Repeat this pattern 3 times. (15 stitches)
Rounds 4 to 8: Single crochet in each stitch around for 5 rounds. (15 stitches per round)
Round 9: Single crochet in 1 stitch, then decrease Repeat this pattern 5 times. (10 stitches)
Rounds 10 to 24: Single crochet in each stitch around for 15 rounds. (10 stitches per round)
Round 25: Decrease (dec) in each stitch around. (5 stitches)
Fasten off, leaving a long tail for sewing.
Hairdo:
Color: silver/light grey
1: Start with a magic ring, single crochet 6 stitches into it. (6 stitches)
2: Increase in each stitch around. (12 stitches)
3: Single crochet 1 stitch, then increase Repeat around. (18 stitches)
4: Single crochet 2 stitches, then increase Repeat around. (24 stitches)
5: Single crochet 3 stitches, then increase Repeat around. (30 stitches)
6: Single crochet 4 stitches, then increase Repeat around. (36 stitches)
7-11. Single crochet in each stitch for 5 rounds. (36 stitches)
12: Single crochet 4 stitches, then decrease Repeat around. (30 stitches)
13: Slip stitch in each stitch around. (30 stitches)
14: In the front loops only, single crochet 4 stitches, then increase Repeat around. (36 stitches)
15: Single crochet 5 stitches, then increase Repeat around. (42 stitches)
16: Single crochet 6 stitches, then increase Repeat around. (48 stitches)
17: Single crochet 7 stitches, then increase Repeat around. (54 stitches)
18-26. Single crochet in each stitch for 9 rounds. (54 stitches)
27: Single crochet 1 stitch, chain 1, single crochet 1 stitch in one stitch, skip 1 stitch Repeat until the end of the round.
Fasten off, leaving a long tail for sewing.
Hair ribbon:
In a soft pink hue,
Various choices are available.
Consider crafting a chain of suitable length to encircle the bun, crocheting 1 or 2 rows of single crochet stitches, then wrapping it around the bun and securing it with stitches.
Big bag for the apron:
To make the big bag’s apron, you’ll need a bigger hook and pink yarn.
Row 1: Start by making a chain of 41 stitches, then single crochet (sc) into the second chain from the hook and continue to sc in each stitch across. You’ll have 40 stitches.
Rows 2 to 21: Single crochet in each stitch across, maintaining 40 stitches per row.
Row 22: Single crochet in the first 17 stitches, then stop. Turn your work.
Row 23: Chain 1, skip the first stitch, and single crochet in the next 16 stitches. Turn.
Row 24: Chain 1, single crochet in the next 15 stitches. Turn.
Row 25: Chain 1, skip the first stitch, and single crochet in the next 14 stitches. Fasten off invisibly.
Now, join the yarn on the other side of your work. Turn the piece, and crochet from the edge towards the middle, without covering the entire width.
Row 26: Single crochet in the first 15 stitches, then stop. Turn.
Row 27: Chain 1, skip the first stitch, and single crochet in the next 14 stitches. Turn.
Row 28: Single crochet across the entire width (40 stitches).
Fasten off invisibly.
Caddy Dolls Apron:
You’ll need a pink yarn and a crochet hook size 2.5 mm, just a bit bigger than the other pieces. We’ll be working in rows, starting each row with a chain and turning the work at the end of each row. When decreasing, you can skip one stitch for a more seamless look.
Chain 41 and single crochet (sc) in each chain starting from the second chain from the hook. (40 stitches)
2-29. Single crochet in each stitch across. (40 stitches for each row)
(Single crochet in 8 stitches, then decrease) repeat this pattern 4 times. (36 stitches)
(Single crochet in 7 stitches, then decrease) repeat this pattern 4 times. (32 stitches)
(Single crochet in 6 stitches, then decrease) repeat this pattern 4 times. (28 stitches)
(Single crochet in 5 stitches, then decrease) repeat this pattern 4 times. (24 stitches)
Place the big bag on the apron and mark where it ends. This will help you know where to attach them later.
Chain 30-40 (depending on how long you want the ribbon to be), then slip stitch back to the apron, slipping stitches along the upper side of the apron in each stitch. Chain 30-40 for the other ribbon, then slip stitch back. Single crochet along the side (1 stitch per row), find the marker, and start crocheting the bag and apron together from there. Single crochet along the bottom through both pieces, then along the other side. Finish with a slip stitch into the first stitch. Fasten off invisibly.
Join the yarn into the 7th stitch from the beginning of the row for the upper part of the apron. Make 1 chain into the front loop only. Crochet in rows.
Row 1: Single crochet (sc) in the front loop only of 12 stitches.
Rows 2 to 8: Single crochet in each stitch across (12 stitches).
Fasten off invisibly.
Join the yarn at the right side of the newly made piece, make 1 chain. Now, work 1 single crochet along the side for each row. When you reach the top, crochet 30-40 chains for the ribbon, then go back with slip stitches. Make slip stitches along the top, then again crochet 30-40 chains for the ribbon and go back with slip stitches. Finally, work 1 single crochet per row along the side.
Fasten off invisibly.
Make two little bags in corresponding sizes:
For one bag, make a rectangle with 20 stitches width and 12 rows.
For the other bag, make a rectangle with 10 stitches width and 20 rows.
Crochet around both rectangles with single crochet, making 3 single crochet stitches into each corner for a nice finish.
Divide the big bag into three parts by sewing a few stitches at the top.
Sew the little bags to the big bag.
Optionally, you can make a nice finish for the entire apron. Crochet, for example, with off-white yarn: make 1 chain, then 1 slip stitch, and repeat around.
FINISHING
To finish your cady dolls details… Stuff the bun and attach it to the top of the head with pins.
Create the ears by crocheting 6 stitches in a magic ring using skin-colored yarn, leaving a tail for sewing. Make two of these. Pin the ears to the sides of the head.
If you’re using eyes, sew them onto the head. Ensure they’re positioned correctly.
Check the alignment of the ears and hair once more. If everything looks good, sew them securely onto the head.
Embroider the nose and mouth onto the face.
For a more aged look, like the one in the picture on the right, skip embroidering the mouth. Follow the same steps until reaching the mouth area.
Between the markers for the mouth, there should be around 8 stitches, approximately 3 rounds below the nose. Thread a needle with skin-colored yarn.
Insert the needle into the back of the neck and bring it out at one of the markers. Then, insert it into the second marker and return to the neck, exiting at the starting point.
Pull the thread tightly to shape the mouth, then knot it securely and hide the ends inside the doll’s head.
Now that the mouth is done, let’s fix up the face a bit. The nose might look a bit off. Use a thread that matches the color of the skin. Start by inserting your needle in the middle of the front side, between the head and body. Come out on one side, just above or next to the nose. Then, insert the needle on the other side of the nose and bring it back down to where you started. Pull the thread gently to shape the top of the nose nicely. Tie a tight knot and hide the ends of the thread.
First, if you make a mistake when sewing on the mouth, don’t worry. You can easily undo it and try again. Next, sew the arms on the sides of the head. Lastly, put on the apron and tie the ribbons at the back into a bow.
Inspiring Creativity
Caddy Dolls are not just art objects but also sources of inspiration and creativity. They encourage artisans to experiment with new patterns, techniques, and color combinations, thus expanding their creative horizons. Moreover, Caddy Dolls have the power to evoke nostalgic memories and awaken the imagination, making them perfect gifts for people of all ages.
Conclusion
Crochet Caddy Dolls are more than just dolls; they are testimonies to human skill and imagination. With their timeless beauty and irresistible charm, they capture the hearts and inspire the creativity of all those who have the pleasure of encountering them. Therefore, if you haven’t had the opportunity to be enchanted by these lovely creations yet, it’s time to discover the wonderful world of Crochet Caddy Dolls. See you soon!

Wow…
Lovely work
très beau espère pouvoir en réussir un pareil merci pour le patron
😍🤩
Oh yes I want these.
So cute!!
I’m going to try to do this!!