
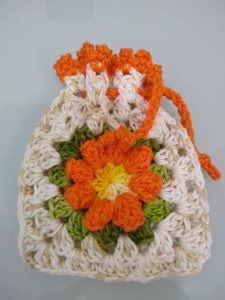
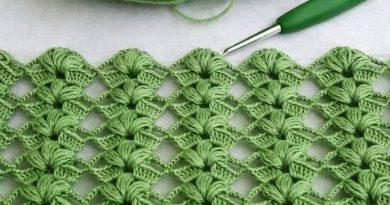
Little Granny Bags
Hello, my dear reader! Welcome to our lovely blog Handmade Learning Here. Today, we’re excited to share with you a very useful item for everyday life. You can make this type of item to gift someone special, like your grandma, or even for your little ones. We’re talking about adorable little crochet bags, also known as Little Granny Bags.
This pattern combines the simplicity of the granny square crochet technique with the practicality of a soap pouch, creating a small bag that’s both practical and charming, perfect for gifting or personal use.
Origins of the Granny Square Pattern
Before we dive into the Little Granny Bag pattern, it’s interesting to know a bit about the history of the granny square in crochet. The granny square is one of the most iconic and versatile crochet patterns, and it has been used for generations to create a variety of items, from blankets and clothing to household accessories.
The exact origin of the granny square is difficult to pinpoint, but its popularity grew especially during the 1970s, when the crafting craze was in full swing. The granny square pattern is known for its simplicity and the countless variations that can be created from it.
The Charm of the Little Granny Bags
The Little Granny Bag pattern is an adorable variation of the traditional granny square, specifically designed to store small items, whether it’s a cellphone or makeup, in a beautiful and practical way. This project is ideal for crocheters of all skill levels, from beginners to the more experienced.
Materials Needed
To get started on making your own Little Granny Bags, you’ll need the following materials:
Crochet Hook – H / 5.00mm
Yarn- Cotton Med (4) 2 oz. total
Yarn Needle
Bar of Soap
Skill Level: Easy
Size: 4.5 X 5 Inches
ABBREVIATIONS
Chain – CH
Slip Stitch – slst
Single Crochet – SC
Half Double Crochet – HDC
Space – SP
Skip – SK
PATTERN NOTES:
-
The first chain (Ch1) is not considered as a stitch (st).
-
Color changes are not specified within the pattern.
PATTERN
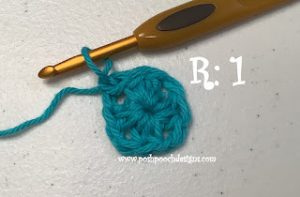
Row 1: Chain 5, join to form a circle, chain 1, Make 2 half double crochet stitches, chain 1 Repeat this sequence 3 more times, Join to the first half double crochet stitch with a slip stitch, Then slip stitch in the next half double crochet stitch, slip stitch in the next chain-1 space, chain 1 (You’ll have 4 sets of 2 half double crochet stitches with a chain-1 space in between each set).
Row 2: Make 2 half double crochet (hdc) stitches, chain 1, then make 2 hdc stitches in the same chain-1 space, followed by chaining 1. Repeat this pattern: *2 hdc stitches, chain 1, 2 hdc stitches in the next chain-1 space, then chain 1*. Repeat from * to * two more times. Join to the first hdc stitch with a slip stitch (slst), then make a slip stitch in the next hdc stitch and in the next chain-1 space. Chain 1. You’ll have completed 4 sets of 2 hdc stitches, separated by chain-1 spaces.

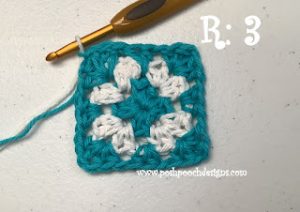
Row 3: Make 2 half double crochet (hdc) stitches. Chain 1. Make 2 hdc stitches in the chain 1 space. Chain 1. Make 2 hdc stitches in the next chain 1 space. Chain 1.
Repeat the following pattern: *Make 2 hdc stitches, chain 1, make 2 hdc stitches in the next chain 1 space, chain 1, make 2 hdc stitches in the next chain 1 space, chain 1*. Repeat this (from * to * ) two more times.
Join to the first hdc stitch with a slip stitch. Slip stitch in the next hdc stitch, slip stitch in the next chain 1 space, chain 1.
(You’ll end up with 4 sets of 2 hdc stitches, chain 1, 2 hdc stitches, chain 1, 2 hdc stitches, chain 1).
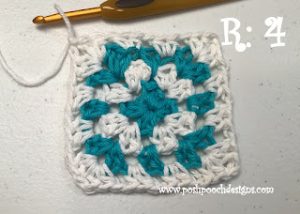
Row 4: Make 2 half double crochet stitches (hdc), then chain 1. Next, make 2 hdc in the same chain-1 space, then chain 1 again. After that, make 2 hdc stitches and chain 1 in each of the next two chain-1 spaces.
Now, repeat the following pattern: make 2 hdc stitches, chain 1, and make 2 hdc stitches in the next chain-1 space. Then chain 1. Continue this pattern by making 2 hdc stitches and chaining 1 in each of the next two chain-1 spaces. Repeat this pattern two more times.
To finish the row, join to the first hdc stitch with a slip stitch (slst). Then make a slip stitch in the next hdc stitch, followed by a slip stitch in the next chain-1 space. Chain 1 to complete the row.
In summary, you’ll end up with 4 sets of (2 hdc, ch1, 2 hdc, ch1, 2 hdc, ch1, 2 hdc, ch1).
Row 5: *Single crochet (sc), chain 1 (ch1), sc in the ch1 space, then sc in the next 2 half double crochet (hdc) stitches. Repeat this pattern: sc in the next ch1 space, sc in the next 2 hdc stitches, sc in the next ch1 space, sc in the next 2 hdc stitches, and sc in the ch1 space again, followed by sc in the next 2 hdc stitches.* Repeat this sequence from * to * 3 more times. Join to the first sc with a slip stitch (slst). Tie off and weave in the ends. (You’ll have 4 sets of sc, ch1, sc, and a total of 11 sc stitches in each set).

Repeat R1 – R5
You will need 2 of The Granny Squares
Leave The Yarn attached to the 2nd Square
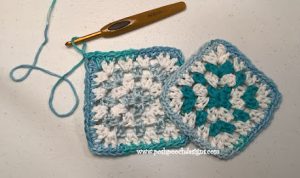
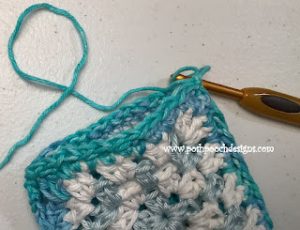
Row 6: Put the granny squares together with the pretty sides facing out. Start by attaching yarn at the top left corner and sew them together. Use the top loops and follow this pattern: slip stitch, chain 1, skip 1 single crochet. Keep repeating this pattern along the three edges.

When you’ve reached the upper right corner,
Repeat from * to * all around the top edge of the bag,
Join to the first single crochet, chain 1
.
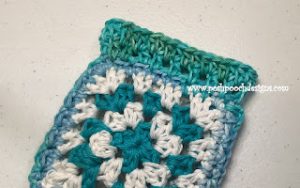
Row 7: *Half double crochet in the first chain 1 space, then chain 1*. Repeat this pattern from * to * all the way around. Join to the first half double crochet with a slip stitch, then chain 1.

Row 8: Make one half double crochet (hdc) stitch in each hdc stitch and in each chain-1 space all the way around. Then, join to the first hdc stitch, tie off the yarn, and neatly weave in the loose ends.
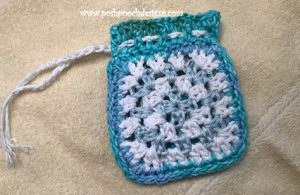
Make a chain of 50 stitches, then thread the chain through the chain-1 spaces of Row 7. Finally, tie the ends of the chain together.
Little Granny Bags – VIDEO TUTORIAL
Dear reader, here we have a beautiful version available in a video tutorial made by Sara Sach Crochet Designs of Posh Pooch Designs’ YouTube channel. It’s a very educational video tutorial and you can watch it below:
To add a special finishing touch to your Little Granny Bags, you can opt to include a decorative edging, such as a shell border or pom-poms.
Personalize Your Little Granny Bags
One of the best things about the Little Granny Bags pattern is the ability to customize it according to your personal preferences. You can choose vibrant colors to add a touch of joy to your bathroom, or opt for more neutral tones for a sleeker look. Additionally, you can experiment with different crochet stitches to add texture and visual interest to your project.
Conclusion
The Little Granny Bags pattern is a charming and practical way to incorporate handmade touches into your daily life. With its simplicity and versatility, this project is perfect for crocheters of all skill levels. So, grab your crochet hooks and your favorite yarn, and start creating your own Little Granny Bag today! We’re thrilled to have you here with us, dear crochet friend, as always, sharing knowledge with you is an honor. Thank you for joining us once again! Now gather the necessary materials to make this lovely pattern and let’s put into practice all that we’ve learned! Have a wonderful day. See you soon. XoXo
Such a cute pattern thank you, I enjoy the information and patterns on your site and it’s a real plus to be able to download pdf patterns . 🤩