
3D Illusion Blanket
Hello, dear reader. Welcome to our lovely blog, Handmade Learning Here. Today, we would like to present the stunning 3D Illusion Blanket pattern. Without a doubt, this blanket is one of the most intriguing I’ve ever seen in my life, boasting outstanding beauty. It plays a trick on our eyes, creating a 3D effect and a truly cool optical illusion. It doesn’t even look like a crochet piece.
This blanket is exceptionally beautiful, making it the perfect gift for anyone. Who wouldn’t love to receive a blanket like this and own such a unique piece? The step-by-step instructions are not that difficult to follow, making it suitable for crafters of any level of crochet experience. The required skill level is EASY.
This unique piece combines craftsmanship with an illusory touch, resulting in a blanket that transcends simple functionality, transforming into a work of art that captivates eyes and warms souls. In this article, we’ll explore the fascinating details of the Illusion 3D blanket and provide color suggestions to inspire your next masterpiece.
The 3D Illusion blanket is a crochet piece that uses a special technique to create three-dimensional illusory patterns. This technique involves the combination of specific stitches that, when worked strategically, give the sensation of depth and movement to the eye. The result is a blanket that is not only warm but also visually intriguing.

Technical details
Specific Stitches: The 3D Illusion blanket generally makes use of stitches such as high stitches and low stitches to create the illusion of shadows and highlights.
Color Scheme: Careful choice of colors is crucial to the effectiveness of the illusion technique. The chosen nuances will influence the three-dimensional perception of the blanket. Contrasting and complementary colors are often used to enhance the effect.
Geometric Patterns: Geometric shapes, such as squares or triangles, are commonly employed to maximize the illusion effect. Crochet is skillfully manipulated to create patterns that play with visual perspective.
Color Suggestions:
If you are unsure of which colors to use in your project, here are some suggestions:
Deep Ocean: Combine shades of dark blue, emerald green, and turquoise to create an Illusion 3D blanket that evokes the serenity of the ocean depths.
Abstract Sunset: Try mixing warm tones like orange, pink, and violet to create a blanket that captures the ethereal beauty of a sunset.
Enchanted Garden: Opt for a palette of greens, pinks, and lavenders for a throw that looks like an enchanted garden in full bloom.
PATTERN
MATERIALS
We will follow the guidelines set by the Yarnspirations standard, but feel free to substitute the shades and colors according to your preference.
YARN
Caron x Pantone Collaboration (Weight: 3.5 oz (100 g) and Yardage: 127 yds (116 m)).
Color Options:
Constrat A Mushroom Greige (01002) – 6 braids
Contrast B Dane Gray (01003) – 7 braids
For Contrasts C, D, E, F, and G (as specified below), you’ll need 6 bundles of Blueberry (01009).
To work with this yarn, use a U.S. K/10½ (6.5 mm) crochet hook or whichever size is necessary to match the required gauge.
ABBREVIATIONS (US TERMS)
Approx – Approximately
Beg – Beginning
Beg dec – Ch 3. Skip first dc. 1 dc in next dc – counts as 1 dc
Beg inc – Ch 3. 1 dc in first dc – counts as 2 dc
Ch – Chain(s)
Cont – Continue(ity)
Dc – Double crochet
Dc2tog – (Yoh and draw up a loop in next stitch. Yoh and draw through 2 loops on hook) twice. Yoh and draw through all loops on hook
Dec – Decrease
Tog – Together
Rem – Remain(ing)
Rep – Repeat
RS – Right side
Sl st – Slip stitch
St(s) – Stitch(es)
WS – Wrong side
Yoh – Yarn over hook
3D ILLUSION BLANKET – DIMENSIONS
Approximately 50×60 inches (127 x 152.5 cm).
GAUGE
Achieving a gauge of 11 double crochet stitches and 6 rows = 4 inches (10 cm).
Notes:
Prepare Yarn: Before using Caron x Pantone multi-shade yarn braid, separate each color link and wind it into 5 separate balls.
Identify Colors: Each color link is identified by its Pantone number, which can be found on the ball band.
Maintain Gauge: To achieve successful results, make sure to match the pattern gauge. This is important due to the limited amount of yarn available in each shade.
3D ILLUSION BLANKET STEP BY STEP
Diamond Motif:
Make 27 with A.
Make 27 with B.
Make 3 with C.
Make 6 with D.
Make 6 with E.
Make 6 with F.
Make 3 with G.
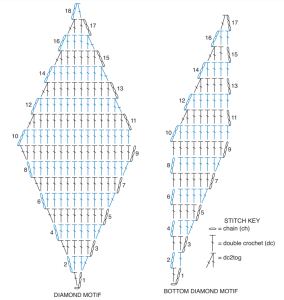
**Ch4. See the diagram below
Row 1: On the right side (RS), make a double crochet (dc) in the fourth chain from the hook, counting as 2 dc. Then, make 2 more dc. Turn your work.
Row 2: Start increasing. Make 2 dc in the next dc. 4 dc. Turn your work.
Row 3: Start increasing. Make 1 dc in each of the next 2 dc, and then make 2 dc in the last dc. 6 dc. Turn your work.
Row 4: Keep increasing. Make 1 dc in each dc until the last dc, and then make 2 dc in the last dc. You’ll have 8 dc. Turn your work. Repeat the last row 5 more times. In total, you’ll have 18 dc.**
Decrease (Dec) Section:
Next Row: On the wrong side (WS), start decreasing. Make 1 dc in each dc until the last 2 dc. Double crochet two together (dc2tog). You’ll have 16 dc. Turn your work. Repeat this row 6 more times. You’ll end up with four dc.
Next Row: Start decreasing again. Double crochet two together (dc2tog), make 2 dc. Turn your work.
Next Row: Continue decreasing. Make 1 dc. Fasten off.
Side Triangle Motif:
(Make 3 motifs using colors C and G)
Following the instructions from ** to ** as given for Diamond Motif. Fasten off.
Bottom Diamond Motif (make 1 each with C, D, E, and F)
See diagram below.
***Ch4.
Row 1 (Right Side): Make 1 double crochet in the 4th chain from the hook (this counts as 2 double crochets). Turn.
Row 2: Ch3 (this counts as a double crochet throughout). Make 1 double crochet in the next double crochet. 2 double crochets. Turn.
Row 3: Begin increasing. Make 1 double crochet in the next double crochet. 3 dc. Turn.
Row 4: Ch3. Skip the first double crochet. Now, make 1 double crochet in each double crochet until the last one. 2 double crochets in the last double crochet. 4 double crochets. Turn.
Row 5: Begin the increase. Make 1 double crochet in each double crochet until the end of the row. 5 double crochets. Turn. Repeat the last 2 rows twice more. 9 double crochets.***
****Dec as follows:
Next row: Wrong Side (WS). With the wrong side facing you, start the decrease. Make 1 double crochet (dc) in each dc until the end of the row. 8 dc. Turn your work.
Next row: Ch 3. Make 1 dc in each dc until the last 2 dc. Perform a double crochet decrease (dc2tog). 7 dc. Turn your work. Repeat the last 2 rows twice more.
Next row: Start the decrease again. Make 1 dc in the next dc, then make 2 dc. Turn your work.
Next row: Perform a double crochet decrease (dc2tog). Fasten off your yarn.****
Two Color Top Triangle Motif (make 4)
Using color B, start working from *** to *** as instructed for the bottom diamond motif.
Once completed with B, switch to color A.
Work from **** to **** using color A, following the instructions for the bottom diamond motif.
Corner Motif (make 1 each in A and G)
Work from *** to *** as instructed for the Bottom Diamond Motif. Finish off. Please be aware that the Right Side (RS) and Wrong Side (WS) will be switched during the assembly process.
FINISHING
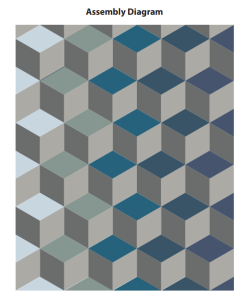
Complete the sewing process by stitching the motifs together following the instructions in the assembly diagram below. Use a flat seam for this step
BORDER
Start with the right side facing you, and attach a new color (Color B) by making a slip stitch to any corner.
Round 1: Ch 1, then single crochet evenly around the entire blanket, making sure to crochet 3 single crochets in each corner. Connect with a slip stitch to the first single crochet.
Round 2: Ch 1. Instead of working from right to left as usual, work from left to right this time. Make a reverse single crochet in each single crochet around. Join with a slip stitch to the first stitch.
If you prefer to have this pattern on hand, here we leave a PDF version made by Yarnspirations for you to print:
3D ILLUSION BLANKET DIAGRAM
Here is the graph that will assist you in executing your project.
VIDEO TUTORIAL
Dear reader, we always like to leave a video tutorial so you can better understand the pattern. We also know that there are people who prefer this form of learning. Therefore, we have put together a very educational video made by Marifu6a’s YouTube channel and you can watch it below:
The 3D Illusion blanket is truly an artistic expression that transcends the boundaries of functionality. By mastering the technique and experimenting with color, you can create a unique piece that will not only warm up your space but also become the visual focal point. Immerse yourself in the magic of crochet and begin your journey to create an 3D Illusion blanket that is both a technical feat and a manifestation of beauty. Your home will never be the same!
It’s great to have you here with us, dear reader. I hope your project is as beautiful as you envision and exceeds your expectations. Share this pattern with your best friends now so they can have fun with this awesome project too. I hope to see you here more often; we have many articles featuring different crochet patterns that you’ll love. Now, let’s put what we’ve learned into practice. See you soon! Have a great day. XoXo 🩷✨
Love the 3D pattern
I love the 3D pattern
Absolutely amazing