
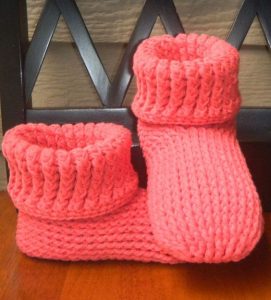
Crochet Slippers
Welcome, fellow crochet enthusiasts, to another exciting article of our blog Handmade Learning Here! Today, we’re diving into the delightful world of crochet and exploring the art of making cozy crochet slippers. Whether you’re a seasoned crocheter or just starting on your crafting journey, this project is perfect for creating functional and stylish footwear that will keep your toes warm in the most charming way possible.
In cold weather, there is nothing more comforting than having your feet warm. This project is perfect for that, ideal for harsh cold days like January and February. However, throughout the year you can wear your crochet slippers, as they are a very comfy piece that will bring you comfort with their softness and leave you completely at ease, just as you should feel at home.
Choosing the Right Yarn:
Before we get our hands busy with hooks and stitches, it’s crucial to choose the right yarn for your crochet slippers. Opt for a soft and durable yarn that provides the comfort and warmth you desire. Worsted weight yarn is a popular choice for slippers, striking the perfect balance between thickness and flexibility.
Getting Started:
Once you’ve selected your yarn and the pattern… Here you go! Gather your crochet hooks and any additional materials specified in the pattern. Begin by creating a slipknot and foundation chain, setting the foundation for your slipper masterpiece. Follow the pattern instructions step by step, paying careful attention to stitch counts and any special techniques involved.
Adding Personal Touches in yout crochet slippers:
One of the joys of crafting your own crochet slippers is the opportunity to add personal touches. Experiment with different color combinations, stitch textures, or even incorporate embellishments like buttons or bows. Customizing your slippers allows you to express your unique style and create a one-of-a-kind pair.
Crochet Slippers Tutorial
SKILL LEVEL – Easy
DIMENSIONS
Sizes for Women: Small (Medium, Large)
Completed Foot Length: 7 1/2 inches (19 cm) for Small, 8 1/2 inches (21.5 cm) for Medium, and 9 1/2 inches (24 cm) for Large.
Note: The pattern is written for the smallest size, with adjustments for larger sizes in parentheses. If only one number is provided, it is applicable to all sizes. To facilitate following the pattern, kindly circle all numbers corresponding to your size before starting.
SUPPLIES
- 1 ball of yarn in your preferred color
- Crochet hook size H-8 (5 mm)
- Stitch markers
- Pom-Pom Maker
- Large-eyed blunt needle
GAUGE
14 sc + 16 rows = about 4 in. (10 cm).
ABBREVIATIONS (US TERMS):
beg: begin(ning)(s)
ch: chain
rep: repeat
RS: right side
rnd(s): round(s)
sc: single crochet
sk: skip
sl st(s): slip stitch(es)
st(s): stitch(es)
STITCH EXPLANATION
sc2tog (single crochet 2 stitches together): To make this stitch, insert your crochet hook into the first stitch and draw up a loop. Then, insert your hook into the next stitch and draw up another loop. Yarn over and draw the yarn through all three loops on the hook. This completes the sc2tog stitch, effectively decreasing the stitch count by one.
NOTES
- Begin by working the sole back and forth in rows, then proceed to work the sides in rounds around the outer edge of the sole.
- Work the top of the foot in rows, and subsequently, work the cuff around the ankle edge.
- Attach pom-poms to each slipper as the finishing touch.
CROCHET SLIPPERS (make 2)
Sole
Start with Ch 9 (11, 13) stitches.
Row 1: Single crochet in the second Ch from the hook, and continue single crocheting in each chain across. You should end up with 8 (10, 12) single crochet stitches.
Note about sizes: S(M,L)
Rows 2 to 11 (13, 15): Ch 1, turn your work, and single crochet in each single crochet across.
Row 12 (14, 16): Ch 1, turn your work. Make 2 single crochet stitches in the first single crochet, then single crochet in each sc until you reach the last single crochet. Finally, make 2 single crochet stitches in the last single crochet.
Note: There should be a total of 10 (12, 14) single crochet stitches at the end of this row.
Row 13 (15, 17): Ch 1, turn your work. Single crochet in each single crochet across.
Repeat the last row until the piece (sole) measures approximately 7 1/2 (8 1/2, 9 1/2) inches (19 (21.5, 24) centimeters) from the beginning.
SIDES
Note: Sides of Slippers are worked in rounds.
Round 1 (Right Side – RS): Chain 1, turn your work, single crochet (sc) in each sc across the last row of the sole (which is the toe). Then, evenly space 26 (for the small size), 30 (for the medium size), or 33 (for the large size) single crochets along the side of the sole. Next, work 8 (for the small size), 10 (for the medium size), or 12 (for the large size) single crochets across the opposite side of the foundation chain (which is the heel). Continue by evenly spacing 26 (for the small size), 30 (for the medium size), or 33 (for the large size) single crochets across the other side of the sole.
Do not join; instead, work in continuous rounds. At the end of this round, you should have a total of 70 (for the small size), 82 (for the medium size), or 92 (for the large size) single crochets. Place a marker to indicate the beginning of the round, and move the marker up as each round is completed.
Next 4 (4, 5) Rounds: crochet in the front loops only, single crochet in each single crochet around. Remove the marker.
Top of Foot
NOTES
- The slip stitches (sl sts) at the and of each row are intended for joining the top of the foot to the sides of the Bootie. Skip the slip stitches when working to the next row.
- Don’t Chain 1 at the beginning of rows.
Row 1 (Right Side): Don’t turn at the beginning of this row, keep going in the same direction as the last round you worked. Crochet in the front loops only, single crochet in the next 11 (13, 15) sc, then crochet in both loops and slip stitch in the next 2 sc. Leave the remaining stitches untouched.
Row 2: Turn your work and skip the first 2 slip stitches. Now, focus on the front loops only and perform a single crochet decrease (sc2tog) 6 (7, 8) times. After that, switch to working in both loops and slip stitch in the next 2 single crochets on the side of the Bootie. At the end of this row, you should have 6 (7, 8) stitches.
Row 3: Turn your work. Skip the firsts 2 slip stitches, working in front loops exclusively. Create 2 single crochet stitches in the first single crochet, followed by a single crochet in each of the next 4 (5, 6) single crochets along the top of the foot. Finish the row by making 2 single crochets in the last single crochet. Now, switch to working in both loops and slip stitch in the next 2 single crochets on the side of the slipper. At the completion of this row, you should have 8 (9, 10) single crochets.
Row 4: Turn your work. Skip the first two slip stitches, and in the front loops only, make 2 single crochets in the first single crochet. Then, single crochet in the next 6 (7, 8) single crochets across the top of the foot. After that, make 2 single crochets in the last single crochet. Now, working in both loops, slip stitch in the next 2 single crochets on the side of the slipper. At the end of this row, you should have a total of 10 (11, 12) single crochets.
In the following 14 (18, 20) rows: Turn your work. Skip the first 2 slip stitches, then crochet in the front loops only. Make a single crochet in the next 10 (11, 12) stitches along the top of the foot. Now, switch to working in both loops and slip stitch in the next 2 single crochets on the side of the slipper.
Next Row: Turn your work. Skip the first 2 slip stitches and crochet in only the front loops. Make a single crochet in the next 10 (11, 12) sc along the top of the foot. Then, switch to crocheting in both loops and slip stitch in the next single crochet on the side of the slipper.
CUFF
Round 1 (Right Side): Turn your work and skip the first slip stitch. Insert your hook through both loops, and make 26 (28, 32) single crochet stitches evenly around the entire opening of the slipper. Do not join; instead, continue working in continuous rounds – you should have 26 (28, 32) stitches at the end of this round. Place a marker to indicate the beginning of the round, and move the marker up as you complete each round.
Round 2: Make one single crochet in each single crochet around.
Repeat Round 2 until the cuff measures approximately 4 1/2 inches (11.5 cm).
Fasten off.
FINISHING
Creating Pom-poms:
Using the instructions on the package, craft four small pom-poms. Make sure to keep long yarn tails for the tying strand on each pom-pom.
Attaching Pom-poms to Slippers:
Securely tie two pom-poms to the outside edge of each slipper cuff.
Finishing Touch:
Complete the process by neatly weaving in any loose ends.
Dear reader, if you prefer a printable version, here is a very educational PDF with this pattern made by Lion Brand and you can access it below:
VIDEO TUTORIAL
Dear reader, we will leave here a learning option in video tutorial format. The video tutorial has a very easy pattern to make, perfect for beginners, it is a very educational video developed by the YouTube channel CrochetDreamz and you can watch it below:
Crocheting your own slippers is not only a satisfying and relaxing craft but also a practical way to keep your feet warm in style. Whether you’re gifting them to a loved one or treating yourself to a handmade luxury, these crochet slippers are sure to become a cherished addition to your cozy collection. So, grab your hooks and yarn, and let the soothing rhythm of crochet lead you to a pair of comfy, handmade slippers that you’ll adore! Happy crocheting!
Hi .
Your work is beautiful.
As I haven’t the best of eyesight I would love t0 crochet these slippers but would have difficulty with the pattern on my phone but can I print it off?
Can I print the slipper pattern off? Or can P D F IT?