
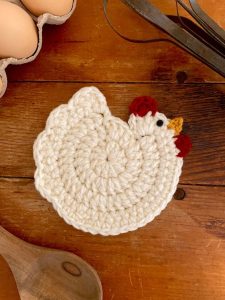
Crochet Chicken Coasters
Hello, dear reader! It’s great to have you here for another day. Today, we want to share with you a lovely and charming pattern called Chicken Coasters. These adorable pieces have a unique and fun charm while being very useful. The best part is that making a coaster like this is not difficult. They are perfect for crafting, allowing you to have several copies on hand in just one or two afternoons. If you’re looking to add a touch of whimsy and functionality to your home decor, these charming coasters are the perfect DIY solution.
Why Crochet Chicken Coasters?
Crochet chicken coasters not only serve a practical purpose by protecting your surfaces from beverage spills but also bring cheerful and rustic charm to your living space. Handmade with love and attention to detail, these coasters are a testament to the artistry and versatility of crochet.
I don’t know why, but chickens seem to have a significant presence in kitchen decorations, don’t they? They are beautiful and have a huge personality, in addition to their friendly appearance. Perhaps that’s why these coasters are so cool and fun. Chicken enthusiasts will love this beautiful specimen.
These adorable table accessories are made with skill and patience, using the ancient crochet technique to create small miniature chickens. Each coaster is crafted with colorful threads and varying textures, providing not only a practical surface to hold glasses and mugs but also a lovely themed home decor. The craftsmanship involved in creating these pieces adds a warm, personal touch to any room, making crochet chicken coasters not only useful but also truly special.
In addition to their practical function, crochet chicken coasters also provide a creative opportunity for craft enthusiasts to express their individuality. With a variety of patterns and colors available, you can choose or create designs that perfectly align with your home decor or the craftsman’s personality.
A BEAUTIFUL WAY TO GIFT…
Whether as a charming gift for friends and family or as a distinctive touch in your own home, crochet chicken coasters celebrate the artisanal tradition and timeless beauty of crochet. You can choose the perfect colors for the project or make your chickens in several different colors and give them as gifts to your loved ones.
MATERIALS
Crochet Hook Size: F (3.75mm)
Yarn: Worsted weight (Approximately 15 yards for the main color; leftover yarn is suitable for red and yellow sections)
Scissors
Darning Needle
CROCHET CHICKEN COASTERS DIMENTIONS
Final Dimensions: 4.5 inches (11cm) in diameter
ABBREVIATIONS (US Terms)
Ch – chain
Sc – single crochet
Dc – double crochet
Ss – slip stitch
Sk – skip
St(s) – stitch(es)
Sc2tog – single crochet next 2sts together
TIP: When finishing your project and dealing with tiny parts like the wattle, comb, and beak, it can be a bit tricky. One trick is to weave the ends under the double crochet stitches in the shell on the back of your work.
PATTERN INSTRUCTIONS
Main Body
Note: Round 1 is the sole round, and the subsequent sections of the project are executed in rows. Each ch3 is equivalent to a double crochet (dc).
Utilizing the magic circle method, create a ch3 and incorporate 11 double crochets (dc) into the ring. Slip stitch (ss) into the top of the ch3.
Round 1: Chain 3 (ch3). Perform a double crochet (dc) in the same stitch as the last ss. Add 2 dc in each stitch around. Slip stitch into the top of the ch3. (24 stitches)
Row 2: Ch3. *Add 2 dc in the next stitch. Perform a dc in the next stitch*. Repeat between the ** 8 more times. Dc into the next 2 stitches. Turn the work. (30 stitches, 3 stitches unworked)
(For the next row, work in the front loops only!)
Row 3: Ch3. Perform 1 dc in the next stitch. *2 dc in the next stitch. Perform a dc in the next 2 stitches*. Repeat between the ** 8 more times. Perform a dc in the next stitch. Perform a dc in the top of the ch3 from the last row. Turn the work. (40 stitches)
Row 4: Ch1. *Skip the next stitch. Add 6 dc in the next stitch. Skip the next stitch. Slip stitch in the next stitch*. Repeat between the ** 7 more times. Single crochet in the next 5 stitches. Add 6 dc in the next stitch. Skip the next stitch. Slip stitch in the top of the ch3 from the last row. (9 dc shells and 5 sc stitches)
Cut the yarn, pull it through the stitch on the needle, and weave in all ends.
WATTLE
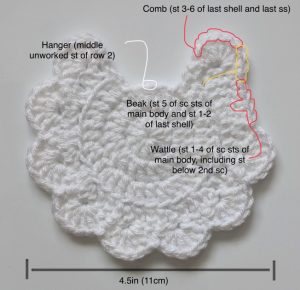
Position the work with the right side facing you. Attach the red yarn at the initial single crochet of the previous row after the slip stitch, precisely where the eighth shell concludes. Refer to the following page for further instructions.
Chain 1. Make 3 single crochet stitches in the row below the next stitch. Skip the next stitch. Slip stitch in the next stitch. Cut the yarn, pull it through the stitch on the needle, and weave in the ends.
COMB
Using the side of the work that’s on your right, attach the red yarn to the third stitch in the ninth shell. Refer to the next page for additional help.
Chain 1. Repeat the sequence 2 double crochet, chain 1, 2 double crochet in the next stitch between the asterisks two more times. Slip stitch in the next stitch.
Cut the yarn, pull it through the stitch on the needle, and tidy up by weaving in all the loose ends.
BEAK
With the right side facing you, attach the yellow yarn to the last single crochet (sc) of the fifth sc in the last row of the main body. For more guidance, refer to the next page.
Ch1 and single crochet in the next 2 stitches. Then, turn your work.
Single crochet two stitches together (sc2tog) for the next two stitches.
Cut the yarn, pull it through the stitch on the needle, and weave in all the loose ends.
HANGER (Optional)
Turn your work so the back side is facing you.
Using the main color yarn, attach it at the middle stitch of row 2. You can find more details on the next page.
Chain 12 stitches.
Slip stitch in the same stitch where you joined the yarn.
Cut the yarn, pull it through the stitch on the needle, and tidy up the loose ends by weaving them in.
Chicken Coaster PDF version
Dear reader, if you prefer to have a pattern to print, here we will make available an incredible and very educational PDF with the chicken coaster pattern made by Cosmic Thread. We will make it available below:
🐔 Crochet Chicken Coaster PDF 🐔
VIDEO TUTORIAL
If you are more visual and prefer learning in the form of a video tutorial, we are leaving here a very educational video that will teach you how to make your adorable chicken coasters, this video is from the YouTube channel Bag-O-Day Crochet and you can watch it it below:
We are so grateful to have you here with us in our space of love and crochet learning. I hope your chicken coasters turn out beautiful. Do you know someone who would love this pattern? So send it to your contacts right now.
We at the Handmade Learning Here team love to bring different patterns to you, our lovely readers, so we are always updating with new things. Look at our other articles and see how many free patterns we have here!
These crochet chicken coasters are a delightful addition to any home, offering a handcrafted touch that showcases your creative flair. Whether you’re an experienced crocheter or a beginner looking for a fun and rewarding project, these coasters are sure to bring joy to your crafting journey.
Share your handmade creations with us on social media using the hashtag #HandmadeLearningHere. I hope your day is amazing and I hope to see you soon…
Happy crocheting!

I just watched your chicken tutorial and enjoyed it very much all the way down to seeing how you tie in your tails! For a beginner you just don’t realize how showing every little step is so appreciated! I am going to make me some chickens tonight!!
I agree! Quite helpful! I will be hatching chickens tonite, as well! Thanks so much for sharing! 💕
This is adorable!! I wish I could Pin it for later…
Adorable! I can’t wait to try them!