
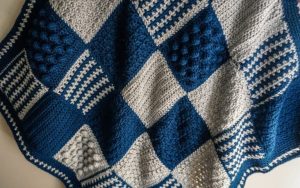
Textured Crochet Blanket
Hello, my beloved readers! I hope you’re doing well! Today, I want to bring you a very special project. It’s the pattern for a blanket that incorporates a combination of various patterns, forming a unique and very elegant design. The interesting thing about this blanket is that you’re free to make it as you wish, and not necessarily will one blanket be exactly like another, since you can alternate the positioning of your squares and the patterns used to make them. It’s the Textured Crochet Blanket.
This Textured Crochet Blanket pattern offers remarkable versatility, making it suitable for crafting items ranging from baby blankets and lapghans to full-sized king blankets.
This pattern basically consists of parts, first you crochet the different squares with the selected patterns, remembering that the more squares you have, the larger your blanket will be. Next, we will join the squares together and add the border.
For this pattern, it is recommended that each block be about 6″ square, depending on your gauge. These squares work SUPER fast! Great for crocheting while watching something on your favorite streaming or listening to a audiobook!
Worsted weight/Aran yarn/size 4 is what we recommend using when crocheting the squares to complete this project, in the colors of your choice.
-approx. 925 yards for baby blanket
-approx. 2200 yards for small throw
-approx. 3800 yards for large throw
-approx. 5600 yards for full
-approx. 7600 yards for king
Crochet hook in size I/5.5mm
What size of blanket are you crocheting? This chart can assist you in determining the number of squares required…
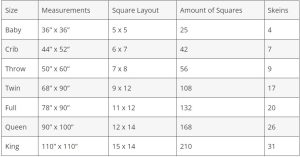
You can mix and match the squares however you want, for a baby blanket you need 25 squares, you can choose the pattern you prefer, here we will leave some suggestions that you can use:
Half Double Crochet
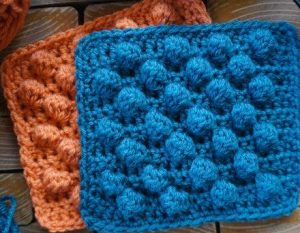
Bobble
Crossed Double Crochet
Lemon peel
Moss Stitch
Mini Bean
Waffle Stitch
Basket Weave Square
Crochet Weaves Square
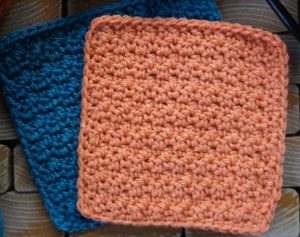
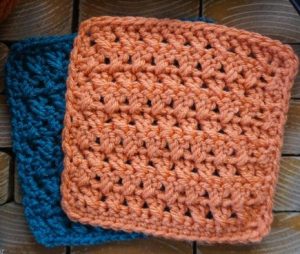
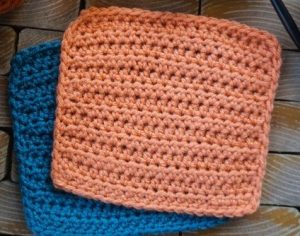
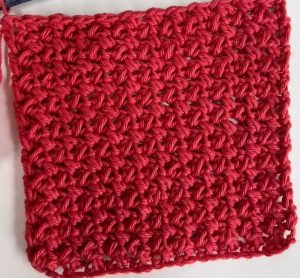
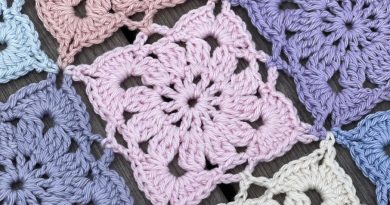
CROCHET SQUARES
Of course, if you want to add some other crochet stitches to this stitch sample blanket, let your creativity guide you and do it according to your preference! Just make sure all of your crochet squares are the same size (within 1/2″) when they are finished. We’ll block the squares before connecting them, but it’s always good to be as close in size as possible anyway.
Don’t worry if the border has exactly the same number of stitches in each square, but make sure you crochet as evenly as possible. If you need help adding a border to your crochet, here is a brief summary that might help you.
Important: Here are available square pattern options that you can use, you don’t necessarily have to use them all, just the ones you like the most.
Bobble Stitch
First, you’ll need to make a foundation chain with 20 chains.
Row 1: Start by doing a half double crochet in the second chain from your hook, and then do one half double crochet in each chain until the end. You’ll have 19 stitches in total.
Row 2: Chain one and turn your work. Do a single crochet in the first two stitches. Then, make a bobble stitch in the next stitch, followed by a single crochet in the next three stitches. Repeat this pattern until you reach the end, then finish with a single crochet in the last four stitches.
Row 3: Chain one and turn. Now, do a half double crochet in each stitch across, maintaining 19 stitches.
Row 4: Chain one and turn. Start with a single crochet in the first four stitches. Then, make a bobble stitch in the next stitch, followed by a single crochet in the next three stitches. Continue this pattern until the end, and finish with a single crochet in the last two stitches.
Rows 5 to 15: Repeat rows 3 and 4 alternatively. (Example: Row 5: Repeat row 3. Row 6: Repeat row 2. Row 7: Repeat row 3. Row 8: Repeat row 4… )
Border: Chain one, then single crochet in each stitch around the entire square, putting two single crochets in each corner stitch. This will give your project a neat finish.
Lemon Peel Stitch
Start by making a chain of 19 stitches (Ch-19).
Row 1: Skip the first two chains, then double crochet (dc) in the third chain from the hook. Single crochet (sc) in the next chain. Repeat this pattern across until the end. You should have 17 stitches.
Row 2: Chain 1 and turn your work. Single crochet in the first stitch, double crochet in the next stitch. Repeat this pattern across, ending with a single crochet in the last stitch.
Row 3: Chain 2 and turn your work. Double crochet in the first stitch, single crochet in the next stitch. Repeat this pattern across, ending with a double crochet in the last stitch.
Rows 4 to 15: Repeat rows 2 and 3 six times.
Row 16: Repeat row 2.
Border: Chain 1, then single crochet in each stitch around the entire square, putting 2 single crochets in each corner stitch.
Crossed Double Crochet
Row 1: Make a chain of 20 stitches (Ch-20). Double crochet (dc) in the 3rd chain from the hook. Skip the next chain, double crochet in the next chain. Then go back and double crochet in the skipped chain. Repeat this pattern until the end of the row. Double crochet in the last chain. (You should have 18 stitches in total)
Row 2: Chain 2 (Ch-2). Skip the next stitch, double crochet in the next stitch. Then go back and double crochet in the skipped stitch. Repeat this pattern until the end of the row. (You should have 18 stitches in total)
Row 3: Chain 2 (Ch-2). Double crochet in the first stitch. Skip the next stitch, double crochet in the next stitch. Then go back and double crochet in the skipped stitch. Repeat this pattern until the last stitch, then double crochet in the last stitch. (You should have 18 stitches in total)
Repeat rows 2 & 3: Do rows 2 and 3 three more times.
Border: Chain 1 (Ch-1). Single crochet (sc) in each stitch around the entire square, putting 2 single crochets in each corner.
Half Double Crochet
Row 1: Chain 20 stitches (abbreviated as Ch-20). Then, starting from the second chain from your hook, make a hdc stitch in each chain until you reach the end. You should have 19 hdc stitches in total.
Rows 2 to 14: Chain 1 (Ch-1), turn your work, and then make one hdc stitch in each stitch across the row. Repeat this for rows 2 through 14, ensuring you have 19 hdc stitches in each row.
Border: Chain 1 (Ch-1), then make a single crochet (sc) stitch in each stitch around the entire square. When you reach the corners, make 2 single crochet stitches in each corner stitch to help the corners lay flat and neat.
Moss Stitch

Here’s a tutorial on the Moss Stitch, along with a technique for carrying the yarn up each row instead of weaving in numerous ends. I trust it proves beneficial!
Row 1: Chain 23. Single crochet in the second chain from the hook and each chain across. (22 stitches)
Row 2: Chain 2, turn. Skip the next stitch, single crochet in the following stitch, chain 1 Repeat this pattern across, ending with a single crochet in the last stitch.
Change colors every other row, making sure to carry the yarn each time
Rows 3 – 20: Chain 2, turn. Single crochet in the first chain-1 space from the previous row. Chain 1, single crochet in the next chain-1 space Repeat this pattern across, ending with a single crochet in the beginning chain space from the previous row.
Row 21: Do not change color here – Chain 1, turn. Single crochet in each chain and stitch across. (22 stitches)
Border: Single crochet in each stitch around the entire square, making 2 single crochets in each corner.
Mini Bean
Row 1: Make a chain of 21 stitches. Then, make a mini bean stitch in the third chain from the hook. After that, skip one stitch, and make another mini bean stitch in the next chain. Repeat this process until you reach the end of the row, making a total of 10 mini bean stitches.
Rows 2 – 15: Chain 1, then turn your work. Make a mini bean stitch in the side of each mini bean stitch from the previous row until you reach the end of the row. You should have 10 mini bean stitches in each row.
Border: Single crochet in each stitch around the entire square. When you reach a corner, make 2 single crochets in each corner stitch.
Waffle Stitch
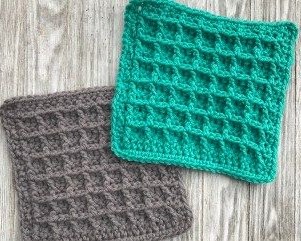
Row 1: Chain 22. Double crochet in the 3rd chain from the hook and in each chain across. (20 stitches)
Row 2: Chain 2, turn. Double crochet in the first 2 stitches. *Front post double crochet around the next post, double crochet in the next 2 stitches.* Repeat from * to * until the end. (20 stitches)
Row 3: Chain 2, turn. Double crochet in the first stitch, front post double crochet in the next stitch. *Double crochet in the next stitch, front post double crochet around the next 2 stitches.* Repeat from * to * 4 more times, double crochet in the next stitch, front post double crochet in the next stitch, double crochet in the last stitch. (20 stitches)
Rows 4–13: Repeat rows 2 & 3.
Row 14: Repeat row 2.
Border: Chain 1, single crochet in each stitch around the entire square, placing 2 single crochets in each corner.
Basket Weave Square
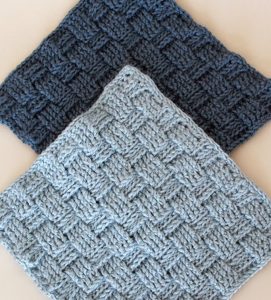
Row 1: Make a chain of 38 stitches. Then, double crochet in the third stitch from the hook and continue to double crochet in each stitch across the row. Alternatively, you can make 36 foundation double crochet stitches. You should have 36 stitches in total.
Row 2: Chain 2 (this doesn’t count as a stitch), then turn your work. Now, alternate between front post double crochet 4 times and back post double crochet 4 times until you reach the end of the row. You’ll still have 36 stitches.
Row 3: Chain 2, turn your work. Repeat the pattern of back post double crochet 4 times followed by front post double crochet 4 times until you reach the end of the row. You’ll still have 36 stitches.
Repeat Rows 4-9: Follow the same instructions as Rows 2 and 3, alternating between front post and back post double crochet stitches. You’ll have 36 stitches in each row.
Rows 10-27: Repeat Rows 4-9 three more times to create the same pattern. Each row should still have 36 stitches.
Border: Work 38 single crochet stitches along one side of the square. Then, chain 1 (this doesn’t count as a stitch). Repeat this process along each side of the square. Cut the yarn and weave in any loose ends.
Crochet Weaves Square
Row 1: Make a chain of 36 stitches.
Rows 2: Begin in the second chain from the hook. Slip stitch 5, then [half double crochet 5, slip stitch 5]. Repeat this pattern across; you’ll have 35 stitches.
*
From now on, work all stitches in the back loop only for the rest of the square!
Rows 3: Chain 1, turn your work. Slip stitch 5, then [half double crochet 5, slip stitch 5]. Repeat this pattern across; maintaining 35 stitches.
Rows 4 & 5: Chain 2, turn your work. Half double crochet 5, then [slip stitch 5, half double crochet 5]. Repeat this pattern across; keeping 35 stitches.
Row 6: Chain 1, turn your work. Slip stitch 5, then [half double crochet 5, slip stitch 5]. Repeat this pattern across; keeping 35 stitches.
*
Repeat the pattern from * nine more times, from rows 7 to 41. Each row will have 35 stitches.
For the border: Make 38 single crochet stitches (not in the back loop only) along one side of the square, then chain 1 (this chain doesn’t count as a stitch). Repeat this process on each side of the square. Cut off the yarn and weave in the ends.
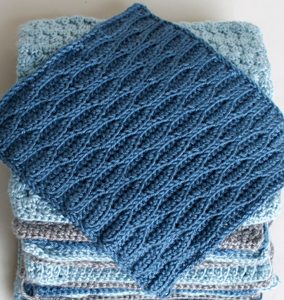
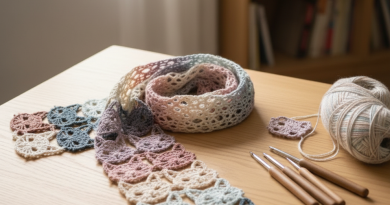
Feel free to create as many squares as you desire, incorporating various colors and crochet stitches. Embrace your creativity without hesitation! Just ensure that all squares are approximately the same size.
Now we will join the squares together and then we will add the border. This crochet stitch sample blanket is so fun to make and we are so close to finishing!
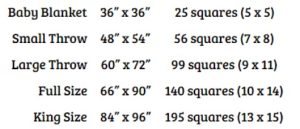
Firstly, you must make sure you have the correct number of squares for the size of blanket you want to make. For example, for a “small throw” you will need 56 squares. As there are several options of square patterns that can be used, you can select how many to make of each square pattern, and also how many of each color.
You can also make other squares. Here we will leave some PDF suggested options for you:
Blocking is often considered the least exciting part of any crochet endeavor. However, it holds significant importance as it ensures uniform size and dimension for each square, even if the stitch counts vary.
Below is a crochet blocking tutorial. While blocking the squares isn’t mandatory, it’s worth noting that opting out may result in a slightly more complex end product.
Once you’ve filled and blocked the desired number of squares, the next step is to determine their arrangement. We suggest stacking the squares based on the stitch used and then evenly distributing each stack while arranging the squares by pattern and color. Be cautious to avoid placing identical squares adjacent to each other. Pay close attention to the orientation of each square to ensure they are not placed sideways or upside down.
Before delving into the various techniques for sewing the squares together, I must emphasize one crucial point: avoid stitching them together too tightly! Overly tight stitching can lead to puckered seams and give the finished squares a bulging appearance.
If you’re employing the Mattress Stitch method, it’s vital to be mindful of your tension. Similarly, if you opt for the slip stitch method, consider using a larger crochet hook size, perhaps even two sizes up.
I can not stress enough the importance of staying loosey goosey while attaching the squares.
Slip Stitch or Mattress Stitch?
Next, you’ll determine the method for sewing the squares together. Let me illustrate the distinction…
You’ll observe that due to the use of different stitches and varying numbers of rows for each square pattern, the stitch counts differ. AND THAT’S PERFECTLY FINE! There’s a trick to maintaining flat seams: employ stitch markers!
On the edges designated for sewing, utilize stitch markers to identify both the corners and the midpoint of the squares when laid flat. Employ as many stitch markers as necessary to ensure precise alignment of both corners. It won’t be noticeable (not even to you!) if you have to skip a stitch on either side to achieve aligned corners, but if skipping more than a couple of stitches becomes necessary, it’s advisable to distribute them evenly along the length of the seam.
Employ the Mattress Stitch technique along with a needle and yarn for joining the squares. Arrange the squares with their right sides facing up. Begin from the bottom of the blanket, progress upwards, stitching across each row to securely attach the edges together. Add subsequent vertical rows sequentially until reaching the end. Once all vertical edges are seamed, rotate the work clockwise and proceed to stitch the horizontal edges together.
Another technique available is the slip-stitch-outside-loop method, which is notably quicker, though it comes with a learning curve.
To employ this method for joining, begin by aligning the squares with their right sides facing each other, using stitch markers to maintain alignment along the edges.
Insert your hook into the outer corner, utilizing ONLY the OUTSIDE loops of each square.
Proceed to slip stitch along the length of the edge using only the OUTSIDE loops, ensuring alignment is maintained when reaching the midpoint stitch markers. If necessary, it’s permissible to skip a stitch on either square to retain alignment.
Once you’ve completed seaming these two squares, proceed to the next pair in sequence, placing them right sides together and aligning the edges with stitch markers as before. Continue slip stitching until reaching the top of the row. Ensure stitches are aligned neatly at the “middle” stitch marker before progressing.
After seaming all vertical rows, flip the blanket so the wrong side is facing you, rotate it clockwise, and seam up the horizontal edges. Ensure all stitches at the intersections are properly worked.
Honestly, both techniques yielded excellent results. Slip stitching the squares together proved to be the easier and quicker method of the two. I suggest experimenting with various seams using both methods before making a decision. Ultimately, choose the approach that feels most comfortable for you, but be sure to maintain a loose tension throughout.
Adding the border
Adding the border is the final and easiest part of making the blanket. Here’s how to do it:
Row 1: Start at any corner. Chain 1, then single crochet in each stitch around, putting 3 single crochets in each corner. Join with a slip stitch to the first single crochet.
Rows 2–6: Chain 1, then single crochet in each stitch around, putting 3 single crochets in each corner. Join with a slip stitch to the first single crochet.
Row 7: Change to a different color yarn for decoration. Chain 1, Do a* half double crochet in the next stitch, chain 1, skip the next stitch*, repeat between * * until you reach the corner. Do a half double crochet in the stitch before the last one, chain 2, skip the next stitch, and half double crochet in the next. Continue this pattern around the entire blanket. Join the round. (Don’t worry if you need to adjust a little to make the corners look right – it’s not noticeable).
Row 8: Switch back to the main border color yarn. Chain 1, then work 2 single crochets around each chain space from row 7, putting 3 single crochets around each corner chain from row 7. Join with a slip stitch to the top of the first single crochet.
Rows 9–10: Chain 1, then single crochet in each stitch around the entire blanket, putting 3 single crochets in each corner. Join with a slip stitch to the top of the first single crochet, and weave in all ends.
And after following these steps your blanket will be ready, dear reader! I hope you are satisfied with the result and that it is as unique as you!
Thanks for being here with us on our lovely blog Handmade Learning Here. We are always bringing different crochet patterns for you to make! In fact, our stitches category is full of other patterns that can inspire you to make beautiful squares.
Remember that you are always welcome on our blog, have a beautiful day! Hope to see you here soon… Happy crocheting!
I simply love your squares. I am in the throws of doing a blanky for great grandchild no: 8. Thank you for your post.
Thank you for this information I love to crochet