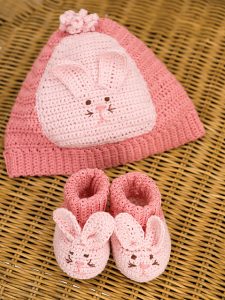
Bunny Hat and Booties
Welcome to our lovely blog Handmade Learning Here, my dear reader. I hope you are having an amazing day! Today we want to bring you an incredible children’s pattern that is very cute and that you will love. You can reproduce this pattern for your little ones and make them very cute.
Nowadays, there’s a growing quest for personal expression and distinctiveness, fueling a revival of artisanal methods. Among the crafts gaining widespread attention is the creation of bunny hats and booties.
The other day, I was strolling through the grocery store when I bumped into my friend Carol. She was with her twins, and they were rocking these adorable bunny booties. I couldn’t get over how cute those little shoes were! As soon as I got home, I hopped online to find a pattern so I could make a pair for my niece. It turns out, personalized items like these are super trendy right now! I looved the Bunny Hat and Booties pattern. It’s very easy and cute!
The real joy of making bunny hats and booties lies in the careful, detailed process. Each piece is lovingly crafted by hand, from picking out the materials to adding the final touches. This attention to detail not only ensures that each item is unique but also showcases the skill and care put into making them. It’s so important to know how to choose the best materials and to have a cozy spot to work on these crafts, whether it’s just for fun or as a little side project.

The Perfect Handmade Delight for Little Ones
Let’s talk about why these bunny-themed creations are so irresistible. First and foremost, they’re absolutely adorable. I mean, who can resist the charm of a little bunny rabbit hopping around? Incorporating that cuteness into handmade items for babies just takes the cake.
Now, let’s delve into the details. Crafting a crochet bunny hat and matching booties requires just the right combination of skill and creativity. You’ll need basic crochet skills, such as chain stitch, single crochet, and double crochet. But don’t worry if you’re new to crochet; there are plenty of tutorials and patterns available online to guide you through the process.
When it comes to selecting materials, I always opt for soft, baby-friendly yarns. After all, comfort is key when it comes to anything baby-related. Pastel shades like baby blue, pink, or cream work beautifully for bunny-themed creations, but feel free to let your imagination run wild with colors!
Now, let’s talk about the design.
The bunny hat typically features cute floppy ears, which you can shape using simple increases and decreases. For the booties, you can opt for a classic design with bunny faces stitched onto the toes or go for a more whimsical approach with 3D ears and pom-pom tails.
One of the things I love most about crocheting bunny hats and booties is the versatility they offer. Whether you’re making them as a gift for a baby shower, a handmade present for your own little one, or even as a charming addition to a newborn photo shoot, they’re sure to delight everyone who sees them.
But perhaps the best part of all is the joy that comes from creating something with your own two hands. There’s a special kind of satisfaction that comes from seeing your crochet project come to life, stitch by stitch. And when you see those bunny hats and booties adorning the sweetest little faces, well, it just warms your heart like nothing else.
So, fellow crafters, if you’re looking for your next crochet project, I highly recommend giving bunny hats and booties a try. Not only are they fun and rewarding to make, but they also make for cherished keepsakes that will be treasured for years to come. Happy crocheting!
Bunny Hat and Booties – FINISHED SIZES
The hat and booties are designed to fit a child of 12 months. The hat has a circumference of 17½ inches, while the booties measure 4½ inches in length.
MATERIALS
Crochet Hook: 3.25mm [US D-3].
Yarn needle
GAUGE
12 stitches = 2 inches; 6 rows = 2 inches in double crochet with double strands of thread.
14 stitches = 2 inches; 12 rows = 2 inches in single crochet with double strands of thread.
Verify your gauge. Utilize any size hook necessary to achieve the desired gauge.
ABBREVIATIONS (US TERMS)
A, B, C = colors A, B, C;
Ch –chain;
dc – double crochet;
hdc – half double crochet;
mm – millimeters;
sc – single crochet;
st(s) – stitch(es);
tog – together;
yo – yarn over;
* or ** = repeat the following * or ** as instructed;
[ ] – perform the directions in brackets the specified number of times.
Special Abbreviations
dc2tog (worked over 2 stitches) = [Yarn over and draw up a loop in the next stitch, yarn over and draw through 2 loops] twice, yarn over and draw through all 3 loops on the hook.
sc2tog = [Draw up a loop in the next stitch] twice, yarn over and draw through all 3 loops on the hook.
Please note: Double thread is used throughout the process.
INSTRUCTIONS
HAT
Starting from the bottom edge, begin with A yarn and make a foundation chain of 9 chains (ch 9).
Row 1: Start in the second chain from the hook, single crochet (sc) in each chain across; turn – you’ll have 8 single crochets.
Rows 2-106: Chain 1, then single crochet in the back loop of each single crochet across; turn.
After completing row 106, pivot your work to start working across the long edge, which will form the top of the hat.
Beginning Top of Hat:
Row 1: Chain 1, single crochet in the side of each row across; turn – you’ll have 106 single crochets.
Row 2: Chain 2, skip the first single crochet, double crochet (dc) in the next single crochet and in each single crochet across; turn – 106 stitches.
Rows 3, 5, 7: Chain 2, skip the first double crochet, double crochet in the next double crochet and in each double crochet across, and in the top of the chain-2; turn.
Row 4: Chain 2, skip the first double crochet, double crochet in the next 7 double crochets, double crochet 2 together (dc2tog), then [double crochet in the next 8 double crochets, dc2tog] repeated 9 times, double crochet in the next 5 double crochets and in the top of the chain-2; turn – 96 stitches.
Continue in the same manner for Rows 6-9, decreasing stitches as specified until you have 24 stitches remaining.
Row 19: Chain 1, single crochet 2 together (sc2tog) 12 times. Fasten off, leaving long ends for sewing. Weave threads through remaining stitches, draw up firmly, and fasten securely. Sew back seam to close the hat.
Bunny Appliqué:
Using B yarn, chain 25.
Row 1: Single crochet in the second chain from the hook and in each chain across; turn – 24 single crochets.
Rows 2 and 3: Chain 1, 2 single crochets in the first single crochet, single crochet across to the last single crochet, then 2 single crochets in the last single crochet; turn – 28 single crochets.
Rows 4-17: Chain 1, single crochet in each single crochet across; turn.
Continue with decreases and increases as specified to shape the bunny appliqué. Finish off with an edging round of single crochets around the entire piece.
Ear (Make 2):
Using B yarn, chain 10.
Row 1: Single crochet in the second chain from the hook and in the next 7 chains, then work 3 single crochets in the last chain. Now, working on the opposite side of the chain, single crochet 8 times; turn – 19 single crochets.
Row 2: Chain 1, single crochet in the first 8 single crochets, [2 single crochets in the next single crochet] repeated 3 times, single crochet in the last 8 single crochets; turn – 22 single crochets.
Row 3: Chain 1, single crochet in the first 4 single crochets, half double crochet in the next 5 single crochets, [2 double crochets in the next single crochet] repeated 4 times, half double crochet in the next 5 single crochets, single crochet in the last 4 single crochets. Fasten off.
Make a tail with B yarn and attach it to the back of the hat. Embroider eyes, whiskers, nose, and mouth using different colored yarns as specified, then sew all the parts in place on the front of the hat.
Booties (Make 2)
Ribbing: Using yarn A, chain 19.
Row 1: Single crochet (sc) in the second chain from the hook and in each chain across; turn – 18 sc.
Rows 2-36: Chain 1, single crochet in the back loop of each sc across; turn.
At the end of the last row, pivot to work across the long edge.
Foot:
Row 1: Chain 1, sc in the side of each row across; turn – 36 sc.
Row 2: Chain 2 (counts as double crochet), skip the first sc, double crochet (dc) in the next 14 sc, [2 dc in the next sc] 6 times, dc in the next 15 sc – 42 sts. Fasten off.
Row 3: Join yarn B with a single crochet in the first dc, sc in the next 15 dc, half double crochet (hdc) in the next 2 dc, [2 dc in the next dc] 6 times, hdc in the next 2 dc, sc in the next 15 dc, sc in the top of the chain-2; turn – 48 sts.
Row 4: Chain 1, sc in the first stitch, 2 sc in the next stitch, sc in the next 15 stitches, 2 hdc in the next stitch, 2 dc in the next stitch, [2 dc in the next stitch, dc in the next stitch] 5 times, 2 dc in the next stitch, 2 hdc in the next stitch, sc in the next 15 stitches, 2 sc in the next stitch, sc in the last stitch; turn – 59 sts.
Rows 5-11: Chain 1, sc in each stitch across; turn. At the end of Row 11, join to the first sc of the row with a slip stitch to begin working in rounds.
Sole:
Rounds are worked continuously without joining. Place a marker in the first stitch of the round and move it up each round.
Round 12: Single crochet in the back loops of each sc around.
Round 13: Working in both loops, [sc2tog] 3 times, sc in the next 17 sc, [sc2tog] 3 times, sc in the next sc, [sc2tog] 3 times, sc in the next 17 sc, [sc2tog] 3 times – 47 sc.
Round 14: Single crochet in each sc around.
Round 15: [Sc2tog] 3 times, sc in the next 11 sc, [sc2tog] 3 times, sc in the next sc, [sc2tog] 3 times, sc in the next 11 sc, [sc2tog] 3 times – 35 sc.
Round 16: Single crochet in each sc around.
Round 17: [Sc2tog] 3 times, sc in the next 5 sc, [sc2tog] 3 times, sc in the next sc, [sc2tog] 3 times, sc in the next 5 sc, [sc2tog] 3 times – 23 sc.
Round 18: Single crochet in each sc around. Fasten off, leaving long ends for sewing. Sew the sole seam lengthwise. Sew the back seam. Join yarn B in any free loop of Row 11; chain 1, single crochet in each free loop around; join. Fasten off.
Ear (Make 2):
Using yarn B, chain 7.
Row 1: Single crochet in the second chain from the hook and in the next 4 chains, 3 sc in the last chain; working on the opposite side of the chain, work 5 sc; turn – 13 sc.
Row 2: Chain 1, sc in the first 5 sc, [2 sc in the next sc] 3 times, sc in the last 5 sc; turn – 16 sc.
Row 3: Chain 1, sc in the first 3 sc, hdc in the next 3 sc, [2 dc in the next sc] 4 times, hdc in the next 3 sc, sc in the last 3 sc – 20 sc. Fasten off. Sew in place at the front of the bootie.
Embroidery:
Use yarn C to satin stitch the eyes and straight stitch the whiskers.
Use yarn A to satin stitch the nose and straight stitches for the mouth.
PDF:
Here is a completed version of this bunny booties and hat pattern for you to print. The PDF tutorial is very educational and was made by Yarnspiration, and you can access it below:
VIDEO TUTORIAL
Dear reader, we know that many readers love and even prefer learning in video form, so we have put together a very educational tutorial video made on the Storybook Crochet Youtube Channel with the complete crochet bunny booties tutorial and you can watch it below:
In conclusion, crafting these darling Bunny Hat and Booties through the art of crochet has been an absolute joy. There’s nothing quite as satisfying as creating something with love and care for our little ones. These sweet accessories not only keep our babies warm and cozy but also fill our hearts with warmth and happiness. I hope these bunny booties and hat bring as much joy to others as they have brought to me.
What do you think of this adorable pattern? Very cute, isn’t it? Send it right now to your 5 best contacts. Thank you very much for being here with us on our lovely blog, dear reader, now with this tutorial in hand you can have the most beautiful pieces made by yourself. We love sharing the best of the world of crochet patterns with you. I hope you have a beautiful day! Now, let’s put everything we learned here into practice, shall we? See you soon. XoXo