
How to Crochet Cat Stitch
Hello dear crocheters! Welcome to our nice blog. Today we want to share with you something very special, especially for those who love animals. The name of the stitch pattern that we bring you here today is Crochet Cat Stitch. It is a very cute pattern, its appearance resembles the image of kittens and it is very easy to make. We hope you like it, because we love it!
The crochet cat stitch is a very quick and easy crochet stitch, you can make beautiful blankets for your children, an amazing and warm blanket. You can even put this pattern on pieces of clothing like sweaters or coats. Can you imagine how different and exclusive? As you get closer you can notice the outlines of kittens in this crochet stitch pattern. Cute kittens with pointed ears, their face with part of their body and their little legs hanging down, like a cat leaning on a window looking at you. It is a very cute pattern that conquers the eyes wherever it goes.
Currently we all have or know at least one person who has or loves cats, right? So, this is a good request to gift that person. Making beautiful pieces composed of this pattern will surely delight those who love the charm of felines. You can work on nice scarves or a blanket to keep you warm while you read and drink tea or hot chocolate. The ideas are numerous, just let your creativity flow.
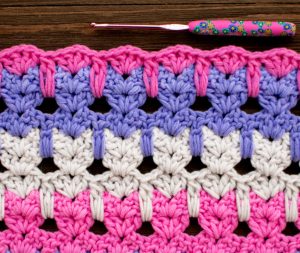 Image by Naztazia
The colors can be varied, being able to make different colors according to the rows of cats, alternating in two or more colors according to your preference. For those who know how to double crochet, this pattern is considered a pretty quick and easy crochet stitch pattern. Basically most of it is made up of a basic shell stitch. If you know how to work with the double crochet, you will definitely love working with this beautiful pattern, it consists of a chain stitch and two more double crochet stitches.
Elongated double crochet stitches make the basic shell pattern turn into a cat stitch pattern. These points when extended form the paws and define the kitten’s ears. You don’t need to do a complete project with the cat pattern, making the edge of some other work or ready-made piece with this pattern would also make the project very charming. Anyway, there are countless ways you can work with this project.

MATERIAL
Recommended Supplies
Here’s a list of the materials you will require:
- Yarns in your preferred colors (Use two or more contrasting colors to get the best effect.)
- Crochet Hook
- Yarn Needle
- Scissors
ABBREVIATIONS:
This pattern is presented using the standard crochet terminology used in the United States/ UK.
Chain Stitch – CH
Double Crochet – DC
PREV – Previous
SLST – Slip Stitch
ST – Stitch
E-DC-CL – Elongated Double Crochet Cluster
SHELL = 2DC, CH1, 2DC
CH 40 or any multiple of 5.
STEP BY STEP INSTRUCTIONS
ROW 1: Begin by double crocheting (DC) into the 4th chain (CH) from your hook. Repeat the following sequence: Skip 4 CHs, then work a SHELL (which consists of 2 DC, CH 1, 2 DC) into the next CH. Continue this pattern across until you have 6 CHs left. To finish the row, skip the next 4 CHs and DC into the last 2 CHs. Chain 3 to turn.
ROW 2: The turning CH-3 at the beginning of this row counts as a DC throughout. DC into the first DC of the PREV row. Repeat the following sequence: Work a SHELL into the CH-1 space of the previous SHELL from the row below. Continue this pattern across until you have 2 STs (stitches) left in the row. Finish by working a DC into each of the last 2 STs. Change to PINK yarn, then chain 3 and turn your work.
ROW 3: Start with a DC into the first DC of the PREV row. Repeat the following sequence: Work an Elongated Double Crochet Cluster (E-DC-CL) into the space from 2 rows below, then work a SHELL into the CH-1 space of the previous SHELL from the row below. Continue this pattern across until you have 2 STs left in the row. Finish by working a DC into each of the last 2 STs. Chain 3 to turn.
ROW 4: Again, start with a DC into the first DC of the previous row. Repeat the following sequence: Work a SHELL into the CH-1 space of the previous SHELL from the row below. Continue this pattern across until you have 2 CHs left in the row. Finish by working a DC into each of the last 2 CHs. Chain 3 to turn.
ROW 5: Repeat the same pattern as ROW 4.
Repeat ROWs 3-5, changing colors every 3 rows. The sample provided ended on a ROW 3.
Access the PDF/ How to Crochet Cat Stitch
We always recommend that our readers watch the video tutorial as many times as necessary to understand the pattern and try to do it together to improve their confidence when handling your hook and performing the crochet stitch taught. Do and undo as many times as necessary with yarn you already have from some other project, this way it increases your practice before working on your final project.
The video tutorial provided is from Naztazia and is very easy to understand. We hope you like and appreciate this beautiful pattern, we always like to share with you these beautiful projects to make beautiful pieces. What do you think of this kitty pattern? Do you know someone who loves cats and would love to have a piece with this pattern? Tell us in the comments below! If you have any questions or suggestions, let us know. We love to read your feedback and it is very important for us to keep improving!
You might like these patterns
The Handemade Learning team warmly thanks everyone and extends warm wishes for a wonderful week filled with lots of cool projects, creativity and positive vibes. We also want you to make your beautiful crochet project and experience joy and fulfillment in the process. Don’t forget to tell us everything afterwards. We from the handmade learning team wish you all the best for your day and lots of crochet! See you soon!
Do you mind if I quote a couple of your articles as long asI provide credit and sources back to your website?My blog site is in the very same niche as yours and my users would certainly benefit from some of the information you present here.Please let me know if this okay with you. Thanks!
This is so neat!
What size crochet hook and how much yarn would you recommend?
Cute!!
But changing colors every 3 rows seems to leave a lot of ends to hide. Any ways to avoid this?
If you start each repeat on the same side, then the ends will all be on the same side, and you can just carry the yarn up. i.e. Start color A on a RS, it ends with a RS row. Start color B on the RS, also ends on a RS row. All the ends are on the same side, and for the next “block,” all colors will start on the WS row. Throw a border on it to cover the floats, and bam! Few ends to weave!
Thank you for this fun pattern. I think that the written instructions should say to place the DC at the beginning of each row in the NEXT DC of the previous row (not the first), as the Ch3 counts as the first stitch, and in your video you go into the next DC, not the first.
I’m confused how it can be both UK and US terms and they are different. Can anyone tell me which terminology they’re using please.
US and UK use different terms… For example a UK double crochet is a US treble or triple crochet. Based on the video these instructions are in US terms.