
How to Crochet the Diamond Stitch
Hello my beloveds! We know that crochet stitches are numerous and very varied, they allow us to make different combinations and also lovely works. A small modification here or there and we can have a different and exclusive stitch, an extra chain will make all the difference in the final result of the work. This is because of the versatility of crochet, which allows us to explore many magnificent crochet stitches. Today we are going to introduce you to a point that is a real treasure (and this is not just for its name), it has a special charm and its appearance is formidable. We are talking about the crochet stitch called Diamond Stitch.
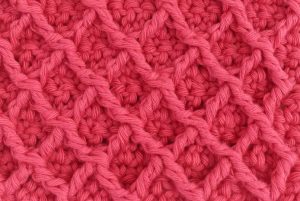
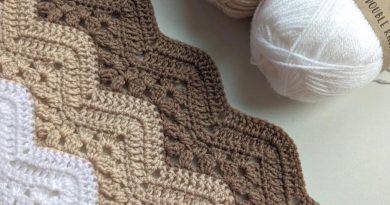
The diamond stitch is a textured and tightly closed crochet stitch, commonly used in pieces that will be used on colder days, such as sweaters and coats. It’s a beautiful pattern and can be used in both women’s and men’s pieces.
As it is a very versatile stitch, it is suitable for all types of audiences. In addition to clothes, you can also work on elegant blankets that will look sophisticated with that precious and exquisite aspect of a diamond, or also beautiful bags, scarves. It is a magnificent stitch that has small deep diamonds in relief forming an incredibly charming texture!
We always like to score here for our readers to test the stitch in small squares, also do in patchwork or small pieces of cloth to see and feel. That way you can perform your work more accurately, knowing exactly which combinations will best fit your work. This will also allow you to have more practice and better handle your hooks when making, and then just choose your yarn and execute your beautiful project.
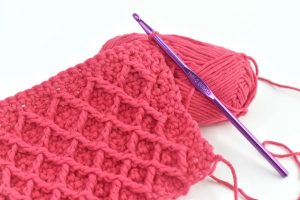
Diamong Stitch. For this pattern you won’t need much, as with most stitches, the necessary materials required are the good old yarn chosen and a good crochet hook that you enjoy working with. The choice of colors goes according to your taste and can make all the difference in the piece! You will notice that as you make the pattern, the stitch will start to take shape and thus form beautiful diamonds as you go around.
So, my dear reader, don’t give up right at the beginning thinking you’re doing it wrong. Keep going and you’ll see that your work is paying off, don’t stop at the first round and you’ll have beautiful crochet diamonds at the end. This beautiful crochet stitch will make your pieces incredibly beautiful and stunning, everyone will want to have one just like it.
MATERIALS
Supplies Needed:
Gather the following materials for this project:
- Stash yarn in Aran/worsted weight
- A 5mm crochet hook
- Optional: Stitch markers for added convenience.
Notes:
Front post treble crochet: Abbreviated as Fptrc
Yarn over your hook twice, then insert the hook around the post as specified by the pattern. Proceed by yarning over once more and pulling up a loop, resulting in 4 loops on your hook. Next, yarn over, draw through 2 loops, and repeat this step twice more until only one loop remains on the hook.
Front post treble crochet two together: Abbreviated as Fptrc2tog
This stitch, known as the Front Post Treble Crochet Two Together (Fptrc2tog), creates a V-shaped stitch in front of your work, with its two arms wrapping around the posts of the stitches located two rows below. All these V-shaped stitches, when worked side by side, form one half of the diamond pattern. To begin the first row of Fptrc2tog, follow these instructions:
- Yarn over your hook twice, then insert the hook horizontally (from front to back to front again) behind the “post” of the single crochet stitch indicated. In this case, it will be the post that was just worked by the previous post stitch.
- Yarn over your hook and draw up a loop, resulting in 4 loops on your hook. Now, yarn over your hook again, draw through 2 loops, and repeat this step. You’ll be left with 2 loops on your hook, forming one arm of the V.
- Yarn over your hook twice more, then skip 3 single crochet posts. Insert the hook horizontally behind the next post, yarn over your hook, and draw up a loop. You should now have 5 loops on your hook. Yarn over your hook, draw through 2 loops, and repeat this step. You’ll have 3 loops left on your hook. Finally, yarn over your hook and draw through all three loops.
- There will be one “unworked” stitch remaining in the row below, situated behind the newly created Fptrc2tog stitch.
Continue working the remaining Fptrc2tog stitches in the first row using the same method, ensuring that the first arm of each V is worked around the same post as the last arm of the previous stitch. After completing the first row with this stitch, subsequent Fptrc2tog stitches are worked around the top of the previous Fptr2tog stitches rather than the single crochet posts.
STEP BY STEP INSTRUCTIONS
Ch 14+1 (add multiples of 4ch for a larger swatch)
Row 1: Start by single crocheting (sc) in the second chain (ch) from the hook and continue to sc in each stitch until the end, resulting in a total of 14 stitches.
Row 2: Chain 2 (ch2), which counts as a double crochet (dc), and double crochet in each stitch until the end, maintaining 14 stitches.
Row 3: Chain 1 (ch1) and turn (note that this doesn’t count as a stitch). Perform a front post treble crochet (fptrc) around the post of the third single crochet (sc) from Row 1. Then, *single crochet three times (sc 3 times), execute a fptrc2tog (front post treble crochet 2 together), and repeat from *, sc 3 times, and finally, perform a fptrc around the same sc post that was used in the last post worked in the previous fptrc2tog stitch. Conclude with a single crochet in the last stitch, resulting in a total of 14 stitches.
Row 4: Repeat Row 2 to maintain a total of 14 stitches.
Row 5: Chain 1 and turn (this does not count as a stitch). Single crochet in each of the next two stitches. Next, *perform a fptrc2tog around the tops of the post stitches from Row 3, followed by three single crochets (3sc). Repeat from * two more times, resulting in a total of 14 stitches.
Continue repeating Rows 2-5 until the piece reaches your desired square size or until you feel confident with the fptrc2tog stitch technique!
The diamond stitch is easy to do and when you see the diamonds forming you start to get excited. And what about the result? Charming! I bet you will love it.
Access the PDF/ The Diamond Stitch
Our tutorial contains all the instructions with the complete step by step. In addition, we will also make the Hopeful Honey video available so that you can follow it better and thus understand the beautiful diamond stitch pattern and execute it with more confidence and precision. We always recommend that you watch the video before you even start reading the pattern, that way you will be able to better understand the point you are going to work on.
If you liked this crochet stitch, you might like this one too:
It is worth checking!
Tell us in the comments what you think of this amazing crochet stitch! Have you heard of the diamond point before? He’s very handsome, isn’t he? Imagine how your beautiful projects will look using this beautiful crochet stitch.
Tell us everything, we are always following the comments and we are happy to hear your opinion, besides, it can also help other people who can be inspired. If you have questions and suggestions, you can also leave them in the comments, we always try to answer!
We’re so happy to have you here in our beautiful craft learning space, so we’re always making new materials available with amazing and unique patterns, and all for free! We hope your day is wonderful and that you can do what makes you feel good, and of course.. Crochet! Here we go? See you later!
The point of view of your article has taught me a lot, and I already know how to improve the paper on gate.oi, thank you.