
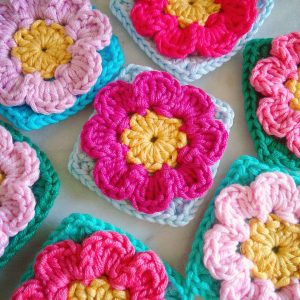
3D Flower Square
Dear friend, today we have an adorable pattern that you will love! This is a unique crochet square design. It’s the 3D flower square, it’s beautiful and will look great in the composition of your projects, such as blankets, coats and the like. But, unlike some crochet flower squares, this square has a 3D flower that gives it a different, elegant and fun look.
Here on our lovely blog, we always want to bring you readers amazing and adorable patterns that you can use in your projects. 3D Flower Square is a pattern that allows you to use different colors, as flowers come in a variety of colors and look great in any color you want.
It’s not a difficult project to execute, of course you need to know the basics of crochet, such as making a magic ring… But it’s a project that can be done by any beginner. If you have doubts about any step to carry out this project, take a look at our crochet category for beginners and you will be able to resolve your doubts and proceed with your 3D flower square more easily.
To make your 3D flower square, you will need some materials. So let’s move on to the recommendations:
3D Flower Square – Supplies:
Select your preferred yarn and a corresponding hook (I recommend using a hook that is half a size smaller for a cleaner stitch definition in projects like these).
Scissors
Darning needle
Abbreviations (US terms)
MC – magic circle
Ch – chain
Sl st – slip stitch
BPsc – back post single crochet
Hdc- half double crochet
Dc- double crochet
3D FLOWER SQUARE STEP B STEP
Round 1: In MC, make 16 half double crochet stitches, join to create a circle, secure the end, and weave in loose ends.
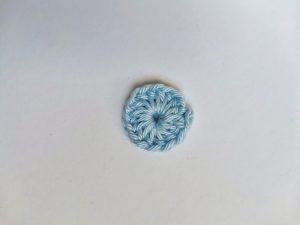
Round 2: Begin by joining a new color in any stitch and chain 1 (which serves as the initial slip stitch). *Chain 2, skip 1 stitch, and slip stitch in the next stitch.* Continue repeating this pattern from * to * until you reach the end of the row. Join to close the round, and do NOT fasten off. (8 slip stitches, 8 chain-2 spaces)
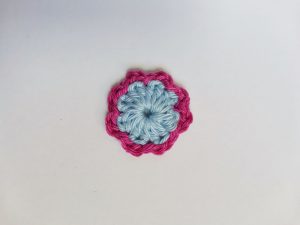
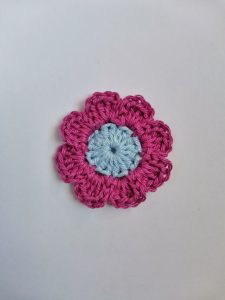
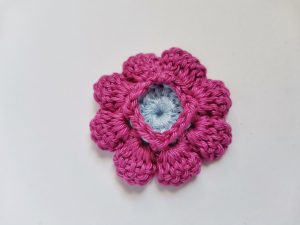
Round 3 (petals): *(Sl st) Insert your hook into the next space, pull the yarn through, chain 2, make 4 double crochet stitches, chain 2, and slip stitch in the same space.* Keep repeating this pattern from * to * until you finish the row. Don’t cut the yarn. (You should have 8 petals now.)
Round 4: involves working on the back of the flower. Begin with the right side facing you, create a long chain, and then Back Post single crochet (BPsc) around the corresponding slip stitch (Sl st) from the previous round.
Continue the pattern: Chain 4, skip the next Sl st, BPsc around the next Sl st from the previous round. Repeat this sequence from * to * until the end of the row, and join with a slip stitch. Fasten off and secure the ends by weaving them in.
After completing Round 4, this is how the back of your flower will appear:
As evident, we have a “square” composed of chains, and this is the focal point where we will concentrate our efforts to transform our flower into a square.
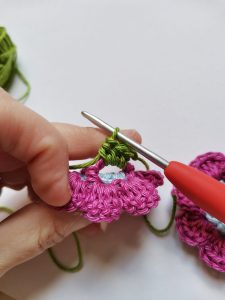
Round 5: Transition to a different color. With the right side facing, gently fold your petal to access the chain spaces from Round 4 (refer to the picture below for guidance). Proceed as follows: In each 4-chain space, crochet 3 half double crochets, chain 3, 3 half double crochets. Repeat this sequence three more times, and then slip stitch to the first half double crochet to complete the round. Don’t cut the yarn. You have now completed the initial round of your square, consisting of 24 half double crochets and 4 chain-3 corners.
The image above indicates the location for working Half Double Crochet (Hdc) stitches in Round 5.
Round 6: Begin with a chain of 2 (this counts as the initial Half Double Crochet, Hdc). Proceed to work one Hdc in each stitch around. In the corners, execute 2 Hdc, chain 2, and then work 2 more Hdc. Finally, fasten off and neatly weave in all ends. This round results in a total of 40 Hdc, with 4 chain-2 corners.
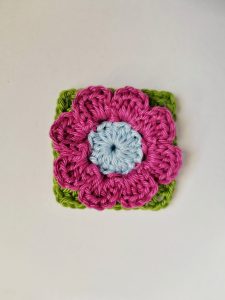
And that’s it! Your 3D flower square is ready. It is a relatively small square, so you can choose to enlarge it by adding more solid granny rounds as you wish, this way you will increase their size.
It’s not a difficult square to do, any beginner can do it. I really hope you enjoy making these adorable 3D flower squares.
Share with your friends so they can also do this beautiful project.
If you have any questions, send them to us! We are ready to answer your questions, it’s great to have you here following our materials 💗I hope to see you more often. Follow our lovely blog weekly, we always bring you new things and different patterns! See you soon, have a good job. XoXo


hey there, your site is cheap. We do thank you for work
Thankyou for showing us much appreciated 👍