
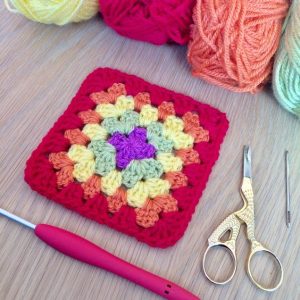
Classic Granny Square
Have a great day, my dear friend and reader of the lovely Handmade Learning Here blog. I am very happy to have you here with us and to welcome you to our lovely space where we share beautiful free craft projects. The pattern we are going to cover here is a classic from the wonderful world of crochet, if you crochet you certainly know this beautiful pattern or at least heard about it, the crochet squares also known as Traditional Granny Square are elegant works that combine with different projects, being classic, it has the perfect design and goes well in just one color or with many different colors.
The beautiful crochet squares are easy and quite quick to make, they are one of the first patterns that beginners should learn, or at least be on their learning list after the famous crochet chain. The traditional granny square is the most common and simple format, there are several other models that you can make that are incredible variations of this beautiful traditional granny square, one more beautiful than the other.
Now let’s talk about this amazing pattern that this article is about. The traditional granny square basically consists of a square that uses granny curls and chains techniques. To make the granny square you will simply need three double crochets in the same place, which are worked in the chain spaces from the previous round. Despite being characteristic, the term “grandmother square” came to be used for all different existing types of crochet squares, whatever their structure.
ABOUT GRANNY SQUARES
Despite being called a crochet square, some of them aren’t even square. You can find them out there in different shapes like triangles, rectangles, hexagons and even circles.
And it is not today that this beautiful pattern exists, the granny square has existed since 1891, it appeared as an engraving in The Art of Crocheting, and in 1897 the pattern was finally written and published in Weldon’s Practical Needlework. The design of the pattern used at the time was very similar to the one we know today, the structural difference was in the crochet curls with double crochets less, instead of three as nowadays, only two were used. Apart from that small detail, it was like what we know and do today.
The term “grandmother’s square” came about because of the dear grandmothers of the time who were the greatest crocheters of the time and who used to do a lot. Also, you don’t need to have super vision to run this project. Honestly, you don’t even need eyesight!
No doubt it is an absolutely charming project that you can do! They are very practical, easy to make, very economical and you can use them in many different projects, in addition, they allow you to have different experiences in the world of crochet and improve your technique by taking chances with new stitches and experimenting with colors, in addition to improving your skill.
Let your creativity guide you and go for it, using different combinations of stitches and colors. And for that you won’t need to spend a lot of your time or your wires. In addition, you will gain more experience for your next project, this will guarantee you that the choice you made for the official project with a different stitch or a combination of different colors is a good choice. This pattern that we make available here is very easy to follow.
MATERIALS
- A 3.5-mm crochet hook (E-4 in the USA, 9 in the UK)
- A yarn needle
- A tapestry needle
Feel free to select any yarn weight, just be sure to match it with the right hook size!
CROCHET ABBREVIATIONS (US TERMS)
Ch – Chain
Dc – Double Crochet
MC – Magic Circle
Sl St – Slip Stitch
St – Stitch
Yo – Yarn over
PATTERN NOTES
- When the pattern instructs “dc 2,” it indicates crocheting 1 double crochet stitch into each of the next 2 stitches.
- “(…)” denotes that you should repeat the instructions within the brackets the specified number of times.
- “[…]” instructs you to crochet the directions within the brackets into the same indicated stitch.
HOW TO START YOUR GRANNY SQUARE
Starting a granny square in crochet can be done using various methods. One popular way is to create a magic circle, also known as an adjustable ring. This technique ensures the center of the square remains closed, without any holes. However, if you prefer not to use a magic circle, you can opt for these alternatives:
-
Chain 5 Method: Begin by chaining 5 stitches and crochet all the stitches of the first round into the initial chain.
-
Chained Ring Method: Start with a chain of 4, then join it with a slip stitch into the first chain to create a small ring. Afterward, chain 4 more and crochet all the stitches of the first round inside this ring.
It’s important to note that when you don’t use the magic circle, the center of the granny square may not be as tightly closed as when using the magic circle. However, both methods are effective for creating granny squares.
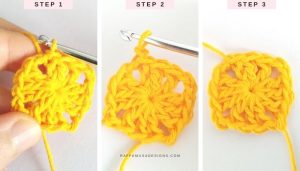
CLASSIC GRANNY SQUARE – PHOTO TUTORIAL
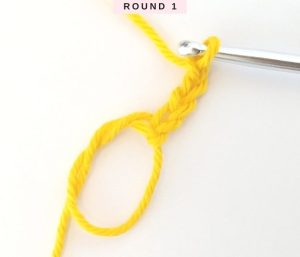
ROUND 1
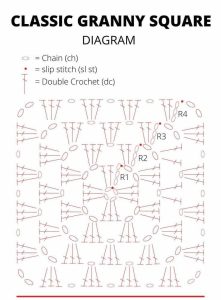
Start with a magic circle (MC) and Ch 4. Within the MC, work (Double crochet 3, chain 2) three times, followed by 2 double crochets. Conclude the round by joining with a slip stitch into the third initial chain.
A quick note before proceeding: The typical method in this pattern requires a starting chain of 5. However, I’ve found that a 5-chain beginning results in a larger-looking initial corner compared to the others. To ensure uniformity, I opt for a chain of 4 so that all corners maintain the same size.
Joining Each Round of the Granny Square
When it comes to joining the rounds, my preferred method involves inserting my crochet hook under both of the top loops of the third chain made. This approach yields a more robust and secure connection compared to joining into just one of the loops within the chain.
At the conclusion of the first round, your work should consist of 3 double crochets on each side, a chain-1 space in the initial corner, and a chain-2 space in the other three corners.
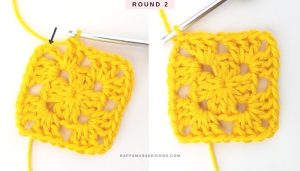
ROUND 2
Begin by slip stitching into the chain-1 space at the corner, and then chain 4. Next, work 3 double crochets into the same corner space.
*Chain 1, skip the next 3 double crochets from the previous round, and work [3 double crochets, chain 2, 3 double crochets] all in the next chain-2 space. Repeat this pattern from * 3 more times.
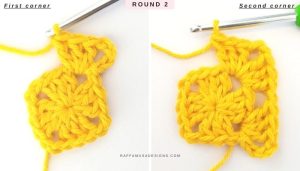
Chain 1, skip 3 stitches, and work [2 double crochets] in the initial corner space. Finally, complete the round by joining with a slip stitch in the third chain of the initial chain-4.
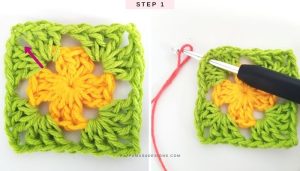
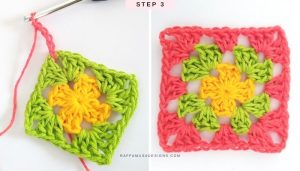
ROUND 3
In Round 3, we will delve into the stitch pattern that you’ll need to replicate in each subsequent round to expand your granny square.
Begin as you did in Round 2:
- Slip stitch (sl st) in the first corner space.
- Chain 4 (ch 4), and make 3 double crochets (dc 3) in the same space.
- Now, proceed as follows:
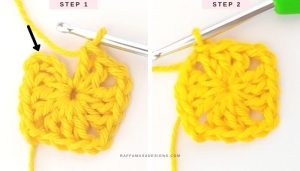
- *Chain 1 (ch 1), then create 3 double crochets (dc 3) in the next chain-1 space (indicated by the arrow in the accompanying picture). Chain 1 again.
- Form the next corner by crafting [dc 3, chain 2, dc 3] in the next chain-2 corner space.
- Repeat this pattern from * a total of 3 times.
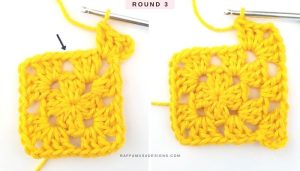
Finally:
Chain 1 once more, skip the next 3 stitches, and work [dc 2] in the initial corner space. Conclude the round by joining with a slip stitch (sl st) in the third chain from the start.
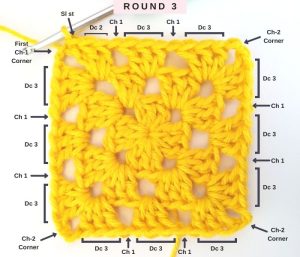
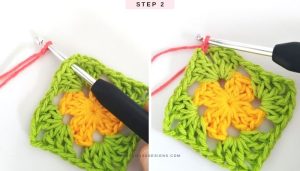
Begin the round by slip stitching (sl st) into the next chain-2 space (ch-2 sp), then chain 4, and work 3 double crochets (dc 3) into the same space.
Along each side, chain 1, and for each chain-1 space (ch-1 sp) from the previous round, work [dc 3] in that space.
In the corners, chain 1, and create [dc 3, ch 2, dc 3] into the next chain-2 space (ch-2 sp).
Conclude the round by slip stitching (sl st) into the third chain of the initial chain-4 made in this round.
Utilize the approach employed in Round 3 to integrate extra rounds into your traditional granny square.
CLASSIC GRANNY SQUARE DIAGRAM
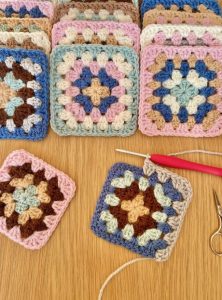
Creating a Multicolored Granny Square
When you’re just starting, mastering the art of crocheting a granny square with a single solid color is the way to go. However, as you gain confidence and experience, it becomes much more enjoyable to introduce a variety of colors into your project. Here’s how to crochet a multicolored granny square:
Fasten Off and Weave Ends: The initial step is to fasten off your previous color and weave in those pesky yarn ends. Trust me, weaving in your ends now will save you from dealing with a multitude of loose ends at the project’s conclusion.
HOW TO FASTEN OFF YARN
To fasten off your yarn:
- Step 1: Complete the final stitch of the round/row. If you’re working on a granny square, this would involve making the last slip stitch to join the round.
- Step 2: Create a chain of one.
- Step 3: Without taking your hook out of the loop, trim the yarn, leaving a tail of around 4 inches (about 10 cm) or longer. Next, pass the cut end of the yarn through the loop and tug on the tail to secure it.
Next, we will add the new color to one of the corners of our granny square.
JOINING A NEW YARN COLOR:
STEP 1 Begin by inserting your crochet hook into one corner of your granny square, going from the front to the back.
Now, create a slip knot with your new color yarn and insert your hook into the knot. Your fresh yarn color will be positioned on the back side of your granny square.
STEP 2: Secure the slip knot firmly onto your hook, position your hook near the corner of the granny square, and create a Ch 1.
STEP 3: Crocheting Ch 4, which counts as both one double crochet (dc) and a corner space. Continue to crochet your round of the granny square in your usual manner.
Continue adding additional rows with different colors to create a multicolored classic granny square!
VIDEO TUTORIAL
Dear reader, we always like to provide you with several learning options to improve your performance. For those who prefer video tutorials, we’ve got you covered. I recommend this tutorial created by RaffamusaDesigns, which is complete and perfect for beginners to learn how to make their beautiful granny square.
We recommend that you follow the video tutorial, this way you will be able to familiarize yourself with the project more easily and do a great job when making your classic granny square. Watch the step-by-step video below.
If you’re a beginner in crochet, you’ll love working with this pattern, follow the step by step and watch the video tutorial to make sure you’ve understood the execution correctly. get a good result and expand your skills. With just a few turns you will have your result, the most basic crochet squares usually have an average of 10 to 15 cm.
It was great to learn together briefly about the history of the traditional granny square, it will basically be part of several of your projects, believe me! Thank you for having you here with us on our beloved blog, we have a lot of amazing patterns that you might like here, check out our many free patterns. Also send this article right now to all your friends who you think will like to know more about the history of the granny square and this incredible universe of crochet squares.
We think you might like:
If you have any questions or suggestions, let us know in the comments, we are always ready and willing to answer them. Do you already have an idea of the project you want to execute? Well, get your crochet hooks, your threads right now and let’s do what we love most, which is crocheting. Have a great day and see you soon. Happy crochet!

My grandmother taught me to crochet 70 tears ago. I have made many, many afghans over the years, but not with granny squares. I just could not figure out joining and going to the next row making it look neat. Thank you for the clean and easy to understand video.
Your Granny Square instructions are very easy to follow however I did not see the instructions to crochet them together. Will you be posting how to crochet them together?
Hi Judy! We have an article about joining granny squares here in this Crochet Granny Squares category, take a look! I hope it helps you.
Soy novata en el tejido a crochet y me encantó su clase y forma de explicar. Muy clara y didactica. Agradecida desde ya pues iniciaremos la ejecución de los cuadrados.