
Crochet Sunburst Granny Square
Dear reader, I hope you are having an enjoyable day. I brought here something that will definitely make your day at least more interesting. Granny squares are amazing projects that can be made in different ways, with them you can have beautiful blankets, coats or any project you want to have. The best thing is that over time, the look of the granny square has been changing, opening up a range of options that can be chosen when making your beautiful project. Today we are bringing you the adorable Crochet Sunburst Granny Square pattern.
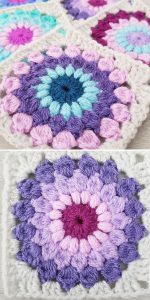
Crochet Sunburst Granny Square is a different and very beautiful granny square pattern, with a sunflower inside a small square, it will look great in that blanket project on your wish list. Another great idea is to use it in the crochet flip flops project we have here on our lovely blog and we think you should check it out right now.
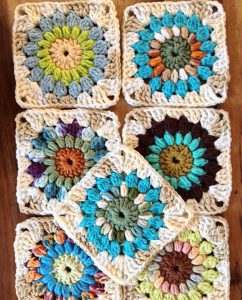
Well then, since we have you here, let’s talk a little more about this work of art that is the crochet square that looks like a sunflower. This pattern is a great choice for beginners in the crochet world and perfect for using scrap yarn. And speaking of threads, you can choose the most varied colors, although the sunflower has specific colors, this does not tie you to specific colors, you can use your creativity and leave your pattern the way you prefer.
YOU SHOULD KNOW
Unlike many other variations of granny squares that are more recent, the sunburst granny square is a classic that has been around for several years. It is a pattern made in rounds and in each different round a shade of the same color or a different color is used. To make this beautiful crochet granny sunburst square you will need silver yarn in four different colors.
The step by step is quite simple and following it calmly you will be able to obtain an absolutely incredible result in your crochet squares. You can access it through the link that we leave here for you. It’s really worth using this pattern in your crafts. Pieces with colorful and delicate details in their structure are usually very successful, they always draw attention because of their beauty and the sweetness in their delicacy.
Usually pieces with crochet squares, also called granny squares, are in great demand and call attention for their beauty. What’s more, they are very beautiful, delicate and easy to perform. Its appearance consists of always having a different design in the middle of the square, which makes each pattern unique, one more beautiful than the other.
As much as you think it’s difficult, it’s not. Be patient, you will definitely do a good job!
Level: Beginner/Intermediate
Finished Size: 5 inches by 5 inches
Materials:
Crochet Hook: Size H (5.0 mm)
Yarn: Worsted weight yarn (Category 4)
Additional Tools:
- Yarn needle
- Stitch markers (optional)
- Ruler or tape measure (optional)
Pattern Notes
This pattern worked in the round.
The instructions in this pattern are written in US crochet terms.
Stitches and Abbreviations
SL ST – Slipe Stitch
St/Sts – Stitch(es)
Ch – Chain
HDC – Half Double Crochet
DC – Double Crochet
TC – Treble Croche
Special Stitches
Puff Stitch: To create a Puff Stitch, follow these steps: Yarn over, insert your hook into the designated stitch, yarn over, and pull up a loop three times (resulting in 7 loops on your hook). Then, yarn over and pull through all the loops on your hook. Finish by chaining 1 to secure the puff stitch.
Cluster Stitch: The Cluster Stitch is crafted as follows: Yarn over, insert your hook into the specified stitch, yarn over, and pull up a loop, then yarn over and pull through 2 loops four times (leaving you with 5 loops on your hook). Finally, yarn over and pull through all the loops on your hook to complete the cluster stitch.
Pattern Instructions
Round 1
Start with a magic ring. Alternatively, you can commence with a chain: Create a slip knot, chain 5, and connect with a slip stitch.
Next, chain 3 (this counts as your initial double crochet) and craft 15 additional double crochets into the ring. Join by making a slip stitch to the top of the initial chain-3. (Totaling 16 stitches) Now, snip the yarn and securely fasten it off.

Round 2
Begin by attaching a new strand of yarn using a slip stitch to any double crochet (dc). Chain 2, create a puff stitch in the same stitch, and continue making puff stitches in each double crochet around. Finish by joining with a slip stitch to the initial puff stitch. You should have a total of 16 puff stitches. Cut the yarn and secure it by fastening off.
To create a puff stitch:
Yarn over and insert the hook into the designated stitch, then pull up a loop (resulting in 3 loops on the hook).
Yarn over again, insert the hook into the same stitch, and pull up another loop (for a total of 5 loops on the hook).
Yarn over once more, insert the hook into the same stitch, and pull up yet another loop (now with 7 loops on the hook).
Finally, yarn over and pull the yarn through all the loops on the hook, followed by chaining 1 to secure the stitch.
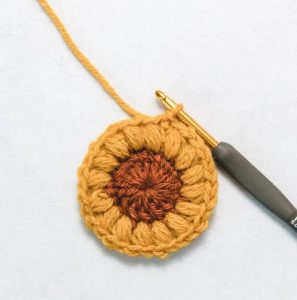
Round 3
Begin this round by attaching a new yarn with a slip stitch into any of the chain-1 spaces. Then, chain 2. In this round, we will be creating a series of cluster stitches. Crafting a cluster stitch is akin to executing a sequence of unfinished double crochet stitches.
The initial cluster stitch of this round differs slightly to accommodate the initial chain-2. To craft the first cluster stitch, follow these steps: Yarn over, insert your hook into the same stitch, yarn over again, and pull up a loop. Yarn over once more and pull through 2 loops. Repeat these steps two more times. This will result in having 4 loops on your hook. Yarn over and pull through all 4 loops to finalize the stitch. After that, chain 2.
Following that, proceed to create the remaining cluster stitches as follows: (Cluster stitch, chain 2) in the subsequent chain-1 space and in each chain-1 space all the way around. Join everything together with a slip stitch to the initial cluster stitch. This will yield a total of 16 cluster stitches. To finish, cut the yarn and fasten off.
To create a cluster stitch, follow these steps:
Yarn over, then insert your hook into the designated space, and pull up a loop. Yarn over once more, and pull through 2 loops (resulting in 2 loops on your hook).
Yarn over, insert your hook into the same space, and pull up a loop. Yarn over again, and pull through 2 loops (now there are 3 loops on your hook).
Yarn over, insert your hook into the same space, and pull up a loop. Yarn over one more time, and pull through 2 loops (resulting in 4 loops on your hook).
Yarn over, insert your hook into the same space, and pull up a loop. Yarn over and pull through 2 loops (leaving you with 5 loops on your hook).
Finally, yarn over and pull the yarn through all the loops on your hook.

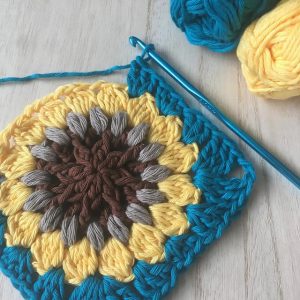
Round 4:
Begin by attaching a new yarn using a slip stitch in any of the chain-2 spaces. Chain 4, which counts as your initial treble crochet (tr), and then work 2 tr stitches in the same space.
Proceed to create the first side of the square as follows: Work 3 double crochets (dc) in the next chain-2 space, followed by 3 half double crochets (hdc) in the subsequent chain-2 space, and then complete the side with 3 more double crochets in the next chain-2 space. This sequence forms the first side of the square.
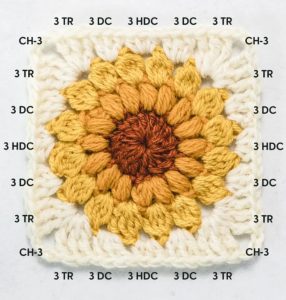
Now, craft the first corner: Work 3 treble crochets (tr) in the following chain-2 space, chain 3, and then work another 3 treble crochets in the same chain-2 space. This combination forms the first corner.
Proceed to repeat this side and corner pattern for the other three sides and corners in the square.
For the second side: Begin with 3 double crochets in the next chain-2 space, then follow with 3 half double crochets in the subsequent chain-2 space, and complete the side with 3 more double crochets in the next chain-2 space.
For the second corner: Work 3 treble crochets in the next chain-2 space, chain 3, and then work another 3 treble crochets in the same chain-2 space.
Moving on to the third side: Start with 3 double crochets in the next chain-2 space, followed by 3 half double crochets in the subsequent chain-2 space, and complete the side with 3 more double crochets in the next chain-2 space.
For the third corner: Work 3 treble crochets in the next chain-2 space, chain 3, and then work another 3 treble crochets in the same chain-2 space.
Crochet the final side: Begin with 3 double crochets in the next chain-2 space, followed by 3 half double crochets in the subsequent chain-2 space, and complete the side with 3 more double crochets in the next chain-2 space.
To complete the last corner: Work 3 treble crochets in the same space as the initial treble stitches, chain 3, and then join them with a slip stitch to the top of the starting chain-4.
Finishing
Congratulations, your sunburst granny square is now finished. To complete your square, trim the yarn and secure it. Then, weave in the ends.
If you plan to join multiple granny squares together, consider blocking them to ensure straight and even edges.
If you would like to print this beautiful pattern, we have a PDF option available for you to access below.
Access the PDF/ Sunburst Square
VIDEO TUTORIAL:
Dear reader, we really like to highlight the importance of a video tutorial to help when learning a new pattern, as a different way can be shown with new techniques to execute the pattern, so we are making a video from the channel available here Bella Coco that you can watch and follow.
We think you might like:
What did you think of this beautiful pattern we brought you here? Already have the perfect project in mind to use these beautiful crochet squares? I believe so! If you still have doubts, check out our other pages on our lovely blog, we have a lot of wonderful patterns here that can help you choose and give you amazing ideas. We really appreciate your presence in our space of love where we share craft learning. Grab your crochet hooks and thread and let’s get some work done! See you later. Have an excellent day!
Sincerely, Handmade Learning Here team.

Thanks so much for these tutorials.
It is inspiring me to start a project. The daisy GS.
Afghan for my Son and daughter in law, to leave before I pass.
Hope my old brain can complete a granny square daisy Afghan. I’m beg/ inter..
The tutorial video is very helpful. Thank you!
I really like your work! I have tried so many times and I just can’t seem to get it right 😕
That was a very good demonstration, thank you.
I am wanting to learn to crochet, this video is inspiring and easy to follow. Thank you.
How do you attach the squares to each other