
Mitered Granny Square
Welcome, fellow crafter, to another exciting journey into the world of crochet wonders! Today, we’re diving deep into the realm of crochet and exploring the fascinating technique of mitered granny square. If you’re a crochet enthusiast looking to elevate your skills and add a touch of sophistication to your projects, you’re in for a treat.
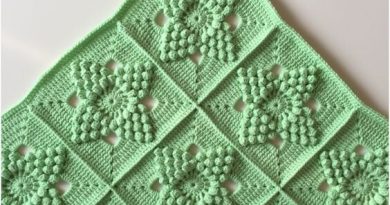
Today we want to bring you a very beautiful pattern that is very successful! It’s the mitered granny square pattern. This beautiful and lovely pattern will make your projects more charming. You can definitely make a beautiful blanket for your bed, umm afghan or any other project.
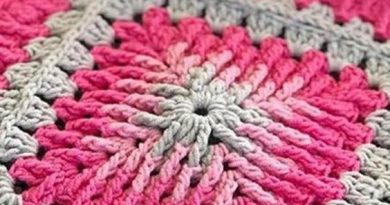
I was talking to my friend Wendy about how this pattern had a curious aspect, it seemed to be a 3D effect. She told me that she thought it would be difficult to work with, however it was much easier than she imagined, and that the colors chosen can change the final visual effect. The sensation of depth happens because it goes from dark to lighter.
We know that there are countless variations of crochet squares out there, but this one has a different touch that makes the projects very interesting. They are easy to make squares and have incredible color combination possibilities. You can make magnificent color variations. It is generally recommended to use worsted weight and the ideal size hook would be a size 7 (around 4.5mm).
Understanding Mitered Granny Squares:
Mitered granny squares are a captivating variation of the classic granny square that adds a modern twist and a sense of geometry to your crochet creations. Unlike traditional granny squares, mitered squares feature a unique construction that results in a striking diagonal pattern, creating a visually appealing effect.
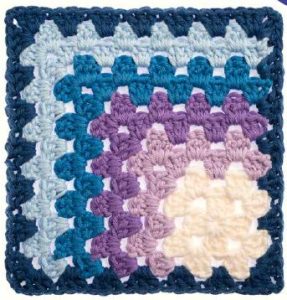
Mitered Granny Squares exude a singular beauty that transcends the simplicity of traditional crochet. With their geometric approach and angular patterns, these woven squares transform into true works of textile art. The harmony between vibrant colors and the mathematical precision of the mitered corners creates a captivating look, while the repetition of these interlocking blocks results in a stunning final piece. The beauty of Mitered Granny Squares lies not only in the technical skill involved, but also in the ability to convey a sense of modernity and sophistication, elevating crochet to a level of contemporary artistic expression.
Getting Started
Before we embark on our mitered granny square adventure, let’s gather our materials. You’ll need your favorite yarn, an appropriate crochet hook, and a basic understanding of the traditional granny square. With these in hand, we’re ready to explore the step-by-step process of creating mitered granny squares.
Step 1: Begin with a Traditional Granny Square
To create a mitered granny square, start with the foundation of a traditional granny square. Work your chosen number of rounds, keeping in mind that the final size of your mitered square will depend on the size of your initial granny square.
Step 2: Choose Your Corner
Select one corner of your traditional granny square to be the starting point for your mitered design. This corner will serve as the anchor for your diagonal stitching.
Step 3: Diagonal Stitching
Now comes the magic! Instead of continuing with the usual rounds, you’ll begin stitching diagonally across your granny square. This involves working stitches from one corner to the opposite corner, creating a diagonal line that adds depth and dimension to your square.
Step 4: Repeat and Expand
Continue working diagonally from corner to corner until you achieve the desired size for your mitered granny square. Feel free to experiment with color changes, creating intricate patterns that showcase the versatility of this technique.
Finishing Touches
Once you’ve reached your desired size, finish off your mitered granny square with a neat border. This not only adds a polished look but also reinforces the structure of your square.
Creative Applications
Mitered granny squares open up a world of possibilities for your handmade projects. Consider incorporating them into blankets, shawls, or even as standalone pieces of art. The diagonal lines create a sense of movement and intrigue, making your creations truly unique.
How many squares?
Depends on what you’re making… A medium afghan measures about 6 x 8 squares.
Each square measures 6 1/4 inches, including the white border if that gives you a better idea of the proportions. (6 1/2 inches not counting the border.)
Dear reader, we can’t say exactly how much yarn you will use in the project.Iit depends on the size of the project you will do and the weight of the yarn you choose, in addition to the colors used as well.
Here are some tips for beginners:
MATERIALS
- Crochet HookH/8 or 5 mm hook (I/9 USA, 5 UK)
- Yarn Weight(4) Medium Weight/Worsted Weight and Aran (16-20 stitches to 4 inches)
- Crochet Gauge3 repeats = 4 inches
- in 3 dc, ch 1
- Tapestry Needle
ABBREVIATIONS (US TERMS)
Ch – Chain
Dc – Double Crochet
MC – Magic Circle
Sl St – Slip Stitch
Sp – Space
St – Stitch
Yo – Yarn over
GRANNY SQUARE PATTERN
LET’S START WITH A SIMPLE GRANNY SQUARE
ROUND 1 To begin, make a Magic Circle (also known as a sliding ring) or use your preferred method for starting granny squares. Pull up a loop and chain 3 (this counts as the first double crochet here and throughout). Place 2 double crochets in the circle, then chain 3.
Repeat the pattern {3 double crochets, chain 3} three times.
Slip stitch to the top chain of the initial chain-3. Don’t finish off or cut the yarn.
ROUND 2 Chain 3, then in the next chain-3 space, work {3 double crochets, chain 3, 3 double crochets}. Repeat this pattern in the next two chain-3 spaces.
In the last chain-3 space, work 3 double crochets, chain 3, and then 2 double crochets. Slip stitch to the top of the starting chain-3. Now you can finish off.
Now… The mitered part
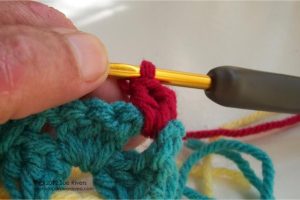
Start by adding a new color at any corner made of three chains (ch3). I recommend attaching it with a beginning double crochet (dc), but you can also use a slip stitch (slpst) and chain 3 (ch3) if you prefer. It’s your choice!
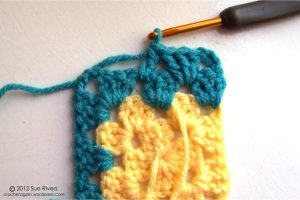
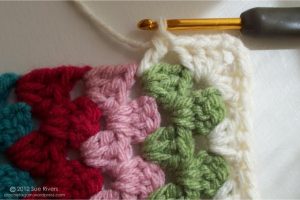
Work 2 double crochets (2dc) in the same corner space. Then, crochet 3 double crochets (3dc) in the space between the two groups of 3 double crochets from the previous row. After that, in the next ch3 corner space, crochet 3 double crochets, chain 3 (ch3), and 3 double crochets (3dc).
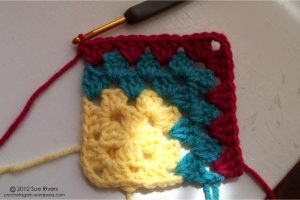
Moving along, crochet 3 double crochets in the space between. Next, in the next corner space, crochet 3 double crochets and chain 3 (ch3). Here comes a slightly tricky part – turn your work. Now, imagine you’re working in rows, continuing along two sides of the square.
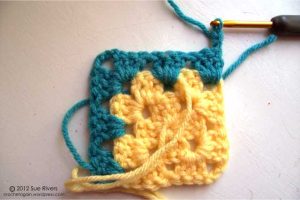
3 double crochet in the next space.
Continue working across by doing 3 double crochets (3dc), chain 3 (ch3), 3 double crochets (3dc) in the corner, and 3 double crochets (3dc) between each set until you reach the end. Double crochet (dc) in the top of the stitch on the end, and then finish off.
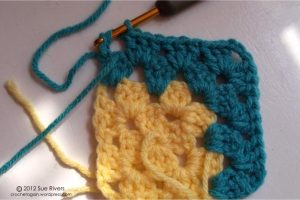
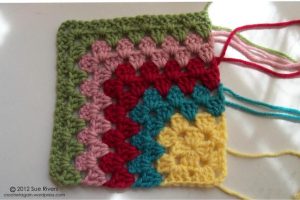
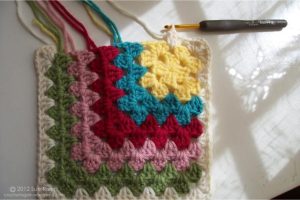
Turn it around and add a different color using a double crochet (dc) or a chain-3 (ch3).
Carry on as before, along the 2 sides you did before.
Do as many rows as you desire.
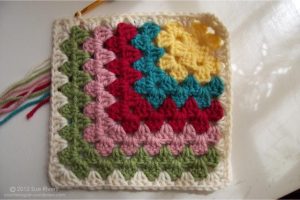
Let’s continue by adding a border. Start with the initial center square facing up (the yellow one in the picture). Attach the white yarn at the beginning of the row, just like before. Then, crochet 2 double crochets (2dc), chain 3 (ch3), and crochet 3 double crochets (3dc) to create a corner.

Keep going to the opposite corner, make 3 double crochets (3dc), chain 3 (ch3), and then 3 double crochets (3dc) like you usually do for a granny square corner. Move on to the next corner and repeat the process by making 3 double crochets (3dc), chaining 3 (ch3), and finishing with 3 double crochets (3dc).
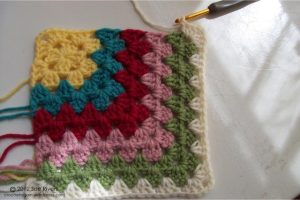
Now, make your way to the edges of the rows. Keep doing three double crochets (3dc), placing them in the same space as the lower part of the double crochets on the sides. It’s easy to spot – there’s a clear space there.
Now, let’s continue by working on the 3 double crochets (3dc) and the corners made up of 3 double crochets, chain 3, and another 3 double crochets (3dc, ch3, 3dc).
And at last, we reach the finish line, slip into the top of the first stitch, and we’re done!
To connect the squares, I recommend using the “join as you go” method. There’s a great tutorial on the Things to Make and Do blog with clear photos to guide you through the process.
Note: If you find the white borders and joining confusing, here’s a tip. For the first square, add the white border all around. For the rest, create the white border during the joining round. If you prefer preparing all squares in advance, skip the white border until you’re ready to connect them. Check out my new Join As You Go tutorial posted on 1/14/14 for more guidance.
If you prefer a smaller square, I suggest transitioning to ch2 for the corners, with ch1 placed between the 3dc groups. This arrangement aligns better with the join-as-you-go method. The resulting squares will be approximately 20 centimeters each.
Feel free to explore your creativity by adjusting the size—adding or subtracting half turns, preferably in increments of 2 for optimal functionality. You can maintain a consistent design by arranging colors similarly in all squares, or vary them for a diverse look. Additionally, consider incorporating borders around each square, as demonstrated in the original piece—opening up a multitude of possibilities!
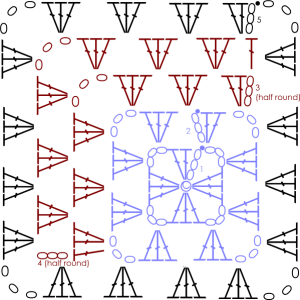
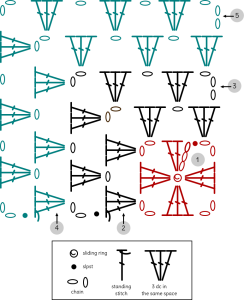
GRAPHIC
If you prefer to have a chart at hand for your learning. This graphic likely illustrates a specific design. Each round of the graph can correspond to a color change. Progress through the chart until the entire design is complete. Be prepared to use a variety of crochet stitches, such as single or double crochet, and make color changes as instructed in the graphic.
VIDEO TUTORIAL
Well, dear reader, if you are the type of person who prefers video learning… Here we have two incredible videos available for you to learn how to make your mitered granny square. But why two options? Well, here we have the bordered and borderless version of your mitered granny square, you choose the best way to do it and which one best suits your desired project.
Below is the Mitered Granny Square bordered option. The video is from the Knotting Hook Crochet YouTube channel and you can watch it here:
We also have a borderless option for your Mitered Granny Square. The tutorial video is from the Secret Yarnery YouTube channel, it is very educational and you can watch it below:
We are here to help you with your crochet learning, and we hope your project turns out beautiful!
If you have questions about how to join your squares, we recommend that you see the step-by-step guide here: HOW TO JOIN YOUR GRANNY SQUARES
CONCLUSION
What did you think of this tutorial? I hope you liked it and make good use of it. Send it to your friends right now, so you can share your learning with other people.
Thank you very much for being here with us, dear reader, it’s always great to see you here and we can learn the most beautiful patterns together. We have a lot of content available on our blog, we suggest you take a look at our other articles with the most beautiful crochet patterns.
Congratulations, crafter! You’ve now mastered the art of mitered granny squares. With this newfound skill, let your creativity run wild and experiment with different color combinations and project ideas. Whether you’re a seasoned crochet veteran or a beginner eager to learn, mitered granny squares are a delightful addition to your repertoire. Happy crocheting!

I don’t see anywhere that says how much yarn is needed. I know it will depend on blanket size but suggestions on amount would be helpful.
Hello! Unfortunately, I will not be able to answer individuals questions about how much yarn you would used do to multiple factors affecting it. Such as, your tension, the size of hook and the yarn being used…
Nice
The instructions are clear and easy to read. The pictures and video’s are extremely helpful. I have been crocheting for well over 20 years and this tutorial was by far the best I have ever seen. Thank you for putting the time and effort into your tutorial. I do appreciate it.
I have just seen this pattern and I think it’s fantastic showed it to my son and he has asked me to make one for him. How could I refuse. But I as just wondering what ply wool are you using. Thanks June