How Join Crochet Squares
Hello, lovely reader. We realize that one of the questions most people have is how they can join the crochet squares together. There are several ways you can join the crochet squares and we separate here some tutorial videos that clearly show ways of how join crochet squares. Crochet is an enchanting art that allows us to make beautiful pieces and specimens, and most of them are made up of amazing little crochet squares, known as granny squares, one of the most common projects in the making of this craft.
Making crochet squares can be a lot of fun, it may seem easy, and when you see you have a bunch of crochet squares in a pile of small crochet squares but you don’t know exactly what you are going to do to be able to join them together in a way beautiful, discreet and that is not too complex or too difficult to be done.
How join crochet squares. Joining the crochet squares is the crucial step for the formation of the complete project and here we are going to show you some ways and give you some tips so that you can do it in the best possible way.
There are some different tips in different videos that we brought and here you can follow these methods and techniques used and see which one you are familiar with and identify with the most, taking it to the rest of the projects you do. Don’t waste your time and see each one right now. The videos are available for you, so when you have time to get cozy in some corner of your house, grab some crochet squares and thread so you can practice each of the techniques shown.
There are aunts and grandmothers who made the junction in a unique way, and they think that this way is just theirs, but this was passed from one person to another and they developed easier methods and evolved the already existing techniques, making a different way of another, so if you’re one of those people who think you know everything… It’s worth checking out!
Joining granny squares in crochet can be done using various methods, depending on your desired look and the level of sturdiness you want for your project. One common method is the whipstitch join, which I’ll explain below:
Materials you’ll need:
- Granny squares
- Yarn in a coordinating color
- Crochet hook (size should match the yarn you’re using)
Instructions:
- Lay Out Your Squares: Arrange your granny squares in the desired pattern and order. This will help you visualize how your finished project will look.
- Thread Your Yarn: Thread a length of yarn (about 24 inches) onto a yarn needle. This yarn should be in a color that complements your granny squares.
- Position the Squares: Place two granny squares you want to join with the right sides facing each other. This means the front sides should be on the inside, and the wrong sides should be facing out.
- Start at a Corner: Insert your yarn needle through the corner stitches of both squares. The corner stitches are typically chains that create the corners of your granny square.
- Whipstitch the First Side: Bring the needle and yarn under the two loops of the first stitch on one square and then under the two loops of the first stitch on the other square. Continue this whipstitch pattern along the side, working through both squares’ corresponding stitches.
- Continue Around the Corner: When you reach the corner, you can either stitch directly into the chain space or work a few stitches in the last chain stitch. This helps secure the corner.
- Continue Stitching: Whipstitch along the next side, following the same pattern until you reach the next corner.
- Repeat Steps 5-7: Continue this process, working your way around all four sides of the squares. When you reach the final corner, stitch securely, and then tie off your yarn by making a small knot.
- Weave in Ends: Using your yarn needle, weave in the loose ends of the yarn to secure them. Trim any excess yarn.
- Repeat for All Squares: Repeat the process for joining all the granny squares in your project.
- Blocking (optional): If your granny squares are uneven, you might want to block the entire project. This involves gently wetting the squares, pinning them into the correct shape, and allowing them to dry. This can create a neater and more uniform look.
Remember, there are many other methods to join granny squares, including slip stitch joins, single crochet joins, and more. The method you choose may depend on your project’s specific needs and your personal preference.
So here are some tips:
Block the granny squares: Before you even start to join the crochet squares, it is very important to block each one individually. But what is the lock for? You must be asking yourself. Well, if that’s your question, know that blocking helps to match the size of the squares and will allow you to better visualize the pattern. You can use pins or even some yarn to hold the edges to a flat, smooth surface, gently stretching the fabric. Next, you must moisten them with water or use a blocking spray. Make sure they are completely dry before proceeding.
Choose the method that best suits your project and with which you are most skilled. There are several ways you can join your squares, the most common are sewing, joining with a low point and joining with a slip stitch. Each of the methods has its advantages and you can choose according to the desired effect on the look of your piece after finishing it.
Sewing: With a tapestry needle and yarn the same color as the yarn in the square, you can sew the squares together. You must align the edges of the squares and insert the needle, passing it through the upper loop of both squares. Then you continue your work by sewing along the edge, making small, even stitches. This technique is very discreet, perfect for projects where the joint must be more “invisible”.
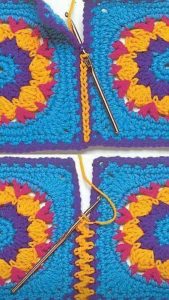
Union with a low point: In this technique, the necessary tool for joining the squares is a crochet hook. Line up the edges of the squares and insert the needle into the first stitch of the square on the left. After that you will direct the needle to the same point as the square on the right and insert it there and make a normal single crochet. Repeat the process along the edge of the squares, making single crochets in each pair of stitches. The result of this combination is visibly apparent, but leaves the piece with a very elegant decorative touch.
Union with flap slip stitch: It is very similar to the previous technique. Using a crochet hook, after lining up your squares correctly, you will do the similar process. Make sure you line up your squares, huh? Align the edges of the squares and insert the crochet hook into the first point of the left square, then into the corresponding point of the right square and make a slip stitch. You will repeat this process along the edge, making slip stitches in each pair of stitches. The look that this joint will give to this piece is almost invisible, perfect for projects that require a uniform appearance.
VIDEO TUTORIAL
See another option:
Stay tuned for details, dear reader. When joining the crochet squares pay close attention to having the perfect finish! Always keep an eye out when aligning the edges and checking if the number of stitches is consistent throughout the joint. That way your piece will be leveled and without deformations. Take your time, do it calmly, and if necessary, make adjustments as you work so that your end result is pleasant and harmonic.
So, did you like it? We from the Handmade Learning Here team have here some options for crochet square patterns that you can check out, they can serve as inspiration for you now or in some future project. Here we separate it exclusively for you and we believe that you like it!
We think you might like: Solid Crochet Square and Solstic Granny Square
Joining crochet squares is an essential step in creating projects. The proper and well-done technique will guarantee you a formidable finish on your crochet pieces. As we said before, try each of the techniques and see which one you feel more familiar with and get a more satisfactory result according to what you were looking for. With practice and dedication you will create beautiful pieces!
Send this article to some of your friends right now, that way you will ensure that other people have the opportunity to learn new techniques and share this wonderful knowledge. We are so happy to have you here with us on our lovely blog, now that you know how to crochet squares together, take a look at our other articles and look for the perfect granny square for your next project, we have loads of patterns here. Hope you have a beautiful day! XoXo.