
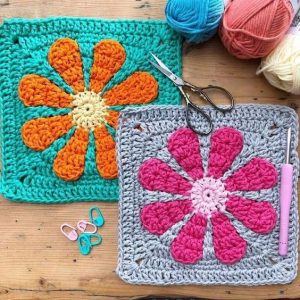
Retro Daisy Square
Hello, my dear reader, I hope you are having a beautiful day! One of these days I went to my friend’s house and saw a beautiful crochet work, such a beautiful pattern that I couldn’t help but bring it here for you. It’s the adorable Retro Daisy Square pattern.
The Retro Daisy Square Crochet pattern brings us comfort as if it were an enchanting trip to nostalgia, this pattern brings a vintage allure with contemporary crochet techniques. Let’s delve into the allure of this complex design and discover how it can enrich your crafting efforts.
Its wonderful design takes with it designs of beautiful timeless daisies, this design invites you to a creative exploration, fusing retro aesthetics with the art of crochet. Each round reveals a narrative, interweaving captivating petals and backgrounds to form an enchanting piece.
In addition to pieces such as beautiful blankets, or combining this square with other squares with different patterns, making your piece completely exclusive… You can also choose to use these beautiful squares to create, for example, a wonderful granny squares cardigan.
I want to invite you to try this wonderful and charming pattern, it is not a difficult project to do and you will have a beautiful result, my dear reader.
Abbreviations (US Terms)
Ch – chain
Cont – continued
Dc – double crochet
Fptr – front post treble
Sc – single crochet
St – stitch
Supplies Required:
- Yarn in your preferred colors (Petal and Background)
- Crochet hook appropriate for your yarn weight
- Stitch markers
- Scissors
- Tapestry needle
Retro Daisy Square Crochet Pattern
Rnd 1 (Petal Color):
Start with a sl knot on your hk. Ch 4 and join to form a ring. Ch 1. Sk next st, then work 3 dc into the following st. Ch 1, sk a st, and work 3 dc into the next st. Repeat around. Ch 1 and join with a sl st to the first true st. Do not fasten off; leave a long lp or use a st marker.
Rnd 2 (Background Color):
Attach yarn to the stitch below in the first round, between the groups of petals. Make 2 chains (or 3), then make 4 chains to reach the next stitch. Make a double crochet into that stitch. Repeat this process all around, making 4 chains between double crochets. Connect with a slip stitch, leaving a long loop or using a stitch marker.
Rnd 3 (Petal and Background Colors):
Using the PC (Petal Color), bring the LP (loop) to the front and widen the petal by turning 3 DCs (double crochets) into 4. Ch 2 or 3 and work an INC (increase) in the next st (stitch). Repeat this pattern around, joining with a sl st (slip stitch), and leaving a long LP.
Rnd 4:
(Begin with the PC (Petal Color). Ch 2 or 3 and INC (increase) in the third st (stitch). Repeat the pattern all around, adding a sl st (slip stitch) and leaving a long LP (loop).
Switch to the BC (Background Color), turning 2 DCs (double crochets) into 3. Repeat the pattern, joining with a sl st (slip stitch), and leaving a long LP (loop).
Rnd 5:
Increase the number of double crochets (dc) in the petals from 4 to 5. Repeat the pattern around, joining with a slip stitch (sl st) and leaving a long loop.
Rnd 6:
Finish the petals with a shell stitch (sh st) in the middle double crochet (dc). Repeat the pattern around, joining with a slip stitch (sl st) and leaving a long loop.
Rnd 7:
Use the background color to increase 2 double crochets (dc) to 3. Work around, forming corners with double crochets (dc), chain 1 (ch 1), double crochets (dc). Join with a slip stitch (sl st) and leave a long loop.
Rnd 8:
Chain 2 (ch 2) for the first half double crochet (hdc). Work half double crochets (hdc) around, forming corners with double crochets (dc), chain 1 (ch 1), double crochets (dc). Join with a slip stitch (sl st) and fasten off if desired.
Optional Single Crochet Border:
Add a single crochet (sc) around the edge, including one in each chain-1 space of the corners. Fasten off and weave in ends.
Well done! You’ve finished crocheting the Retro Daisy Square pattern. Feel free to modify the color combinations and stitch counts according to your preferences.
Retro Daisy Square – VIDEO TUTORIAL
Dear reader, we know that sometimes when we read a pattern we have some doubts. Because of this, we have separated another way of learning for your Retro Daisy Square. This video pattern is not exactly the same as what we wrote here, however, you can understand how to do it and follow the video tutorial if you prefer. This adorable video is very educational and was made by the YouTube channel Adore Crea Crochet and you can watch it below.
🧶 Materials Needed:
3 different colors of DK worsted weight yarn.
Crochet hook 4,5 mm.
Yarn needle Scissors
As you delve into the rhythmic interplay of crochet hooks and yarn, behold the Retro Daisy
Square blossoming before your eyes, a tribute to the timeless charm of vintage-inspired handicrafts. Whether you’re a seasoned crochet enthusiast or an eager beginner, this pattern beckons you to embark on a journey weaving a tapestry that defies the constraints of time.
Embrace the allure of the Retro Daisy Square, and let your crafting voyage evolve into a celebration blending tradition with innovation. Unleash your imagination, witnessing the fusion of bygone eras and contemporary flair with every stitch, culminating in a masterpiece destined to be treasured across generations. Happy crocheting! XoXo.
Muy hermoso sus proyectos la felicitó 👏🏻👏🏻
so pretty. Not crocheted for many years and would like to try again
love thids