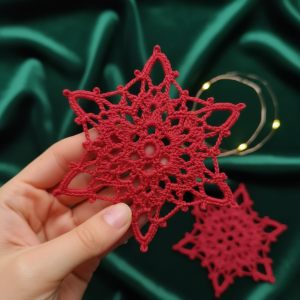
Aurora Snowflake
Hello my dear friends! Welcome to our blog Handmade Learning Here. There is something truly magical about crocheting snowflakes. Each one feels like a tiny piece of winter captured in yarn, and the Aurora Snowflake Crochet Pattern is a perfect example of that quiet, elegant beauty. With its delicate structure and graceful points, this snowflake is a wonderful project for anyone who loves seasonal decor and fine crochet work.
This pattern creates a snowflake that looks intricate and impressive, yet it is built step by step in a way that is very rewarding, especially if you enjoy learning new stitch combinations. It’s the kind of project that encourages you to slow down, breathe, and truly enjoy every stitch.
A Beautiful Blend of Texture and Elegance
What makes the Aurora Snowflake so special is the balance between a solid center and airy, decorative arms. The pattern grows outward in gentle rounds, gradually forming detailed points that resemble real ice crystals. Picots, chain spaces, and taller stitches come together to create a snowflake that feels light, elegant, and full of movement.
Although the final result looks delicate and refined, the construction is logical and well-structured. Each round builds naturally on the previous one, helping crocheters understand how snowflake motifs are formed. This makes the pattern especially appealing to those who want to expand their skills while still enjoying a relaxing project.
Perfect for Beginners Who Want a Little Challenge!
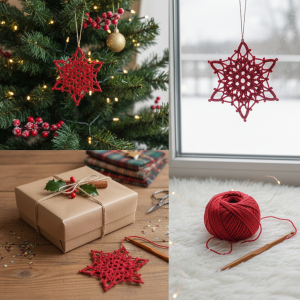
This lovely snowflake ornament combines lacy elements with a more solid center, and it can even double as a festive coaster if you use a heavier cotton thread. Take your time with each round, you’ve got this!
While this pattern is best suited for beginners who are comfortable with basic stitches, it is still very beginner-friendly when approached with patience. The use of familiar stitches combined with decorative elements like picots helps build confidence and skill. Taking your time and following each round carefully is the key to success.
Blocking and stiffening at the end truly brings the snowflake to life, opening up the stitches and highlighting every beautiful detail. It’s always a joy to see the finished piece transform once it’s shaped and dried.
Materials
Here’s what you’ll need:
Yarn: 100% cotton crochet yarn, something around size 10 works beautifully
Hook: Size 1.5 mm crochet hook.
Scissors and a tapestry needle for weaving in ends.
Note: Your snowflake size will vary slightly depending on your tension and hook size, that’s okay! Blocking and stiffening will really help bring out the shape.
Abbreviations (US Terms)
These are the stitches used in this pattern:
ch = chain
sl st = slip stitch
sc = single crochet
hdc = half double crochet
dc = double crochet
tr = treble crochet
picot = chain 3, sl st in same stitch
faux picot = (sc, ch 3, sc) in the same place
ch-sp = chain space
Getting Started
We’ll begin in the round using a magic ring, this makes the center nice and snug. If you’re not familiar with a magic ring, just start with a ch 4 and slip stitch to form a ring instead.
Round-by-Round Instructions
ROUND 1 — Build the Center
- Make a magic ring.
- Work 18 sc into the ring.
- Join with a sl st to the first sc to close the round.
You’re creating the solid center from which all the points will grow.
ROUND 2 — Make the Foundation for Arms
- Ch 2 (does not count as a stitch).
- In the same stitch, work 2 hdc.
- Ch 3, skip the next 2 stitches, then work 3 hdc all in the next stitch.
- Repeat that * to * 5 more times (6 clusters total).
- After the last repeat, ch 3 and sl st into the second ch of the very first chain you made.
This round starts forming the base points for each arm.
ROUND 3 — Add Texture Inside Each Arm
- Ch 1, this does not count as a stitch but gives you height.
- In each arm space:
- Work (sc, ch 3, sc) in the second hdc of the cluster below.
- Then work (sc, hdc, dc, tr, ch 3, tr, dc, hdc, sc) all into the big chain space.
- Repeat this * around 6 times.
- Sl st to the first sc to join.
We’re building nice texture and height here so each snowflake point will be lovely and full.
ROUND 4 — Define the Snowflake Arms More
- Ch 1, then work 1 sc into the small chain space.
- Ch 2, dc in next tr, ch 1, then (3 dc, ch 3, 3 dc) in the big chain space, ch 1, dc in next tr, ch 2, sc in the small chain space.
- Repeat that * around 6 times.
- After the last repeat, ch 2 and sl st into the first sc.
This round makes the arms more prominent and starts giving your snowflake that classic star shape.
ROUND 5 — Add Really Fun Details
This round is the heart of the texture and decorative look:
- *2 sc in the nearest chain space,
- in the same dc: (sc, ch 3, sc),
- sc in the small chain space,
- sc in the second dc,
- ch 3, then (tr, ch 9, tr) all into the big chain space,
- ch 3, sc in the second dc,
- sc in the small chain space,
- (sc, ch 3, sc) again in the same dc,
- 2 sc in the chain space.*
- Repeat this * around 6 times.
- Join with a sl st to the first sc.
You’ll see lots of points and loops, this is where your snowflake really shines!
ROUND 6 — Final Round With Picots & Finishing Touches
This round finishes the outer edge with fun picots and chain loops:
- Work 2 sl st in the stitches, then 2 sl st around the picot from the previous round.
- Ch 3.
- *Ch 4, sc in the tr of the last round, ch 3, then work (7 sc, ch 3, 7 sc) all into the big chain space.
- Ch 3, sc in the tr, ch 4.
- Work a dc2tog (double crochet 2 stitches together) in the faux picots, then finish with *1 picot.
- Repeat this * around 5 times.
- For the final repeat, after the last big chain space, instead of dc2tog, just work 1 dc in the first faux picot, then sl st in the third chain of the picot, and finish with 1 picot.
Take it slowly here — this round adds the beautiful finishing edge that makes the snowflake really sparkle!
Fasten Off & Finishing
Once you’ve completed Round 6:
Cut your yarn, leaving just a little tail.
Weave in your ends neatly with your tapestry needle.
Block and stiffen your snowflake:
-
- Pin it gently into shape on a foam board or towel.
- Spray with water or a fabric stiffener.
- Let it dry completely.
Blocking really makes those arms pop and gives your snowflake a crisp, flat finish.
You Did It!
What a beautiful snowflake! 🥰
This pattern may seem detailed, but each round builds beautifully on the last. Take your time, enjoy the rhythm of the stitches, and know that every stitch brings your snowflake to life.
These videos were made by the lovely Kate’s Crochetpedia channel; you can access the written pattern below:
The Aurora Snowflake Crochet Pattern is a gentle reminder of why we love crochet so much. It invites us to create something beautiful with our hands, one stitch at a time. Whether you’re decorating your home for winter, making heartfelt gifts, or simply enjoying a peaceful crochet moment, this snowflake is a lovely choice.
Thank you so much for visiting Handmade Learning Here. I hope this pattern inspires you to keep exploring, learning, and creating. Be sure to take a look at our other crochet patterns and tutorials, there’s always something new waiting for you. Happy crocheting, dear, and I hope to see you back here again very soon