Crochet Bat
Hello, dear reader! Welcome to our lovely blog Handmade Learning Here. Today we want to bring you a very cute pattern. It’s the Crochet Bat pattern. A great idea for Halloween decoration!
As the leaves turn and the air grows crisp, it’s time to embrace the spooky season! One delightful way to add a touch of Halloween charm to your crafts is with a Crochet Bat Applique. Whether you’re decorating a cozy blanket, a pumpkin-themed project, or making festive accessories, this cute bat will add a whimsical flair. Let’s dive into the world of crochet and discover how this little creature can enhance your handmade items!
Why Choose a Bat Applique? 🎃
Appliqués are versatile and fun, allowing you to personalize your crochet projects easily. The Crochet Bat Applique is perfect for those who want to sprinkle a bit of Halloween spirit into their creations without overwhelming them with dark themes. Plus, it’s an excellent way to use up leftover yarn!
Perfect for Any Project
The beauty of the bat appliqué is its adaptability. Here are some project ideas:
- Halloween Decorations: Sew or glue the bat onto a pillow, blanket, or wall hanging to bring a festive touch to your home.
- Costume Embellishments: Attach it to a hat, bag, or even a child’s costume for a cute accessory.
- Gift Items: Add a bat to a handmade card or gift wrap for a personalized touch.
Choosing Your Yarn and Colors 🎨
When it comes to creating your Crochet Bat Applique, selecting the right yarn is key. Opt for cotton or acrylic yarn for durability. Black is the classic choice for a spooky vibe, but feel free to experiment with shades like purple or orange for a more playful look. The options are endless!
Tips for a Great Applique
- Gauge Matters: While gauge isn’t critical for appliqués, keeping your tension consistent helps ensure your bat turns out just right.
- Stitch Placement: Pay attention to the placement of your stitches. This will affect the final shape and appearance of your bat.
- Blocking: Once you finish your appliqué, consider blocking it to help it maintain its shape, especially if you’re using lighter yarn.
Abbreviations:
Ch – chain
DC – double crochet
DC2tog – double crochet two stitches together
HDC – half double crochet
HDC2tog – half double crochet two stitches together
Rnd – round
SC – single crochet
Sl St – slip stitch
St (Sts) – stitch (stitches)
Level:
Intermediate
Finished Size:
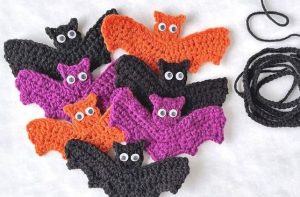
You can adjust the size of this applique by using different yarns and hook sizes. For instance, I made it in two sizes: small and large.
- The small bat measures approximately 3.5″ (9 cm) wide.
- The large bat measures about 6″ (15 cm) wide.
Materials:
Small Bat:
- Lightweight yarn (#3) – I used Patons Grace cotton yarn
- Crochet hook (size C-2 / 2.75 mm)
Large Bat:
- Worsted weight yarn (#4)
- Crochet hook (size H-8 / 5 mm)
Optional: Stick-on googly eyes for a fun touch!
Note:
How to Make a Magic (Adjustable) Ring
Start by creating a large loop with your yarn, making sure the yarn tail is behind the working yarn (the one connected to the skein). Leave about 4-6 inches of tail for easy handling.
Pull the working yarn through the loop on your hook, leaving you with one loop on the hook.
Crochet Bat Applique
To create this adorable bat applique, you’ll be crocheting the head and wings separately and then sewing them together. Let’s get started!
Head
Make a Magic Ring:
This is the starting point for your bat’s head. If you’re unsure how to make a magic ring, there are many video tutorials available that can help!
Round 1:
Chain 3 (this counts as your first double crochet).
Crochet 11 double crochets (DC) into the magic ring.
To close the round, join with a slip stitch (Sl St) in the top of the chain 3. You should have a total of 12 stitches.
Round 2:
Chain 3.
Slip stitch in the 2nd chain from the hook, then single crochet (SC) in the next chain, and slip stitch in the next stitch of the previous round.
Slip stitch in the next 2 stitches.
Repeat from * to * one more time.
Fasten off your yarn.
Wings
Foundation Chain:
Chain 26.
Row 1:
Half double crochet (HDC) in the 2nd chain from the hook and in the next 2 chains.
Crochet 2 half double crochets together (HDC2tog), HDC in the next chain, HDC2tog, and HDC in each of the next 4 chains.
Crochet 3 HDC in the next chain, HDC in each of the next 4 chains, HDC2tog, HDC in the next chain, HDC2tog, and HDC in each of the next 3 chains.
You should have a total of 23 stitches. Turn your work.
Row 2:
Chain 1 (this does not count as a stitch).
Single crochet in the first stitch and in the next 10 stitches.
Crochet 2 single crochets in the next stitch, then SC in the next 11 stitches.
You should have a total of 24 stitches. Turn your work.
Row 3:
Chain 2 (this does not count as a stitch).
Skip the first stitch, then crochet 2 double crochets together (DC2tog).
HDC in the next stitch, SC in each of the next 2 stitches, HDC in the next stitch, and DC2tog again.
HDC in the same stitch as the second leg of the previous DC2tog, slip stitch in the next stitch, SC in the next stitch, HDC in the next stitch.
Crochet DC2tog using the same stitch and the next stitch, HDC in the same stitch as the second leg of the DC2tog.
SC in the next stitch, slip stitch in the next stitch, HDC in the next stitch, and DC2tog using the same stitch and the next stitch.
HDC in the next stitch, SC in the next 2 stitches, HDC in the next stitch, and finally crochet DC3tog.
You should have a total of 21 stitches. Turn your work.
Row 4:
Chain 2.
SC in the 2nd chain from the hook, SC in the first stitch and in each of the next 4 stitches.
Chain 2, SC in the 2nd chain, and SC in the same stitch where you made the last SC before the chain.
SC in the next 4 stitches, crochet DC2tog, chain 3, and SC in the same stitch as the second leg of the DC2tog.
SC in the next 4 stitches, chain 2, SC in the 2nd chain, and SC in the same stitch as the last SC before the chain.
SC in each of the next 5 stitches, chain 2, SC in the 2nd chain, and SC in the same stitch as the last SC before the chain.
Finally, slip stitch in the next stitch. Fasten off your yarn.
Finishing Touches
Sewing:
Use your yarn needle to sew the head to the wings. Make sure they are securely attached.
Blocking and Shaping:
You can block and shape your bat as necessary. This helps it hold its form and look neat.
Adding Eyes:
If you like, you can attach googly eyes to your bat for a fun touch!
Now you have a cute bat applique that’s perfect for decorations or any craft project! Happy crocheting! 🦇✨
VIDEO TUTORIAL
For those who like a more visual way of learning, we have selected some video tutorials here so you can make them. They are different patterns from the written pattern, but you will also make beautiful crochet bats.
Final Thoughts
Creating a Crochet Bat Applique is a fun and rewarding experience, perfect for beginners and seasoned crocheters alike. It’s a delightful way to add a bit of charm to your Halloween projects and a fantastic opportunity to let your creativity shine.
So grab your hooks and yarn, and let’s get crafting! Share your finished bats with us; we’d love to see how you incorporate them into your handmade creations!
Happy Crocheting! 🧶✨