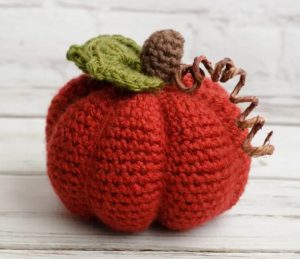
Crochet Pumpkins
Welcome to our lovely blog, Handmade Learning Here, dear reader. I hope you’re doing well! Today, we’re diving into a delightful and perfect pattern for decorating our homes, especially for Halloween. I want you to fully immerse yourself in this amazing Crochet Pumpkins pattern project with us.
Whether you’re decorating your home for the fall, preparing a themed piece for Halloween, or even creating adorable gifts, crochet pumpkins are an excellent choice. In this article, we’ll explore the charm of this pattern, its applications, and some tips to ensure your Crochet Pumpkins turn out perfectly.
The Magic of the Crochet Pumpkins Pattern
The crochet pumpkin pattern is notable for its simplicity and versatility. The rounded shape and lines that mimic the texture of real pumpkins make this pattern ideal for projects ranging from small ornaments to large decorations. The beauty of crochet pumpkins lies in the ability to personalize them to your taste, whether by altering the size, color, or even the decorative details.
To create your crochet pumpkins, you’ll need a few basic materials. Cotton yarn is a popular choice due to its texture and durability. Crochet hooks that match your chosen yarn are essential, and you might also need some stuffing to shape your pumpkins. Additionally, having a tapestry needle on hand for sewing and finishing details is helpful.
Although the pumpkin pattern may seem simple, there are some techniques and tips that can make a big difference. It’s important to start with a magic ring to create the base of the pumpkin, ensuring that the piece is firm and well-structured. Adding lines to simulate the pumpkin’s grooves can be done with single and half double crochet stitches, giving a more realistic finish. For an extra touch, you can add a crochet “stem” on top of the pumpkin.
What you’ll need
Materials Needed:
Worsted weight yarn:
Orange, Brown, Green
Poly-fill stuffing
Size 2.75mm Crochet Hook
Scissors
Yarn needle
Stitch marker (optional)
Abbreviation (US Crochet Terms)
ch: chain stitch
st: stitch
sc: single crochet
inc: increase by making two single crochets in one stitch
dec: decrease by working two single crochets together
slst: slip stitch
BLO: back loops only
FLO: front loops only
FO: fasten off
When I crochet amigurumi, I prefer to have the wrong side facing outwards. However, if you choose to crochet with the traditional right side facing out, it won’t significantly affect the final result—so feel free to follow your own preference.
One thing to note: when you work with the wrong side out, the front and back loops of each stitch will be reversed. In this pattern, when you see instructions like “FLO (BLO),” you’ll follow the part before the parentheses if you’re crocheting with the right side out, and the part within the parentheses if you’re working with the wrong side facing out.
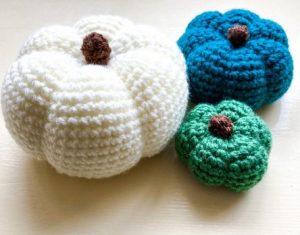
Pumpkin: Small (in orange yarn)
Round 1: Make a magic ring and crochet 5 single crochets (sc) into the ring. [5 stitches]
Round 2: Increase by crocheting 2 single crochets into each stitch around. [10 stitches]
Round 3: *Increase (crochet 2 single crochets in the same stitch), then crochet 1 single crochet in the next stitch*. Repeat from * to * around 5 times. [15 stitches]
Round 4: Increase (crochet 2 single crochets in the same stitch), then crochet 1 single crochet in each of the next 2 stitches. Repeat 5 times. [20 stitches]
Round 5: Increase (crochet 2 single crochets in the same stitch), then crochet 1 single crochet in each of the next 3 stitches. Repeat 5 times. [25 stitches]
Rounds 6-8: Crochet 1 single crochet in each of the 25 stitches around. [25 stitches]
Round 9: Decrease (crochet 2 stitches together), then crochet 1 single crochet in each of the next 3 stitches. Repeat from * to * around. [25 stitches]
Round 10: Decrease (crochet 2 stitches together), then crochet 1 single crochet in each of the next 2 stitches. Repeat 5 times. [15 stitches]
Round 11: Decrease (crochet 2 stitches together), then crochet 1 single crochet in the next stitch. Repeat 5 times. [10 stitches]
Round 12: Decrease by crocheting 2 stitches together 5 times. [5 stitches]
Finish: Cut your yarn, leaving a 12-inch tail. Use the yarn tail to pull through the last 5 stitches and tighten to close the hole. Don’t weave in the end just yet.
Pumpkin: Medium (in orange yarn)
Round 1: Start with 7 single crochets (sc) in a magic ring. [You should have 7 stitches now.]
Round 2: Increase (inc) in every stitch, making 2 single crochets in each stitch. [You should have 14 stitches now.]
Round 3: Do 1 increase (2 sc in one stitch), then 1 single crochet in the next stitch. Repeat 7 times. [You should have 21 stitches now.]
Round 4: Do 1 increase, then 1 single crochet in each of the next 2 stitches. Repeat 7 times. [28.]
Round 5: Do 1 increase, then 1 single crochet in each of the next 3 stitches. Repeat 7 times. [35.]
Rounds 6-11: Single crochet in each stitch around. [You should still have 35 stitches.]
Round 12: Decrease (dec) by crocheting 2 stitches together, then do 1 single crochet in each of the next 3 stitches. Repeat 7 times. [28]
Round 13: Decrease, then do 1 single crochet in each of the next 2 stitches. Repeat 7 times. [21]
Round 14: Decrease, then do 1 single crochet in the next stitch. Repeat 7 times. [14]
Round 15: Decrease in every stitch (crocheting 2 stitches together all the way around). [7]
Finish off (FO) leaving a long yarn tail of at least 24 inches. Weave the yarn tail through the last 7 stitches and pull it tight to close the opening. Don’t cut or hide the yarn tail yet.
Pumpkin: Large (in orange yarn)
Round 1: Start with 8 single crochets (sc) in a magic ring. [You should have 8 stitches now.]
Round 2: Increase (inc) in every stitch, making 2 single crochets in each stitch. Make it 8 times. [16]
Round 3: Do 1 increase (2 sc in one stitch), then 1 single crochet in the next stitch. Repeat 8 times. [24]
Round 4: Do 1 increase, then 1 single crochet in each of the next 2 stitches. Repeat 8 times. [32]
Round 5: Do 1 increase, then 1 single crochet in each of the next 3 stitches. Repeat 8 times. [40]
Round 6: Do 1 increase, then 1 single crochet in each of the next 4 stitches. Repeat 8 times. [48]
Rounds 7-18: Single crochet in all 25 stitches. [48]
Round 19: Decrease (dec) by crocheting 2 stitches together, then do 1 single crochet in each of the next 4 stitches. Repeat 8 times. [40]
Round 20: Decrease, then do 1 single crochet in each of the next 3 stitches. Repeat 8 times. [32]
Round 21: Decrease, then do 1 single crochet in each of the next 2 stitches. Repeat 8 times. [24]
Round 22: Decrease, then do 1 single crochet in the next stitch. Repeat 8 times. [You should have 16 stitches now.]
Round 23: Decrease in every stitch (crocheting 2 stitches together all the way around). [You should have 8 stitches now.]
Finish off (FO) leaving a long yarn tail of at least 24 inches. Weave the yarn tail through the last 8 stitches and pull it tight to close the opening. Don’t cut or hide the yarn tail yet.
Finishing the Pumpkin:
To complete your pumpkin, take the yarn tail and wrap it around the outside of the pumpkin, then weave it back through the center. Pull the yarn tightly to create an indented section. Repeat this process five more times, creating a total of six sections. For a more defined, segmented look, you can thread the yarn through each section multiple times.
Different Sizes:
To create pumpkins in various sizes beyond those listed on this page, try using crochet hooks of different sizes. Additionally, working more single crochet rounds before starting to decrease will result in a taller pumpkin.
Stem: Small (in brown yarn)
Round 1: Start with 4 single crochet (sc) stitches in a magic ring. [4 stitches total]
Round 2: In the Back Loop Only (BLO) or Front Loop Only (FLO), make 1 single crochet in each of the 4 stitches. [4 stitches total]
Round 3: Make 1 single crochet in each of the 4 stitches. [4 stitches total]
Finish off (FO), leaving a long enough yarn tail for sewing. Without stuffing, sew the stem onto the small pumpkin.
Stem: Medium (in brown yarn)
Round 1: Start with 5 single crochet (sc) stitches in a magic ring. [5 stitches total]
Round 2: In the Back Loop Only (BLO) or Front Loop Only (FLO), make 1 single crochet in each of the 5 stitches. [5 stitches total]
Round 3-4: Make 1 single crochet in each of the 5 stitches. [5 stitches total]
Finish off (FO), leaving a long yarn tail for sewing. Without stuffing, sew the stem onto the medium pumpkin.
Stem: Large (in brown yarn)
Round 1: Start with 6 single crochet (sc) stitches in a magic ring. [6 stitches total]
Round 2: In the Back Loop Only (BLO) or Front Loop Only (FLO), make 1 single crochet in each of the 6 stitches. [6]
Round 3-5: Make 1 single crochet in each of the 6 stitches. [6]
Finish off (FO), leaving a long yarn tail for sewing. Without stuffing, sew the stem onto the large pumpkin.
Vines (in green yarn)
You can make vines as long as you like. First, make a chain that’s the length you want, plus a little extra because it will curl up a bit. Next, start single crocheting into the second stitch from the hook and continue single crocheting along the rest of the chain. The vine will naturally curl on its own.
Leaf (in green yarn)
Row 1: Start by making 8 single crochet stitches (sc) into a magic ring. [8 stitches]
Note: Instead of joining with a slip stitch (slst) to the first sc, chain 1 (ch1) and turn your work around.
Row 2: *In the first stitch, do the following: single crochet (sc), half double crochet (hdc), double crochet (dc), and triple crochet (tc).
In the next stitch, do: double crochet (dc), half double crochet (hdc), and single crochet (sc).
Slip stitch (slst) into the third stitch.*
Repeat from * two more times to make a 3 tipped leaf.
Slip stitch (slst) into the first single crochet (sc) you made in this row.
Chain 2 (ch2).
Finish off (FO) your work.
For those of you who like to have the printed pattern on hand, we have separated a PDF with the Crochet Pumpkins pattern by Mevlinn Gusick especially for you.
🎃 CROCHET PUMPKINS FREE PATTERN 🎃
VIDEO TUTORIAL
Dear reader, if you prefer another type of learning, something more visual… don’t worry! We have selected for you a beautiful video tutorial made by the YouTube channel Avocado Handmade and you can watch it below:
Crochet pumpkins are incredibly versatile. They can be used to create festive garlands, decorate dining tables, or even serve as décor pieces for various spaces. Additionally, you can turn pumpkins into toys for children or personalized gifts. The flexibility of the pattern allows you to explore different sizes and styles, adapting them for any occasion.
Customization is one of the biggest advantages of crochet. To make your pumpkins unique, try using yarns in different colors and textures. You can go for traditional shades of orange and green or get creative with unconventional colors for a more modern look. Adding details like buttons, ribbons, or even small crochet leaves can give your pumpkins a special touch.
The crochet pumpkin pattern is a great addition to your project repertoire. With its simplicity and versatility, you can create charming and personalized pieces for any occasion. Whether you’re decorating your home or giving a special gift, crochet pumpkins add a touch of creativity and fun. We hope this article has inspired you to try this pattern and explore all the possibilities it offers.
Good to see you here, my dear reader! I hope see you again soon. See you later! XoXo 😘✨