Cute Owl Amigurumi
Hello! Welcome to our lovely blog Handmade Learning Here. My dears, there is something very special about sitting with a ball of yarn in your lap and a crochet hook in your hand. The world becomes quieter, the heart becomes lighter, and stitch by stitch a little miracle begins to grow. Today I would like to tell you about one of my favorite projects, a small, gentle crochet owl.
I have always loved owls. They look so wise and patient, as if they know all the stories of the night. When I first learned to crochet one, I felt like I was making a tiny friend. Since then, many little owls have flown from my hands to the homes of children, neighbors, and dear friends.
Crocheting Is Like a Warm Hug
What I enjoy most about this pattern is how simple and comforting it is. You do not need fancy stitches or complicated techniques. Just the basic single crochet, a few increases and decreases, and a bit of stuffing to give the owl its soft round belly.
Even if your hands are not as quick as they once were, this project is patient with you. It waits kindly while you count your stitches and sip your tea. That is the beauty of handmade work, there is no hurry, only gentle progress.
To make this little owl, I usually use:
-
soft cotton yarn from my basket
-
a small crochet hook
-
a bit of fiberfill
-
two safety eyes or some black thread
-
my old yarn needle and scissors
Nothing expensive, nothing difficult to find. Many times I use leftover yarn from other projects, and each owl becomes a little memory of the things I made before.
Watching a Character Come to Life
The body grows first, round and cozy in your hands. Then come the bright eyes, the tiny wings, the sweet little feet. I always smile at this moment, because suddenly the owl seems to be looking back at me, as if saying, “Thank you for making me.”
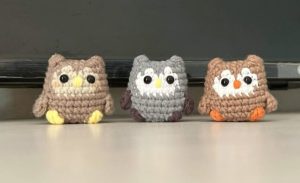
Sometimes I give my owls different colors – lavender for a shy owl, golden yellow for a cheerful one, soft gray for a sleepy night owl. Every single one has its own personality.
This adorable little owl is a fun and relaxing amigurumi project. It works up quickly, uses basic stitches, and is perfect for gifts, keychains, or nursery décor. The pattern is written in US crochet terms and suitable for confident beginners.
Materials
-
Sport or DK weight cotton yarn in main color
-
Small amount of white yarn for eyes
-
Contrast color for beak and feet
-
Crochet hook: 2.5 mm (B/1 US) or size to match your yarn
-
Polyester fiberfill
-
Safety eyes (6–8 mm) or black embroidery thread
-
Yarn needle
-
Scissors
-
Stitch marker
Abbreviations (US Terms)
-
ch – chain
-
sc – single crochet
-
inc – increase (2 sc in one stitch)
-
dec – decrease (sc2tog)
-
sl st – slip stitch
-
st(s) – stitch(es)
-
rnd – round
-
hdc – half double crochet
-
dc – double crochet
Gauge & Size
Gauge is not critical for amigurumi.
Finished size: approximately 7–8 cm (3 in) tall using sport yarn and 2.5 mm hook.
Pattern Instructions
Eyes (make 2)
With white yarn
-
Rnd 1: 8 sc in magic ring (8)
-
Sl st to first stitch and fasten off
Optional: add a second round in a colored yarn for a larger eye effect.
Body
Start with main color
-
Rnd 1: 8 sc in magic ring (8)
-
Rnd 2: inc around (16)
-
Rnd 3: (sc, inc) × 8 (24)
-
Rnd 4: (3 sc, inc) × 6 (30)
-
Rnd 5: sc around (30)
-
Rnd 6: (4 sc, inc) × 6 (36)
7–9. Rnd 7–9: sc around (36)
👉 Place safety eyes between rounds 7 and 8, about 4 stitches apart.
-
Rnd 10: (4 sc, dec) × 6 (30)
-
Rnd 11: (3 sc, dec) × 6 (24)
-
Rnd 12: (sc, dec) × 8 (16)
Begin stuffing the body firmly.
-
Rnd 13: sc around (16)
-
Rnd 14: (3 sc, inc) × 4 (20)
15–17. Rnd 15–17: sc around (20) -
Rnd 18: (3 sc, dec) × 4 (16)
-
Rnd 19: dec around (8)
Fasten off and close the opening.
Wings (make 2)
-
Rnd 1: 6 sc in magic ring (6)
-
Rnd 2: inc 2×, hdc + dc + hdc in next st, inc 3× (13)
-
Sl st, fasten off leaving long tail
Sew the wings to the sides of the body just below the eye level.
Ear Tufts (make 2)
-
Rnd 1: 4 sc in magic ring (4)
-
Rnd 2: (sc, inc) × 2 (6)
Fasten off and attach to the top of the head.
Feet (make 2)
With orange or yellow yarn
-
Rnd 1: 6 sc in magic ring (6)
-
Rnd 2–3: sc around (6)
Fasten off and sew to the bottom front of the owl.
Assembly
-
Sew the eye circles onto the face around the safety eyes.
-
Embroider a small triangular beak between the eyes.
-
Attach wings, ear tufts, and feet securely.
-
Hide all yarn tails inside the body.
Customization Ideas
-
Use fluffy yarn for a cozy winter owl
-
Add eyelashes for a cute kawaii look
-
Make a keychain by inserting a loop before closing the body
-
Create a family of owls with different sizes and colors
A Gift from the Heart
Over the years I have learned that people do not see only the toy. They see the time, the care, and the love inside every stitch. A crochet owl can be:
-
a comfort for a child
-
a decoration on a shelf
-
a little friend on a keychain
-
a kind surprise for someone who feels lonely
The smallest handmade gift can carry the biggest warmth.
My Gentle Advice
If you decide to crochet this owl, remember:
Take your time. Do not worry about perfect stitches. Enjoy the feeling of the yarn sliding through your fingers.
And most of all, crochet with a happy heart. That happiness will stay inside the owl forever!
VIDEO TUTORIAL
This little owl is a great stash-buster and a lovely project for markets or gifts. Feel free to experiment with stripes, textured yarns, or embroidered details to make your owl unique.
Happy crocheting!