Foxy Stash Basket
Hello, dear reader, welcome to our lovely blog Handmade Learning Here. Today I want to bring you a great idea, a very fun crochet basket pattern that you can use for your little ones. It’s the Foxy Stash Basket.
Organizing our spaces can be a daunting task, but with the Foxy Stash Basket crochet pattern, it becomes a fun and stylish activity! This beautiful basket not only serves to hold small items but also transforms into a decorative piece that adds special charm to any environment.
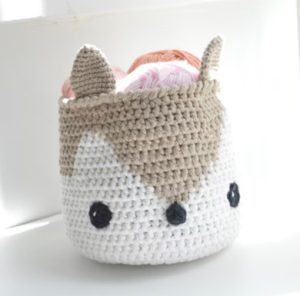
The Foxy Stash Basket features an adorable design that captures the essence of foxes. With its distinctive shape and details mimicking the ears and snout of a fox, this basket is perfect for adding a playful touch to bedrooms, living rooms, or even the office. Its practical and fun shape makes it a great accessory for keeping clutter under control.
One of the wonders of this pattern is the versatility in materials. You can choose from a variety of yarns, ranging from soft cotton to durable acrylic, depending on the use you intend for your basket. If it’s for a child’s room, perhaps a colorful and washable yarn would be the best choice. For a more elegant look in the living room, a neutral and sophisticated yarn can easily complement the decor.
The Foxy Stash Basket doesn’t have to be limited to just a storage basket. You can use it to store toys, blankets, or even as a cachepot for plants. Your creativity is the limit! Additionally, this basket can make a fantastic handmade gift for friends and family, adding a personal touch to any occasion.

Measurements
Approximately 11 inches (28 cm) in height and 12 inches (30.5 cm) in diameter.
GAUGE
10 hdc and 8 rows equal 4 inches (10 cm) using the larger hook and two strands held together.
Materials
Lily Sugar’n Cream® (2.5 oz/70.9 g; 120 yds/109 m)
- Main Color (MC): Soft Ecru (01004) – 2 balls or 192 yds/175 m
- Contrast A: Country Red (01530) – 2 balls or 180 yds/165 m
- Contrast B: Black (00002) – 1 ball or 3 yds/3 m
Crochet Hooks: U.S. G/6 (4 mm) and U.S. J/10 (6 mm), or sizes needed to obtain gauge.
Abbreviations
Approx – Approximately
Beg – Beginning
Ch(s) – Chain(s)
Dc – Double crochet
Hdc – Half double crochet
Hdc2tog – Yarn over hook (Yoh), draw up a loop in each of the next 2 stitches, yarn over, and pull through all loops on hook.
Rem – Remaining
Rep – Repeat
Rnd(s) – Round(s)
Sc – Single crochet
Sc2tog – Draw up a loop in each of the next 2 stitches, yarn over, and pull through all loops on hook.
Sl st – Slip stitch
St(s) – Stitch(es)
Tog – Together
WS – Wrong side
Yoh – Yarn over hook
PDF PATTERN
Here is a written tutorial by Lily Sugar ‘n Cream. The PDF is very well written and you can access it below:
🦊🦊 FOXY STASH BASKET – PDF PATTERN 🦊🦊
Foxy Stash Basket – Instructions
Notes:
- The basket is made using two strands held together.
- The ears are made with just one strand.
- The initial chain of 2 at the beginning of each round does not count as a half double crochet (hdc).
- When changing to a new color, work until there are 2 loops left on the hook from the last stitch. Then, pull the new color through those 2 loops and continue with the new color.
- To avoid stranding, carry the unused color across the top of the previous round and work your stitches around it.
Start at the base using two strands of the main color (MC) and a larger hook. Chain 4, then join with a slip stitch to the first chain to create a ring.
Round 1:
Start by making a slipknot and chaining 2 (Ch 2). Work 8 half double crochets (hdc) into the ring formed by the chain. To do this, yarn over, insert your hook into the ring, yarn over again, pull through (3 loops on your hook), yarn over, and pull through all 3 loops on the hook. Once you have 8 hdc, join the round by making a slip stitch (sl st) into the top of the first hdc you made. This closes the round.
Round 2:
Ch 2 to begin the next round. In each hdc from the previous round, work 2 hdc. This means you will put 2 half double crochets into each of the 8 stitches from the last round.
When you finish this round, you should have a total of 16 hdc. Join the round with a sl st to the top of the first hdc.
Round 3:
Ch 2. Repeat the same process as Round 2. This time, you will work 2 hdc in each of the 16 hdc from the last round.
At the end of this round, you will have 32 hdc. Join with a sl st to the first hdc.
Round 4:
Ch 2. Now you will alternate your stitches: work 2 hdc in the next hdc, then 1 hdc in the following hdc. Repeat this pattern around the entire round.
You should have 48 hdc at the end. Join with a sl st to the first hdc.
Round 5:
Ch 2. Work 1 hdc in each hdc around the entire round. This means you will simply place one half double crochet in each stitch. Join with a sl st to the first hdc.
Round 6:
Ch 2. Again, use the pattern: 2 hdc in the next hdc, then 1 hdc in each of the next 2 hdc. Repeat this around the entire round.
You will have a total of 64 hdc. Join with a sl st to the first hdc.
Rounds 7 to 11:
For each of these rounds, ch 2 at the start. Work 1 hdc in each hdc around. This is a simple round where you place one half double crochet in each stitch.
At the end of each round, join with a sl st to the first hdc.
Final Notes:
Make sure to count your stitches at the end of each round to ensure you have the correct number.
Remember to keep your tension consistent for an even finish.
Don’t forget to weave in your ends when you’re done!
Face:
Round 1:
Begin by making a slipknot and chaining 2 (Ch 2).
Work 1 half double crochet (hdc) into each of the next 32 hdc. You can find these stitches from the previous round.
Next, join 2 strands of color B. To do this, lay the yarn over your hook and pull it through.
With color B, work 5 double crochets (dc) in the next hdc. To make a double crochet, yarn over, insert your hook into the stitch, yarn over again, pull through (you’ll have 3 loops on your hook), yarn over, pull through the first 2 loops, then yarn over again and pull through the last 2 loops.
After making the 5 dc, drop the loop from your hook (this means you can leave it hanging for now).
Insert your hook into the first double crochet of the 5-dc group and pull the dropped loop through this stitch. This creates the nose.
Break the yarn B (cut the yarn), and switch back to your main color (MC).
Work 1 hdc in each remaining hdc to finish the round.
Join this round with a slip stitch to the top of the first hdc.
Round 2:
With your main color (MC), ch 2 to start the round.
Work 1 hdc in each of the next 31 hdc.
Switch to color A and work 1 hdc in each of the next 3 stitches.
Return to your main color (MC) and work 1 hdc in each hdc to the end of the round.
Join with a sl st to the first hdc.
Round 3:
With MC, ch 2.
Work 1 hdc in each of the next 30 hdc.
Switch to color A and work 1 hdc in each of the next 5 hdc.
Go back to MC and work 1 hdc in each remaining hdc to finish the round.
Join with a sl st to the first hdc.
Round 4:
With MC, ch 2.
Work 1 hdc in each of the next 29 hdc.
Switch to color A and work 1 hdc in each of the next 7 hdc.
Go back to MC and work 1 hdc in each remaining hdc.
Join color A with a sl st to the first hdc and break MC.
Rounds 5 and 6:
With color A, ch 2.
Work 1 hdc in each of the next 20 hdc.
Do not break color A; keep it attached.
Switch to MC and work 1 hdc in each of the next 8 hdc. Again, do not break MC.
Switch back to color A and work 1 hdc in each of the next 9 hdc. Don’t break A either.
Go back to MC and work 1 hdc in each of the next 8 hdc.
Finish the round with color A, working 1 hdc in each hdc to the end.
Join with a sl st to the first hdc.
Round 7:
With color A, ch 2.
Work 1 hdc in each of the next 21 hdc.
Keep color A attached; do not break it.
Switch to MC and work 1 hdc in each of the next 6 hdc. Do not break MC.
Switch back to color A and work 1 hdc in each of the next 11 hdc.
Go back to MC and work 1 hdc in each of the next 6 hdc.
Finish the round with color A, working 1 hdc in each hdc to the end.
Join with a sl st to the first hdc.
Round 8:
With color A, ch 2.
Work 1 hdc in each of the next 22 hdc.
Keep color A attached; do not break it.
Switch to MC and work 1 hdc in each of the next 4 hdc. Do not break MC.
Switch back to color A and work 1 hdc in each of the next 13 hdc.
Go back to MC and work 1 hdc in each of the next 4 hdc. Break MC after this step.
Finish the round with color A, working 1 hdc in each hdc to the end.
Join with a sl st to the first hdc.
Round 9:
With color A, ch 2.
Now, work 1 hdc in each of the next 6 hdc, then do a half double crochet two together (hdc2tog). This means you will decrease by working 2 hdc together.
Repeat this pattern around the entire round.
Join with a sl st to the first hdc. You should have 56 stitches at the end.
Round 10:
Ch 2.
Work 1 hdc in each stitch around.
Join with a sl st to the first hdc.
Round 11:
Ch 2.
Work 1 hdc in each of the next 5 hdc, then hdc2tog.
Repeat this pattern around the entire round.
Join with a sl st to the first hdc. You should have 48 stitches at the end.
Round 12:
Ch 1.
This time, you will be working from left to right instead of the usual right to left. Work 1 reverse single crochet (reverse sc) in each single crochet around. To make a reverse sc, insert your hook into the stitch from back to front, yarn over, pull up a loop, yarn over again, and pull through both loops on your hook.
Join with a sl st to the first single crochet.
Fasten off by cutting the yarn and pulling it through the last loop.
Ears (make 2).
Starting:
Take a strand of color A and make a slipknot.
Chain 16 (Ch 16).
Join the last chain to the first chain with a slip stitch (sl st) to form a ring. This means you’ll insert your hook into the first chain, yarn over, and pull through both the first chain and the loop on your hook.
Round 1:
Ch 1 to start the round. Work 1 single crochet (sc) in each chain around the ring. This will give you 16 single crochets. Join this round with a sl st to the first single crochet you made.
Round 2:
Ch 1. Work 2 sc in the first single crochet (this means you’ll place two single crochets in the same stitch). Work 1 sc in each of the next 6 sc. Work 2 sc in each of the next 2 sc (again, place two single crochets in each of these stitches). Work 1 sc in each of the next 6 sc. Work 2 sc in the last sc. Join with a sl st to the first sc. You should have a total of 20 stitches now.
Rounds 3 to 5:
For each of these rounds, ch 1 to start. Work 1 sc in each sc around. Join with a sl st to the first sc. You will keep the same number of stitches in these rounds.
Round 6:
Ch 1. Work a single crochet two together (sc2tog) in the first two stitches. This means you will decrease by combining two stitches into one. Work 1 sc in each of the next 6 sc. Work sc2tog twice (this means you will do the decrease in the next two sets of stitches). Work 1 sc in each of the next 6 sc. Work another sc2tog in the last two stitches. Join with a sl st to the first stitch. You should have 16 stitches at the end of this round.
Round 7:
Ch 1. Work sc2tog in the first two stitches. Work 1 sc in each of the next 4 stitches. Work sc2tog twice (you will do the decrease again in the next two sets). Work 1 sc in each of the next 4 stitches. Work another sc2tog in the last two stitches. Join with a sl st to the first stitch. You should have 12 stitches now.
Round 8:
Ch 1. Work 1 sc in each stitch around. Join with a sl st to the first single crochet.
Round 9:
Ch 1. Work sc2tog in the first two stitches. Work 1 sc in each of the next 2 sc. Work sc2tog twice (again, doing the decrease in the next two sets). Work 1 sc in each of the next 2 stitches. Work another sc2tog in the last two stitches. Join with a sl st to the first stitch. You should have 8 stitches left.
Round 10:
Work this round the same way as Round 8: ch 1 and work 1 sc in each stitch around. Join with a sl st to the first single crochet.
Round 11:
Ch 1. Work sc2tog 4 times (you will decrease by combining two stitches into one for a total of four times). Join with a sl st to the first single crochet.
Finishing:
Fasten off by cutting the yarn and pulling the end through the last loop on your hook. Thread the end through the remaining stitches and pull tightly to close the opening. Secure the yarn end by tying it off and weaving in any loose ends with a yarn needle.
Eyes (make 2)
Starting:
Begin by making a slipknot and chaining 2 (Ch 2).
Round 1:
In the second chain from the hook, work 6 single crochets (sc).
To do this:
- Insert your hook into the chain, yarn over (pull the yarn through the chain), and then yarn over again and pull through both loops on your hook.
- Repeat this process until you have 6 single crochets in total.
Join the round by slip stitching (sl st) into the first single crochet you made. This will close the circle.
Round 2:
Ch 1 to start this round. Work 2 sc in each single crochet around. This means you will place two single crochets in each stitch from the previous round. Join with a sl st to the first single crochet to close the round. You should have 12 single crochets at the end of this round.
Fasten off by cutting the yarn and pulling the end through the last loop on your hook.
Weave in any loose ends with a yarn needle to secure your work.
Finishing
Sew the ears to the top edge of the basket, as shown in the picture. Then, attach the eyes to the front, following the picture for guidance.

VIDEO TUTORIAL
Dear reader, here we have another model option available for you in video tutorial format:
By choosing the Foxy Stash Basket crochet pattern, you’re not just creating a functional item, but also a piece that brings joy and personality to your home. Crochet, in addition to being a relaxing art, allows us to express our creativity in unique ways. So grab your yarn and start creating! Your space will thank you.


