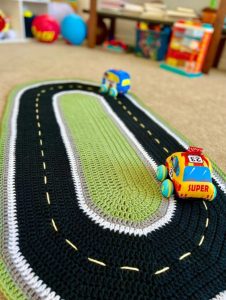
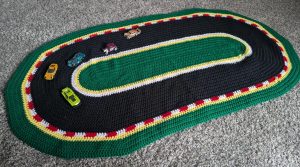
Racetrack Play Rug
Hello, my friends, welcome to our lovely blog Handmade Learning Here. There’s something truly special about crochet projects that go beyond decoration and become part of everyday play. The Racetrack Play Rug is one of those creative designs that transforms simple stitches into a fun and interactive world for children. With its charming road layout and soft texture, this rug invites imagination and storytelling in the most delightful way.
This project is worked in an oval shape, starting from a foundation chain and building outward in continuous rounds. The construction is repetitive and relaxing, making it a great choice for crocheters who are comfortable with basic stitches and want to try something larger. What makes this pattern unique is how the shaping and color changes come together to form a playful racetrack design.
The rug is typically made using medium-weight yarn held double (or a bulky yarn alternative) and a larger hook to create a sturdy and durable fabric. The finished size can be quite generous, making it perfect for playrooms, bedrooms, or as a thoughtful handmade gift.
Understanding the Construction
Before starting, it helps to understand the basic structure:
The rug begins with a foundation chain
You will crochet around both sides of the chain to form an oval
Increases are placed at the ends to maintain the shape
The piece grows in continuous rounds
Color changes create the racetrack effect
Step-by-Step (Adapted Guide)
This is an original, simplified guide inspired by the pattern.
Base of the Rug
- Chain a desired length (for example, 50 – 60 chains depending on size)
- Starting in the second chain from the hook:
- Make 2 single crochets (increase)
- Continue with 1 single crochet in each chain across
- In the last chain:
- Make 3 single crochets
- Working along the other side of the chain:
- Make 1 single crochet in each stitch
- Join with a slip stitch
This forms your initial oval.
Building the Shape
For the next rounds:
- Continue working in single crochet stitches
- Increase at both curved ends
- Gradually space out the increases each round
Example progression:
- Round 2: frequent increases at the ends
- Round 3: (1 sc, increase) at curves
- Round 4: (2 sc, increase), and so on
This keeps the rug flat and evenly shaped.
Creating the Racetrack
Once your base is large enough:
Switch to black yarn for the road
Work several rounds evenly
Add white yarn details:
Dashed or solid lines for road markingsA starting line or finish line
Change colors on the last yarn-over of the stitch for a clean look.
Finishing Touches
- Return to green yarn for the outer border (grass effect)
- Add a few final rounds for balance
- Fasten off and weave in all ends
Helpful Tips
- Hold two strands of yarn together for a thicker, sturdier rug
- If your work starts to curl or wave:
- Adjust the number of increases
- Avoid carrying dark yarn behind light stitches to prevent show-through
- Use stitch markers to keep track of rounds
Dear reader, here’s an amazing link to an incredible website called ekayg, with a complete tutorial on how to make this beautiful crochet piece.
RACETRACK PLAY RUG CROCHET TUTORIAL
The Racetrack Play Rug is more than just a crochet project—it’s a space for creativity, movement, and joy. Every stitch contributes to a playful environment where imagination can run free. Whether you’re making it for a child, as a gift, or simply for the love of crochet, this project is sure to bring smiles and lasting memories.