Crochet Balloon Dog
Hey there, lovely reader! Welcome to our cozy blog, Handmade Learning Here. Today, we’ve got a super fun pattern to share with you. If you’re on the hunt for a delightful project, the Crochet Balloon Dog pattern is a fantastic pick!
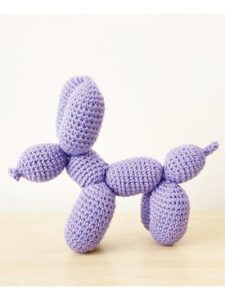
With its playful shapes and bright colors, this adorable balloon pup can be a cute decor item or a unique gift. In this article, we’ll dive into the features of this pattern, some crafting tips, and ideas for personalizing your creation.
The Crochet Balloon Dog is a cute take on those famous balloon animals you see at parties and events. This project mixes simple crochet techniques with a splash of creativity. You can choose from a bunch of colors to bring your little pup to life, using yarn that ranges from cotton to acrylic, depending on the finish you’re going for.
As you work on this pattern, you’ll learn to make different parts of the dog, like the body, head, and legs. That’s where the magic happens when you piece it all together! It’s a great way to practice your amigurumi skills, and the final result will definitely bring smiles all around. 😊
Plus, you can jazz up your Balloon Dog with some extra details, like a cute bow around its neck or even a tiny crocheted toy next to it. The possibilities are endless!
Many people adore balloon animals, but they often pop or deflate. So, why not whip up a version that lasts longer? This soft and snuggly plushie has an easy-to-follow pattern, making it the perfect buddy for dog lovers and balloon fans alike! 🎈
Materials:
- 5mm crochet hook
- Worsted weight yarn (approximately 200g)
- Polyester fiberfill
- Yarn needle
Feel free to use any yarn and hook size you prefer, but keep in mind that this will affect the final size of your plush. With the materials listed above, my plush measures 8 ½ inches long and 8 inches tall.
Abbreviations (US TERMS):
Sc – single crochet
Inc – increase stitch
Dec – decrease stitch
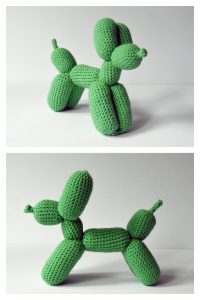
(You can find pictures of the finished product at the bottom of page 3.)
Tail
Start with a Magic Ring: Make a magic ring and crochet 6 single crochets (sc) into it.
Rows 1-4: Continue crocheting 1 sc in each stitch for 4 rows (you’ll have 6 stitches total). This part is the tip of the tail. You can add or reduce rows here if you want a longer or shorter tip.
Row 5: Increase by crocheting 2 sc in each stitch (12 stitches total).
Row 6: Repeat Row 5 (24 stitches total).
Finish the Magic Ring: Pull the yarn end tight to close the magic ring and weave in the end.
Rows 7-16: Continue with 1 sc in each stitch for 10 rows (24 stitches total).
Row 17: Decrease by crocheting 1 sc in the next 2 stitches together (12 stitches total).
Stuff the Tail: Add stuffing until it feels just right.
Row 18: Decrease again (6 stitches total).
Rows 19-22: Finish with 1 sc in each stitch for 4 rows (6 stitches total).
Legs
Row 23: Increase by crocheting 2 single crochets (sc) in each stitch (12 stitches total).
Row 24: Repeat Row 23 (24 stitches total).
Rows 25-38: Crochet 1 sc in each stitch for 14 rows (24 stitches total).
Row 39: Decrease by crocheting 1 sc in the next 2 stitches together (12 stitches total).
Stuff the Segment: Add stuffing until it feels right.
Row 40: Decrease again (6 stitches total).
Rows 41-44: Finish with 1 sc in each stitch for 4 rows (6 stitches total).
Make the Second Leg: Repeat these steps to create the second hind leg, ending on Row 66.
Body
Row 67: Increase by crocheting 2 single crochets (sc) in each stitch (12 stitches total).
Row 68: Repeat Row 67 (24 stitches total).
Rows 69-78: Crochet 1 sc in each stitch for 10 rows (24 stitches total).
Row 79: Decrease by crocheting 1 sc in the next 2 stitches together (12 stitches total).
Stuff the Segment: Add stuffing until it feels just right.
Row 80: Decrease again (6 stitches total).
Rows 81-84: Finish with 1 sc in each stitch for 4 rows (6 stitches total).
Repeat for Front Legs: Do this leg pattern 2 more times to make the front legs.
End on Row 128: You’ll have a total of 6 segments so far.
Neck
Row 129: Increase by crocheting 2 single crochets (sc) in each stitch (12 stitches total).
Row 130: Repeat Row 129 (24 stitches total).
Rows 131-138: Crochet 1 sc in each stitch for 8 rows (24 stitches total).
Row 139: Decrease by crocheting 1 sc in the next 2 stitches together (12 stitches total).
Stuff the Segment: Add stuffing until it feels just right.
Row 140: Decrease again (6 stitches total).
Rows 141-144: Finish with 1 sc in each stitch for 4 rows (6 stitches total).
Ears
Row 145: Increase by crocheting 2 single crochets (sc) in each stitch (12 stitches total).
Row 146: Repeat Row 145 (24 stitches total).
Rows 147-156: Crochet 1 sc in each stitch for 10 rows (24 stitches total).
Row 157: Decrease by crocheting 1 sc in the next 2 stitches together (12 stitches total).
Stuff the Segment: Add stuffing until it feels just right.
Row 158: Decrease again (6 stitches total).
Rows 159-162: Finish with 1 sc in each stitch for 4 rows (6 stitches total).
Repeat for the Second Ear: Follow the same steps to make the second ear, ending on Row 180.
Head
Row 181: Increase by crocheting 2 single crochets (sc) in each stitch (12 stitches total).
Row 182: Repeat Row 181 (24 stitches total).
Rows 183-190: Crochet 1 sc in each stitch for 8 rows (24 stitches total).
Row 191: Decrease by crocheting 1 sc in the next 2 stitches together (12 stitches total).
Stuff the Segment: Add stuffing until it feels just right.
Row 192: Decrease again (6 stitches total).
Row 193: Finish with 1 sc in each stitch for 1 row (6 stitches total).
Row 194: Increase by crocheting 2 sc in each stitch (12 stitches total).
Secure the Yarn: Cut the yarn, leaving a tail long enough to weave in.
Shape the Dog: Twist the piece to form a dog shape, like you would with a balloon.
Printable PDF
Here is a printable PDF version developed by Gloria B. This written tutorial is very educational and easy to understand. To download, click on the following link:
CROCHET BALLOON DOG PDF PATTERN
VIDEO TUTORIAL
Here we have separated tutorial videos for you to follow and make your crochet balloon dogs. Watch below!
What do you think of this lovely pattern, dear reader? We’re here to bring you the best free crochet patterns around. So, go ahead and share this with your friends so they can make these gorgeous patterns too!
We’re super happy to have you here with us, dear reader! It’s always a joy to share great ideas with you. Let us know in the comments what you think of this beautiful pattern—we love hearing what you have to say! 💖
The Crochet Balloon Dog pattern is a fun and creative way to level up your crochet skills. Whether you’re looking to spruce up your home, gift friends, or even join craft fairs, this project is a perfect choice. We hope you have a blast creating your own balloon pup, and that it brings joy and color to your everyday life!
Have a fabulous day and have fun! XoXo