
Little Crochet Pouch
Hey everyone! Hope you’re all doing great and having a lovely day. Today, I want to share an adorable pattern here on our blog, Handmade Learning Here. This pattern is super cute and super useful! You can use it in so many ways, even as a gift.. It’s the Crochet Pouch pattern.
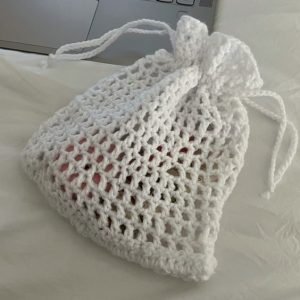
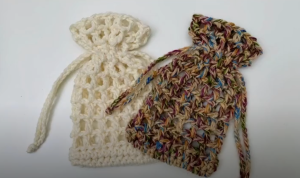
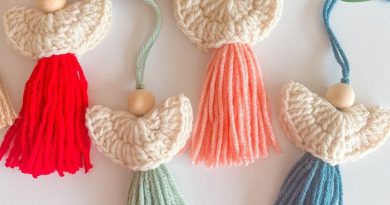
Someone left a comment asking about my crochet netted pouch and mentioned wanting to make a smaller version for a facial scrubby. Such a great idea, right? Plus, it’s perfect for using up leftover yarn! I had some remnants of Lion Brand Comfy Cotton blend lying around, and it worked out perfectly. Cotton is always a solid choice for projects like this, but honestly, any natural fiber would do the trick. I just love the feel of natural fibers, but you can totally use whatever you prefer.
The pouch comes with a handy drawstring, so your facial bar stays nice and secure—no more chasing it around the bathroom while you’re washing up!
If you’re into making more bathroom and home accessories, you might want to check out my bath rug pattern or those cute little faux flower pots I made.
I hope you all enjoy this project as much as I did!
Alright, without further ado, let’s get to the good stuff…
Materials
- Lion Brand Comfy Cotton Blend (Light/DK #3) Yarn
- 5 mm crochet hook
- Scissors
- Yarn needle
ABBREVIATIONS (US TERMS)
ch – chain
st – stitch(es)
hdc – half double crochet
dc – double crochet
sk – skip
sp – space
sl st – slip stitch
Gauge:
16 hdc x 10 rows = 4″
17 stitches (dc & ch) x 7 rows = 4″
Crochet Pouch Measurements :
6.58″ Circumference X 5.94″ Tall
Round 1:
Start by making a slipknot and chaining 15 (this is your foundation chain).
Now, starting from the second chain from your hook, do 1 half double crochet (hdc) into that stitch.
Continue making 1 hdc in each chain across. You should have 14 hdc so far.
Don’t stop! Turn your work to the other side of the foundation chain and keep working. Make 1 hdc into each chain on this side too. (This creates a round base for your pouch.)
When you finish the second side, join with a slip stitch (sl st) into the first hdc you made at the beginning of this round.
You should now have a total of 28 hdc.
Round 2:
Chain 1 (this chain does not count as a stitch).
Make 1 hdc into each stitch around the circle. You should still have 28 stitches.
Join with a slip stitch into the first hdc of this round.
Round 3:
Chain 4 (this will count as 1 double crochet (dc) and 1 chain space).
Now, skip the next stitch, and in the following stitch, make 1 dc.
Chain 1.
Continue by repeating: skip 1 stitch, 1 dc into the next stitch, chain 1 all the way around the pouch.
When you reach the end of the round, slip stitch into the third chain of the starting ch-4.
You should still have 28 stitches, but now it includes the chain spaces between your double crochets.
Round 4:
Chain 4 (counts as 1 dc and 1 chain space).
In the next dc (from the previous row), make 1 dc.
Chain 1.
Continue by repeating: 1 dc in each dc stitch, chain 1 around the pouch.
Slip stitch into the third chain of the starting ch-4.
Again, you’ll have 28 stitches, including the chain spaces.
Rounds 5 to 11:
Repeat Round 4 for each round.
This creates the lacy design for your pouch.
After completing Round 11, finish off by cutting the yarn and pulling it through the loop on your hook to secure it.
Finishing:
Weave in all the loose ends using a yarn needle, and your pouch is ready to use!
DRAWSTRING ( MAKE 2 )
Making the Drawstring:
To create your drawstring, you can decide how long you want it to be! If you want a longer drawstring, just start by chaining more stitches.
For this pattern, I made 60 ch. Once you reach your desired length, cut the yarn, leaving a little extra to work with.
Adding the Drawstring to the Pouch:
Now, we’ll add the drawstring to your pouch. Start at the side of the pouch in Round 9.
Take one piece of the drawstring and thread it through the opening at the side of the bag.
Weave the drawstring through each loop all the way around the bag. This creates a way to pull the pouch closed.
Adding the Second Drawstring:
For the second drawstring, start from the opposite side of the pouch, weaving it through the loops in the same way.
This ensures that both drawstrings are evenly placed on either side of the bag.
Finishing Up:
Once both drawstrings are in place, make sure they are at the sides of the bag.
Tie a knot at the ends of each drawstring to secure them.
VIDEO TUTORIAL
We have separated here for you, dear reader, a very educational video tutorial made by the YouTube channel KnitcroAddict and you can watch it below:
And there you have it! Your crochet pouch is ready to use! This project is great for beginners and a fun way to enhance your crochet skills. Try making several in different colors to give as gifts or to help organize your stuff. Don’t forget to share your creations with us! 🌈✨
Stay tuned for more crochet patterns and tips here on the Handmade Learning Here blog. See you next time! XoXo
What kind of items would you put in the cute sacks?