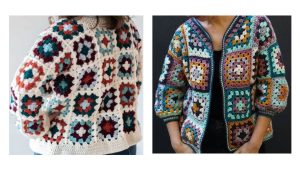
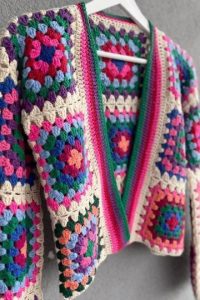
Colorful Cardigan with Granny Square
Hello my dear crochet lovers! Great to have you here with us for another day of learning. Today we want to bring something innovative, you must be familiar with grandma’s squares, right? Well then, they are crochet classics, known for their variety and beauty and they allow us to make several wonderful projects with them, and one of them is what we are going to talk about here today: The Colorful Cardigan Granny Square.
Colorful Cardigan Granny Square. It is a simply perfect project, it is incredible and will allow you to have a totally different and exclusive piece in your wardrobe. There are several options for projects made in this model, from jackets and cardigans to dresses. There are countless possibilities and today we decided to bring you one of them so that we can share this learning together in our space of love.
As you may have noticed, the model I brought here today is the crochet cardigan made completely with granny squares, that’s because we did a poll among our lovely blog team and we all agree that it is a key piece nowadays in any closet, and very practical and useful in everyone’s day to day.
What’s more, after learning this pattern, patterns for jackets and dresses made with granny squares will become easier with simpler and more practical learning. So, after learning this beautiful model, you can be inspired and do other projects with a different design using the same idea. So pay close attention to the step by step and be prepared.
Every detail counts…
We usually recommend that people read the tutorial well and follow the video tutorial very carefully, in addition, if you have a line available there, use it to put it into practice and train along with the video, that way you will be able to improve and the project will be done without major difficulties. And don’t worry if you make a mistake, we’re all subject to failure and nobody knows everything, so keep calm and try again and again until the project comes out in one piece. No need to worry if you don’t succeed at first, there’s always a new chance.
This Colorful Cardigan Granny Square pattern is perfect for your day to day, is a beautiful pattern. It is very useful in anyone’s routine, which makes it perfect for many occasions. Both on colder days, like those days that start out warm but the weather can change and suddenly it gets cold, it’s ideal to have a piece like this in your hands, so you’re already prepared. It also all depends on what type of thread you will use for your project, being able to make it thicker or lighter, according to your preference and taste and also the region you live in.
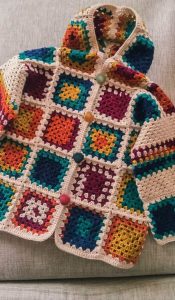
Let your creativity guide you in the choice of colors, you can make a completely unique project with your face, be it with mixed colors, all cheerful and colorful or using just different shades of the same color, it will look beautiful either way. Shape this cardigan any way you like so you can have a one-of-a-kind piece, a wonderful Colorful Cardigan Granny Square in your wardrobe.
It’s also a great idea to give as a gift to a loved one, your mother, grandmother, sister or daughters would love to receive this, don’t you think? And those who want to earn extra income can earn good money by executing this project and selling it, as it is a very beautiful and valuable project, besides, everyone wants to have one when they see this beauty up close.
The pictures used here serve as inspiration for your project, but if you want more ideas you can do a little research to see which colors work best together and that way be sure before executing the project. The colorful models look amazing, but this is very personal, so here are some inspirations for you to have fun making your cardigan and choose everything according to your taste and personality, let your creativity act and get to work!
Here are the instructions with a clearer format
Skill Level: Easy.
This project can be done easily by any beginner.
MATERIAL REQUIRED
Yarn: 1413, (2198, 2512, 2826) yards in total. This is the total yardage required for the entire project, and it varies depending on the size you are making.
- 3, (5, 6, 7) skeins of Main Color (shown in Color A)
- 2, (2, 2, 3) skeins of accent color 1 (shown in Color B)
- 1, (2, 2, 3) skeins of accent color 2 (shown in Color C)
- 1, (2, 2, 3) skeins of accent color 3 (shown in Color D)
- 1, (2, 2, 2) skeins of accent color 4 (shown in Color E)
- 1, (1, 2, 2) skeins of accent color 5 (shown in Color F)
Crochet Hook Size US 7 (4.5 mm)
Tapestry Needle: You’ll need this to weave in ends and finish off your project.
Notes:
The cardigan is crafted by making 4″ x 4″ granny squares and then joining them together.
Since you change colors after each round, this project will result in many loose ends. It’s strongly recommended to weave in these ends as you progress. Avoid tying knots as a substitute for weaving in ends.
Some parts of this pattern use crochet shorthand. For instance, if you encounter “3DC,” it means you should work 3 double crochet stitches into the same stitch, while “2DC” means 2 double crochet stitches in the same stitch.
Unless specified otherwise, consider the starting or turning chains in this pattern as the first stitch.
This cardigan requires 5 coordinating accent colors and a main color. There’s no specific order for using the accent colors; create each square randomly, ensuring the color pattern is visually appealing. Be cautious not to place two similar colors next to each other (e.g., Walnut and Mocha) to maintain variety. Also, try to use each color evenly to avoid running out of any particular shade prematurely.
Granny squares are formed by working the granny stitch in rounds, increasing at the corners to form a square. Various techniques can be employed to make granny squares, but in this pattern, we will turn at the end of each row to prevent the squares from twisting.
FINISHED DIMENSIONS
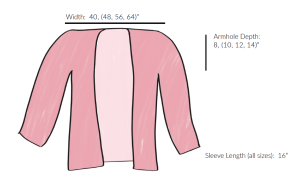

The dimensions provided are in inches and represent the final measurements of the completed sweater.
GAUGE
A gauge of 15 stitches and 10 rows = a 4” using the granny stitch.
It’s important to note that each granny square should have dimensions of 4” x 4”.
If you decide to use a different yarn, make sure to verify the gauge to ensure that your final cardigan fits correctly.
STITCH ABBREVIATIONS (US TERMS)
This pattern uses the US English Terms
Ch – Chain Stitch
DC – Double Crochet
MC – Main Color
MR – Magic Ring
Rd – Round
SC – Single Crochet
SLST – Slipped Stitch
Sp – Space
St – Stitch
Sts – Stitches
PATTERN
Crochet Pattern for a Granny Square Cardigan
To start, crochet your granny squares. You’ll need to make 54, (78, 96, 125) of them.
Remembering that you can do it using other granny square models, but I’ll leave the step-by-step guide on how to do it here to guide you. However, you can check out our granny squares category if you want a different look for your piece.
Granny Square Instructions:
Round 1: Begin with a magic ring (MR), then [chain 2, make 2 double crochets (2DC), chain 1, (3DC, chain 1) three times] into the magic ring. Join with a slip stitch (slst) in the second chain of the starting chain-2, and then turn your work.
Round 2: Slip stitch into the chain-1 gap space directly below, chain 2, make 2DC into the same chain-1 gap space. Next, [(3DC, chain 1, 3DC) into the next gap space] three times, and (3DC, chain 1) once more into the beginning chain-1 gap space. Join with a new yarn color by making a slip stitch in the second chain of the starting chain-2, and then turn your work.
Note: At this point, you should see your granny square taking shape, with each chain-1 space representing a corner where you’ll increase in each round. In every round, you’ll work into the gap space between the clusters of 3DC.
Round 3: Begin by slipping into the chain-1 gap space directly below, chain 2, make 2DC into the same chain-1 gap space. Continue by making 3DC into the next gap space, and [(3DC, chain 1, 3DC) into the corner gap space] three times. Finally, make (3DC, chain 1) once more into the beginning chain-1 gap space. Join with a new yarn color by making a slip stitch in the second chain of the starting chain-2, and then turn your work.
Round 4: Slip stitch into the chain-1 gap space directly below, chain 2, make 2DC into the same chain-1 gap space. Now, make 3DC in each gap space up to the corner, and [(3DC, chain 1, 3DC) in the corner gap space] three times. Finish with (3DC, chain 1) in the beginning chain-1 gap space once more. Join with your main color yarn by making a slip stitch in the second chain of the starting chain-2, and then turn your work.
Note: In the next round, which is the final round of the granny square, replace the chain-1 with a chain-2 at each corner.
Round 5: Start by slipping into the chain-1 gap space directly below, chain 2, make 2DC into the same chain-1 gap space. Continue with 3DC in each gap space up to the corner, and [(3DC, chain 2, 3DC) in the corner gap space] three times. Lastly, make (3DC, chain 2) in the beginning chain-1 gap space once more, and then join with a slip stitch in the second chain of the starting chain-2. Cut the yarn, leaving a tail for weaving in, and secure it. Don’t forget to weave in all ends.
Repeat rounds 1-5 to create as many granny squares as needed until you have completed either 54 (78, 96, 125) squares, depending on your project requirements.
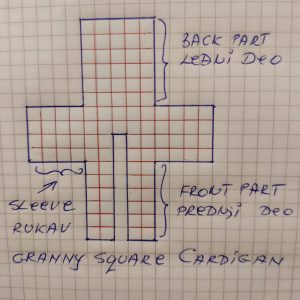
CARDIGAN ASSEMBLY
Granny squares will be joined using a flat slipped stitch join technique. Be sure that you are not working the slipped stitches too tight. If you find that the seams are too tight, you may increase your hook size.
You will begin assembling your cardigan flat by working all vertical seams, and then all horizontal seams. You will also seam together two gussets. Then, you will assemble the body by adding the gusset along the sides.
ASSEMBLY INSTRUCTIONS FOR THE CARDIGAN
To assemble the cardigan, you’ll use a flat slipped stitch join technique for connecting the granny squares. It’s essential to avoid making the slipped stitches too tight. If you encounter tight seams, consider using a larger hook size. If you need assistance with understanding the flat slipped stitch join technique, refer the tutorial.
Start the assembly process for your cardigan by first working on all the vertical seams, followed by the horizontal seams. Additionally, you’ll need to join two gussets together. Finally, connect the gusset pieces along the sides to assemble the body of the cardigan
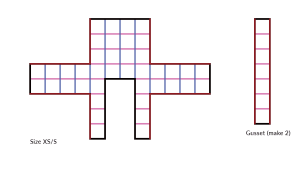
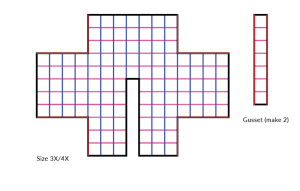
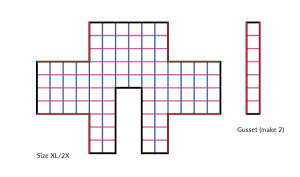
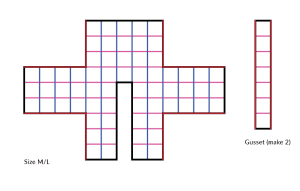
Start assembling squares according to the provided diagram for your chosen size. Use MC (Main Color) to begin seaming your cardigan, focusing on joining all vertical seams (indicated in blue).
Proceed to work on the horizontal seams (highlighted in pink), ensuring that you assemble two gussets as per the diagram.
At this stage, it’s recommended to block your cardigan by laying it flat. You can choose to either steam block or wet block it for the best results.
Fold the cardigan in half and proceed to seam a gusset on each side of the body, as indicated in red on the diagram.
After completing the seaming, weave in all loose ends, and then start working on the border rows to finish your cardigan.
BORDER:
To add a decorative border around the neckline and bottom hem of the cardigan, follow these steps. The border will be worked in rows.
Row 1: Begin with the MC (Main Color) yarn at the bottom corner of the cardigan opening. Make a double crochet (DC) into the corner gap space. Continue by making 3 DC stitches into each gap space, moving along the front and neckline until you’re just before the corner at the back of the neckline. In the corner, make 3 DC stitches into the middle of the 3 gap spaces. Then, continue with 3 DC stitches into each gap space until you reach the opposite corner. Again, make 3 DC stitches into the middle of the 3 gap spaces at the corner. Continue by making 3 DC stitches down the opposite side until you reach the last gap space. Finally, make a DC into the final gap space, chain 2, and turn your work.
Row 2: Make a DC into the first gap space, and then make 3 DC stitches into each gap space as you work your way up around the cardigan opening and down to the opposite edge. Finish this row by making a DC into the final gap space, chain 1, and turn.
Row 3: In the second chain from your hook, make a single crochet (SC). Continue making SC stitches into both loops of each stitch around the cardigan opening. When you reach the final stitch, chain 2, and turn the cardigan to start working across the bottom.
Row 4: Make a DC into the side of the SC stitch you just worked for the border. Next, make 2 DC stitches into both of the DC rows worked along the border. Now, make a DC into both loops of each stitch across the bottom of the cardigan until you reach the opposite border. To finish this row, make 2 DC stitches into both of the DC rows at the border and a DC into the SC stitch at the border. Chain 2, then turn to work back across this row.
Row 5: In the fourth chain from your hook, make a DC. Continue by making DC stitches across, chain 1, and turn.
Row 6: In the third chain from your hook, make a single crochet (SC). Continue to make SC stitches across. After completing the last SC, cut the yarn, leaving a tail to weave in, and pull the yarn through to secure it. Finally, weave in all ends to finish.
SLEEVE CUFFS:
Step 1: Start from the underside of the sleeve. Make three double crochet (3DC) stitches into the first gap space. Continue by making 3DC into each gap space around the sleeve opening. Finish by slip stitching (slst) with the first double crochet to join, then chain one (ch1).
Step 2: In the third chain (3rd ch) from your hook, single crochet (SC). Make one SC in each stitch around the sleeve opening. Finally, slip stitch (slst) to join. Cut the yarn, leaving a tail for weaving, and pull it through all stitches to secure. Weave in any loose ends.
Repeat these steps for the second sleeve.
VIDEO TUTORIAL
Did you like this crochet project? Watch the video on how to make this beautiful poroproject. The video is easy to follow and you will have great success making your beautiful cardigan. The video was created by the Sirin’s Crochet channel. You can find the video tutorial here.
Dear reader friend and crocheter, if you still have questions about how to start your next crochet project and which pattern to follow, I have more options available here for you to get inspired. Check out some more crochet patterns below. We think you might like:
What do you think of this pattern? Amazing isn’t it? How about you share it right now with your five best contacts? I believe you have friends who would love this free pattern and be able to make a beautiful cardigan, you can even try to start a project together and have a chat to exchange experiences, my best friend’s daughter once did a project with me and made me open a snapchat so we could share crochet experiences.
We are so happy to have you here again on our lovely blog and that together we can share amazing crochet projects. I want you to know that there are always amazing different free patterns here for you to follow, so check out the other articles we have available for you here and follow us often, because we have several different projects that we think you will love. If you have any questions or suggestions let us know, we are always ready to answer all your questions and we love to read everything you have to tell us. Now grab your crochet hooks and let’s do one of the things we do best… Crochet! Get to work, my dear friend. Happy crochet! See you soon, kisses and hugs.