Easy Crochet Hair Clips
Hello my friends, who just like me, love crochet! How are you feeling today? I hope you’re doing great. Today we are here to learn a beautiful crochet pattern, it is very useful and beautiful! We are talking about the wonderful Crochet Hair Clips. A brilliant and wonderful idea that can be used in different seasons of the year and made in different models, according to your preference.
Crochet hair clips are decorative hair accessories made using crochet techniques. They are usually small and can be attached to the hair using a clip or bobby pin. Crochet hairpins are popular because they add a touch of charm and uniqueness to hairstyles.
Crochet hair clips can be made at any time of the year, they are very inexpensive and you can make them in less than 10 minutes. That’s great, isn’t it? Especially for those who have little girls at home, as it is a very used item and the more you have, the better, as it is a variety of hairpins that can be used in different combinations.
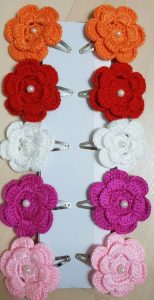
I’ve seen these bobby pins once in crafts and it’s amazing how beautiful they are. I noticed that they had some that were simply combinations of flowers layered with some pearls and also roses in several different colors. But pay attention, if they are hairpins made for children under 3 years old, we strongly recommend that you always do not use these small objects that can be swallowed, such as pearls and small roses.
The use of crochet thread gives them a delicate and elegant look that is ideal for any age! The choice of hair piece is up to you, you can use alligator clips or metal clips, however they also work great on French clips or clips sewn onto nylon headbands!
Here we are teaching the flower pattern, however, you can also crochet small bows and place them on your barrettes. Let your creativity guide you when making this beautiful project, you can vary the colors, leaving the piece very detailed, or doing it in a single color. The important thing is that you like it!
The complete written pattern for this beautiful piece is all available here, it’s a totally useful pattern and perfect for executing a beautiful project.
Here are the instructions with a clearer format
MATERIAL REQUIRED
Supplies for a Rose Hair Clip
Crochet hook with a 2.75mm size.
Yarn in size 10, with your choice of color(s). Size 5 or 3 can also be used.
A pair of scissors.
A sewing needle.
Alligator hair clips measuring 35mm (These can be sourced from various craft stores; I found mine at Hobby Lobby).
A hot glue gun for assembly.
Supplies for Layered Flower Hair Clip
A crochet hook with a size of 2.75mm
Yarn size 10 (You can also use sizes 5 or 3)
A pair of scissors
A sewing needle
Pearl beads (Please exercise caution when using these if making items for children under 3)
Metal hair clips measuring 50mm (You can buy these online or find them at your nearby craft store)
A hot glue gun
STITCH ABBREVIATIONS (US TERMS)
Ch – Chain
SC – Single crochet
Sl st – Slip stitch
DC – Double crochet
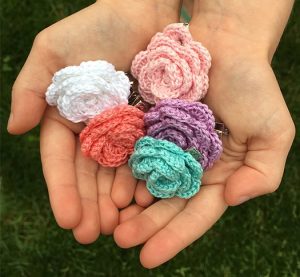
ROSE PATTERN
Crochet Rose
The crochet rose utilizes the V-Stitch. To create this, simply execute a double crochet (DC), chain 1, DC all into the same stitch or chain.
Chain 34.
Row 1: Begin by double crocheting (DC) in the second chain from the hook, followed by a chain 1, and another DC in the same chain. Then, chain 1 again and skip the next chain. Continue this pattern: Create a V-stitch in the next chain, chain 1, and skip the next chain. Repeat this sequence until you reach the end of the chain, concluding with a V-stitch.
You will have 17 V-stitches and 16 chain 1 spaces in between. (Your work may curl, which is normal.)
Row 2: Chain 1 and turn. Begin by making 6 DCs in the first V-stitch (this forms your first petal), and then slip stitch into the chain 1 space. Repeat this process across the row. You will finish with 17 petals.
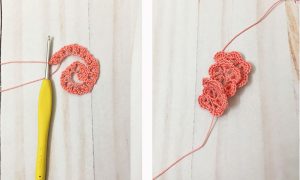
Fasten off, leaving a long tail for sewing it together.
Starting from the side with the long tail, gently roll your petals together into a circle as shown below.
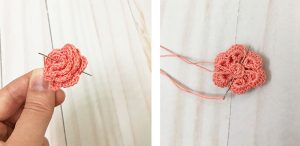
Take your needle and thread it through the first petal and out through the bottom of the flower; this will help secure the inner part of the flower in place.
Sew through each layer back and forth to firmly attach each of the petals in place. Then, fasten off.
Finally, use your hot glue gun to attach the rose to a hair clip.
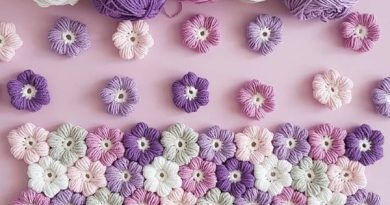
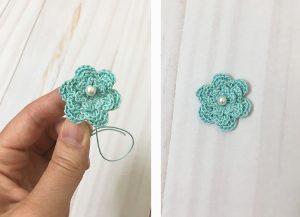
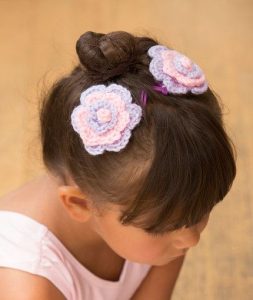
LAYERED FLOWER PATTERN
Layered Flower
Ensure you leave an elongated tail when crafting your magic circle for later attachment of the pearl bead.
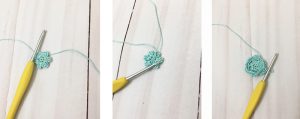
Round 1: Begin by forming a magic circle with 6 single crochets (SC), then connect it to the initial SC with a slip stitch.
Round 2: Chain 1 and work the following sequence in the next stitch: 3 double crochets (DC), chain 1, and a slip stitch into the same stitch. In the subsequent stitch, execute a slip stitch, chain 1, 3 DC, chain 1, slip stitch, and repeat this pattern throughout the round. You’ll conclude with 6 petals.
Round 3: Chain 3 and slip stitch into the back post of the 3rd DC on your first petal. Repeat this action for each petal, and when you reach the 6th petal, slip stitch into the first ch 3.
Round 4: Chain 1 and work the following sequence in the next chain: 4 DC, chain 1, and a slip stitch into the chain. In the following chain, execute a slip stitch, chain 1, 3 DC, chain 1, slip stitch, and repeat this pattern around. You’ll end up with 6 petals.
Round 5: Chain 4 and slip stitch into the back post of the 4th DC on your first petal. Repeat this step for each petal, and when you reach the 6th petal, slip stitch into the first chain 4.
Round 6: Chain 1 and work the following sequence in the same chain: 5 DC, chain 1, and a slip stitch into the same chain. In the following chain, execute a slip stitch, chain 1, 3 DC, chain 1, slip stitch, and repeat this pattern around. You’ll complete the round with 6 petals.
Fasten off and securely weave in any loose ends.
Using the long tail you left, sew the pearl bead to the center of your crochet piece.
Finally, use a hot glue gun to attach the crochet piece to a hair clip.
There you have it—two charming and straightforward crochet hair clips!
To access the PDF of this adorable pattern just click on the link that we leave available below. It’s very simple and easy to follow, you won’t have any major problems with this pattern and you’ll have a lot of fun and enjoy it. Remember, this is just a basic guide, and you can get creative with different stitch patterns, embellishments, and designs to make unique crochet hair clips. Have fun experimenting and customizing your creations!
Access the PDF/Hair Clips
This item is undoubtedly excellent for all ages, as most women like to have good accessories, especially if they are useful. So don’t waste your time, I guarantee that by the end of this day you’ll have a box full of new styled and personalized hair clips.
My dear reader, our lovely blog Handmade Learning Here is here with several beautiful patterns, our team loves to always offer the best patterns for you, because of that we leave available below some other options very fun and beautiful patterns that can serve as inspiration for you. Access through the links that we leave available here, we think you might like:
What do you think of this amazing idea? Send it right now to 5 people you think should see this beautiful pattern. We appreciate your presence on our lovely blog, we are very happy to share beautiful ideas with you. Come back often to check out what’s new, every week we’re always bringing you news and the trends of the moment. Hope you have a great day and see you later!